> ## Documentation Index
> Fetch the complete documentation index at: https://help.aasaan.app/llms.txt
> Use this file to discover all available pages before exploring further.
# Store Setup
> Manage settings for your store
Your store settings are where you customize the workings of your store. You get to customize your tax rates, payment methods, checkout login methods, minimum order value, delivery rates, and much more. You can also configure finer details such as the standard units for your product dimensions.
## General Settings
In this section, you will learn how to manage notifications, tax fields, API authentication, Webhooks, KYC and staff settings.
### Notifications
**STEP 1:**
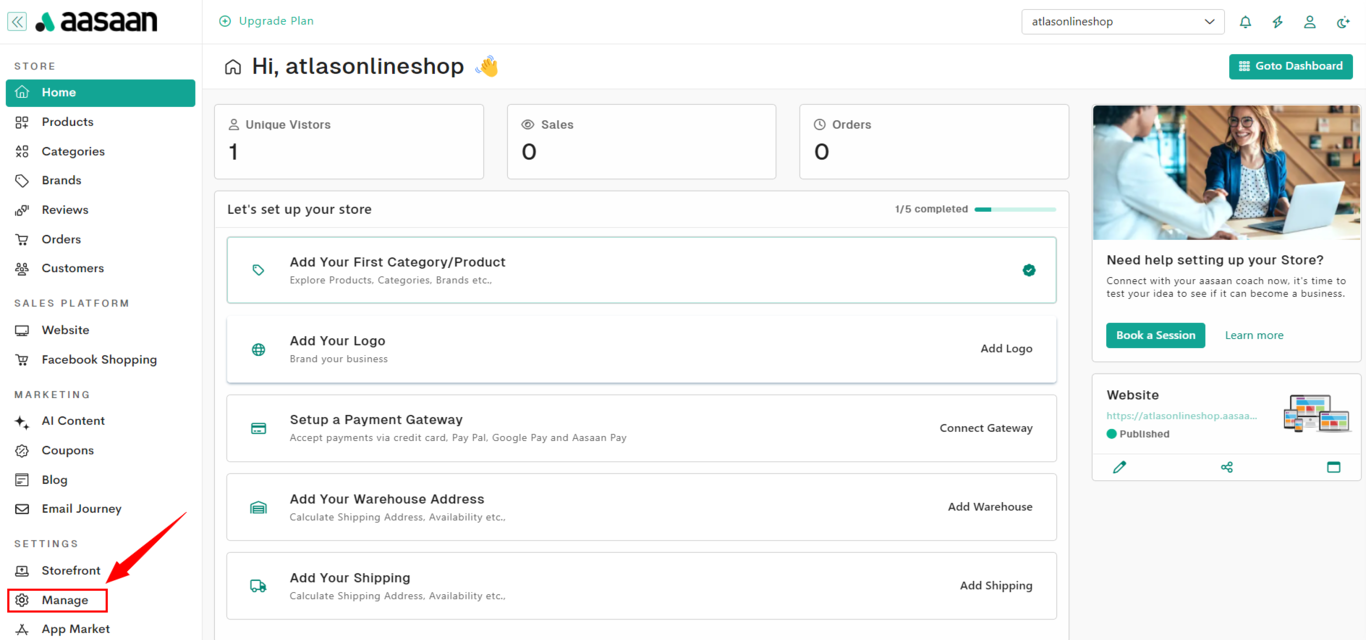
Login to your aasaan admin panel and click on Manage.
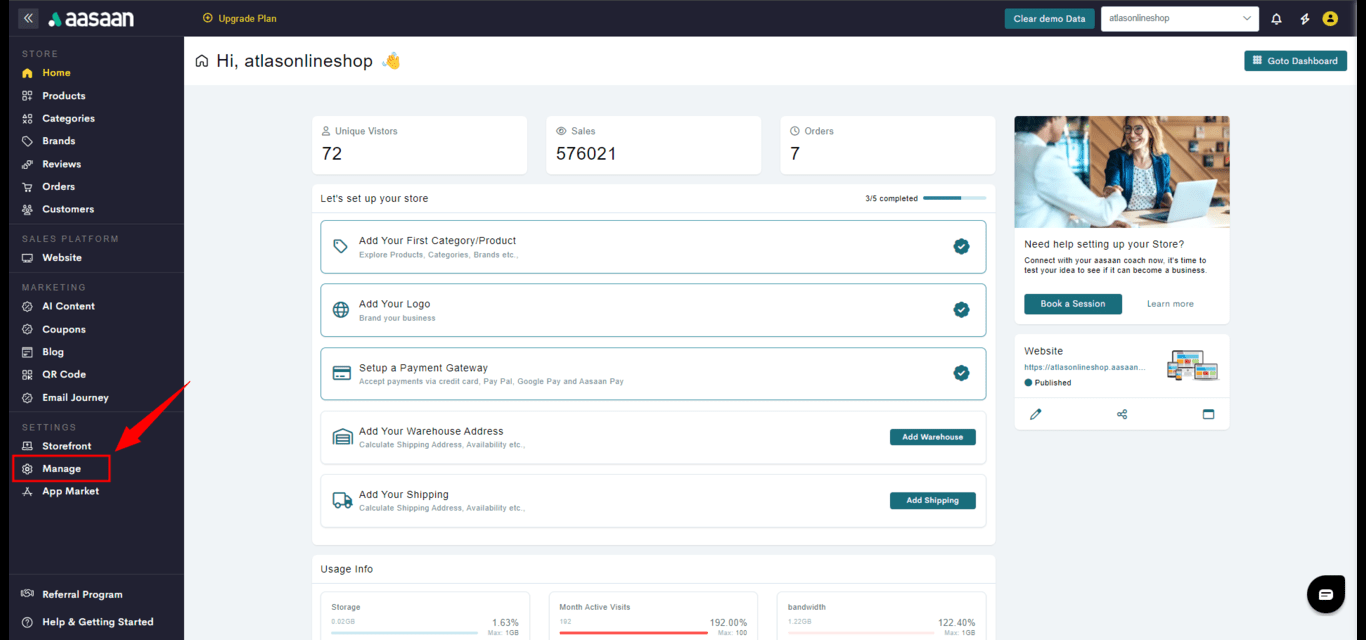 **STEP 2:**
Click on Notification Settings.
**STEP 2:**
Click on Notification Settings.
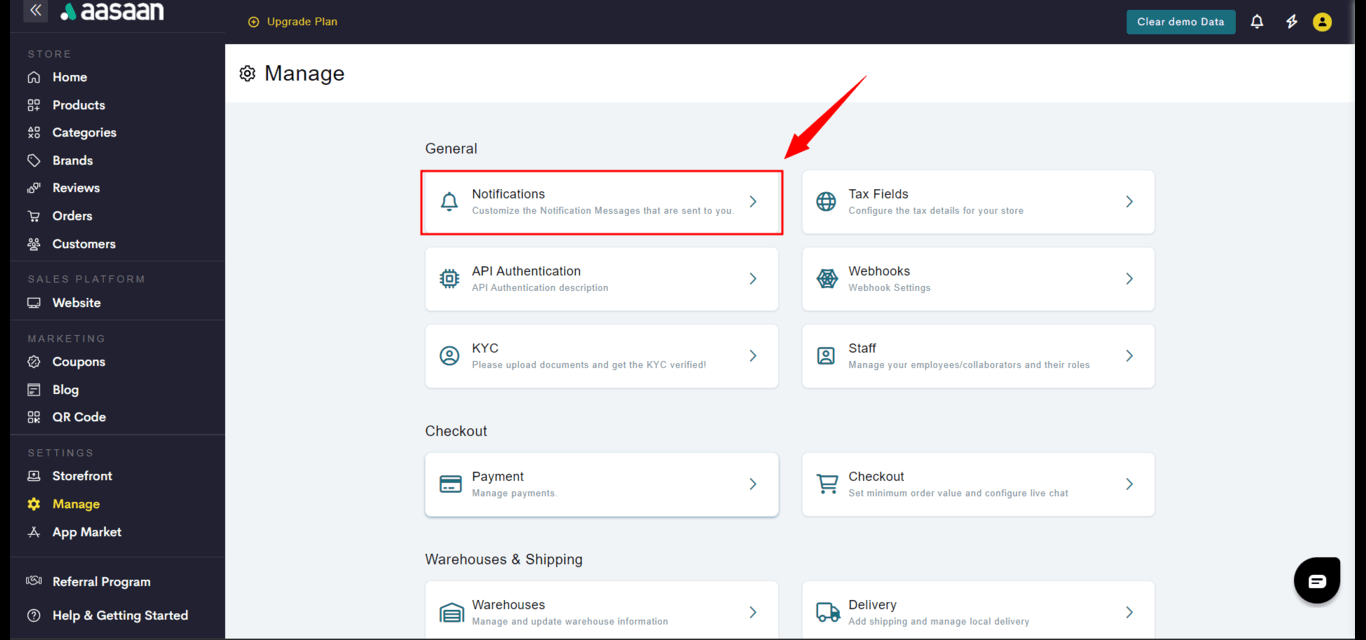 **STEP 3:**
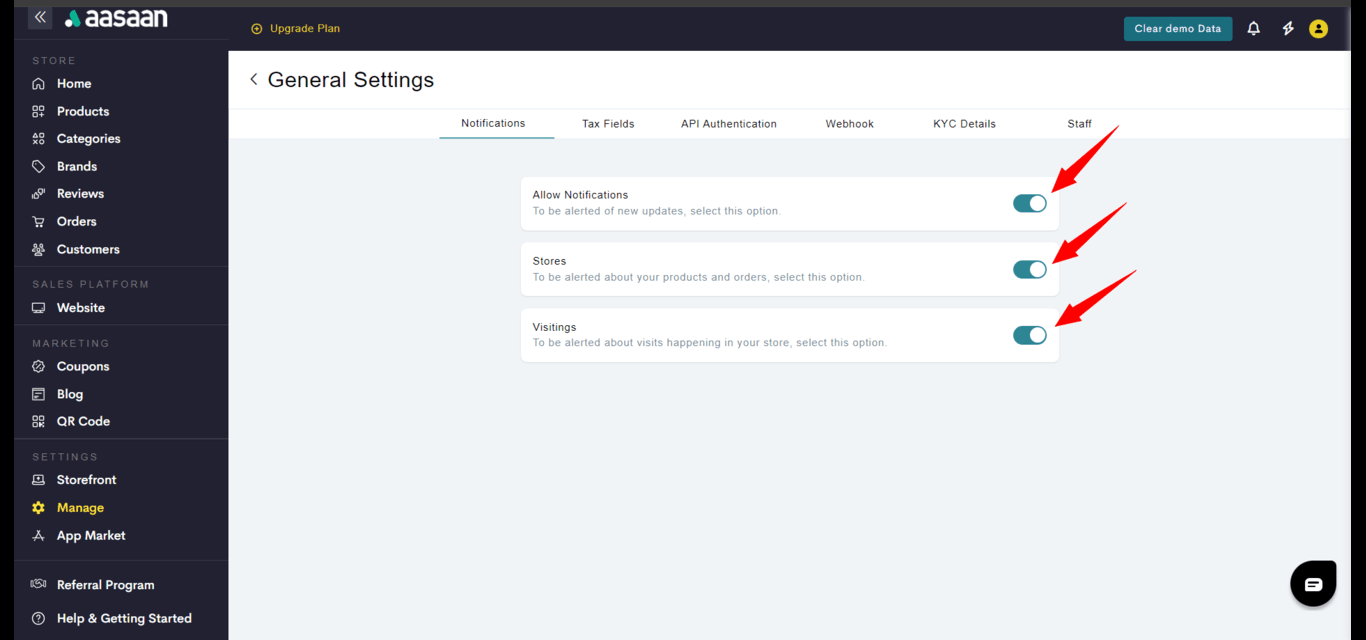
* Enable the toggle for **Allow Notifications**, to initiate all push notifications for your store.
* Enable the toggle for **Stores**, to enable notifications for your orders.
* Enable the toggle for **Visits**, if you wish to be notified about store visits.
**STEP 3:**
* Enable the toggle for **Allow Notifications**, to initiate all push notifications for your store.
* Enable the toggle for **Stores**, to enable notifications for your orders.
* Enable the toggle for **Visits**, if you wish to be notified about store visits.
 ### Tax Rules
This guide is for merchants who use Tax calculations to sell in their online store.
You need to determine whether you should charge tax before you start selling. You might need to register with tax agencies. After that, you can set up your taxes in aasaan to help ensure that you charge the correct rates wherever you sell.
It's your responsibility to consult with local tax authorities or a tax professional to verify that you charge your customers the correct tax rates, and to ensure that you file and remit your taxes correctly.
To make sure that you're charging the correct amount of tax, configure your tax settings on the Taxes Rules page in your aasaan admin.
**STEP 1:**
Login to your aasaan admin panel and click on Manage.
### Tax Rules
This guide is for merchants who use Tax calculations to sell in their online store.
You need to determine whether you should charge tax before you start selling. You might need to register with tax agencies. After that, you can set up your taxes in aasaan to help ensure that you charge the correct rates wherever you sell.
It's your responsibility to consult with local tax authorities or a tax professional to verify that you charge your customers the correct tax rates, and to ensure that you file and remit your taxes correctly.
To make sure that you're charging the correct amount of tax, configure your tax settings on the Taxes Rules page in your aasaan admin.
**STEP 1:**
Login to your aasaan admin panel and click on Manage.
 **STEP 2:**
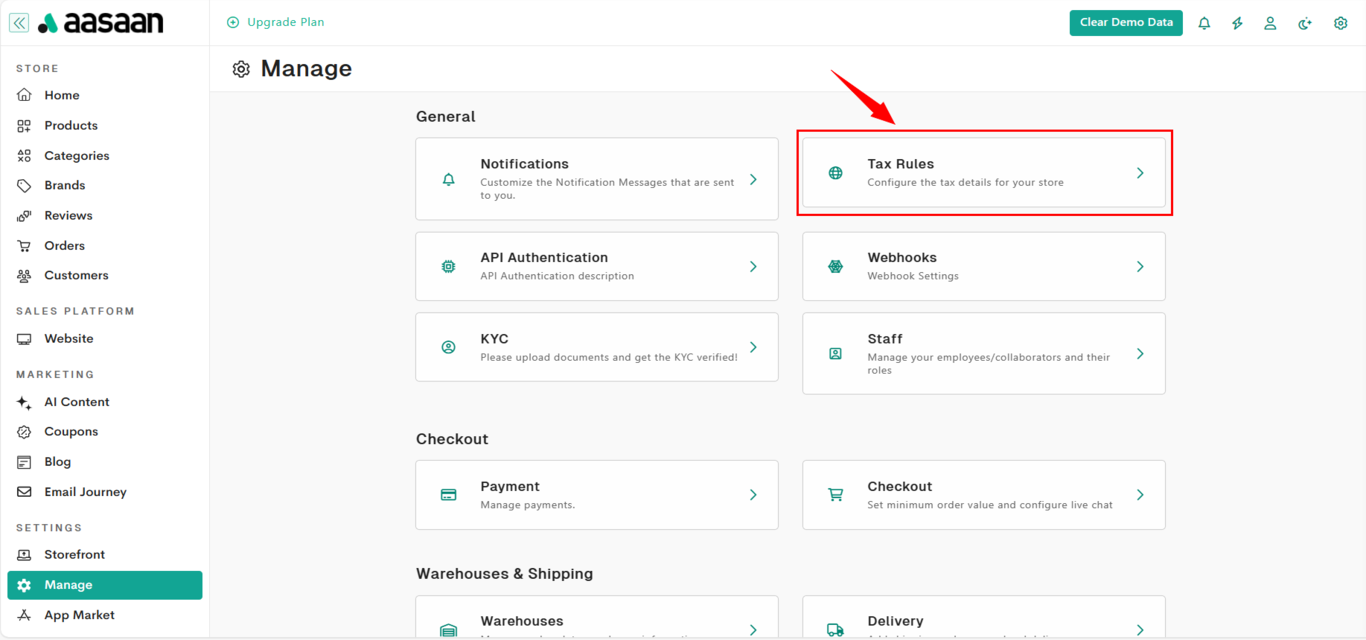
Click on Tax Rules.
**STEP 2:**
Click on Tax Rules.
 You would observe a sample tax rule already available that you can modify as per your business requirements.
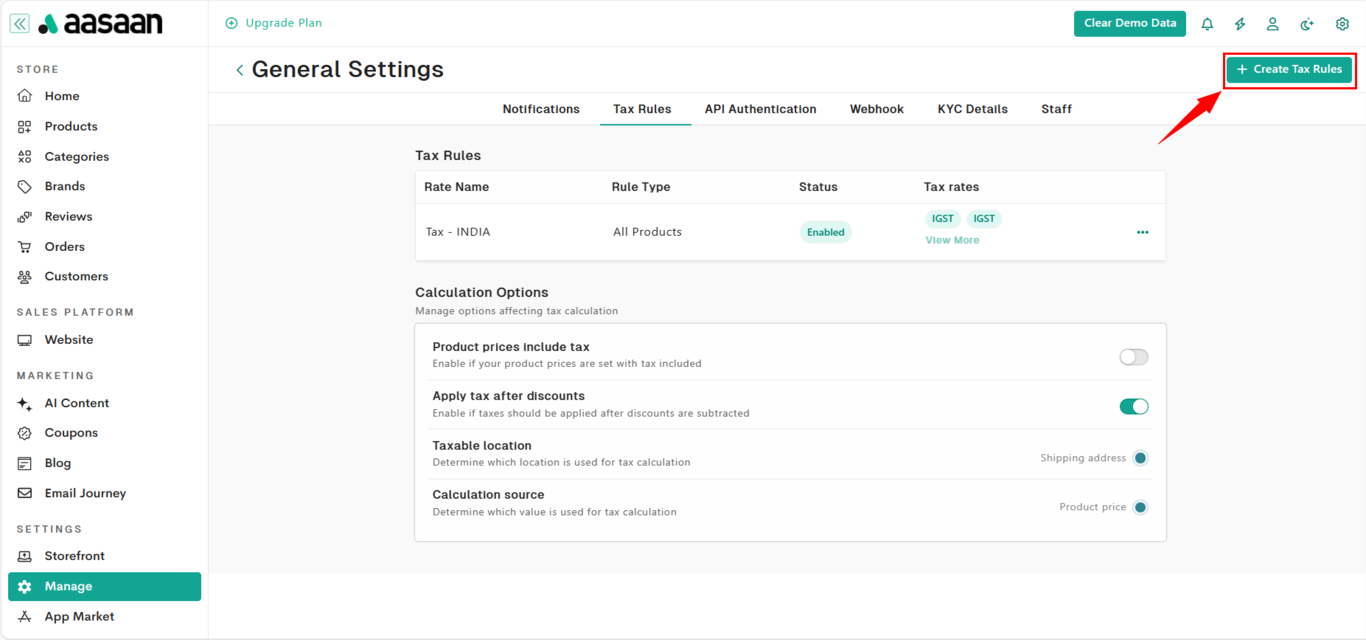
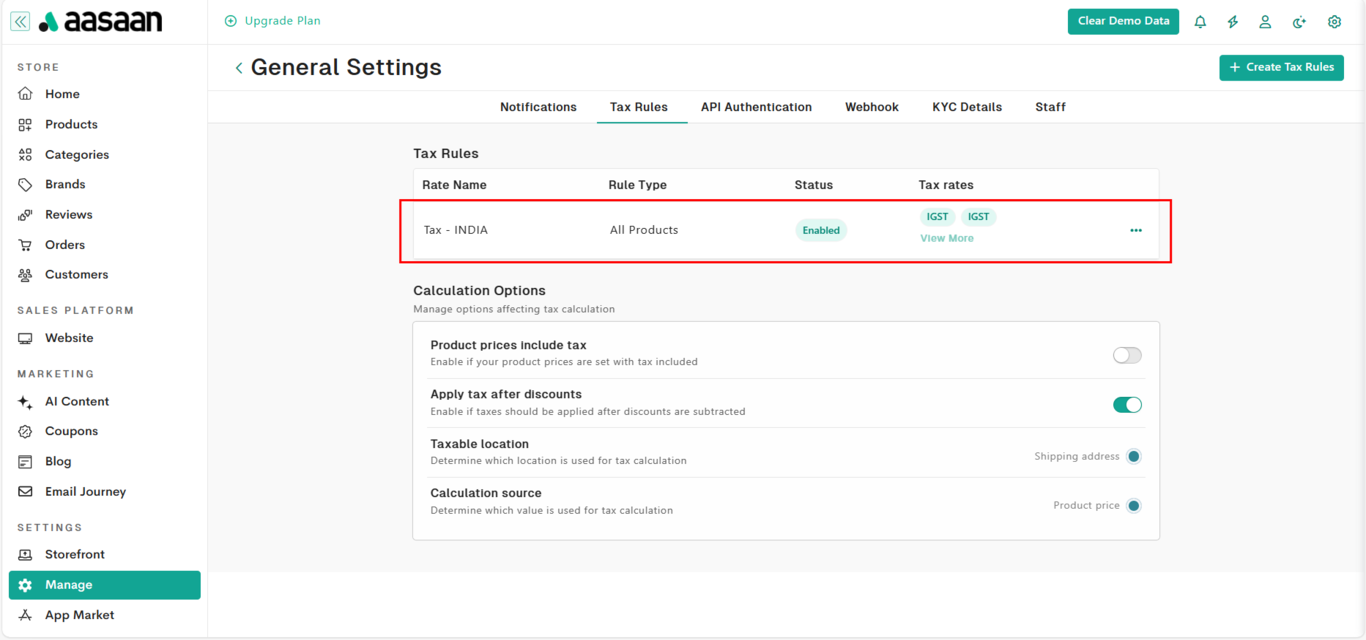 In the event there are no pre-defined tax rule available, create a new tax rule by clicking the button "**+ Create Tax Rules**"
There are additional settings you need to adjust as per your business requirements.
In the event there are no pre-defined tax rule available, create a new tax rule by clicking the button "**+ Create Tax Rules**"
There are additional settings you need to adjust as per your business requirements.
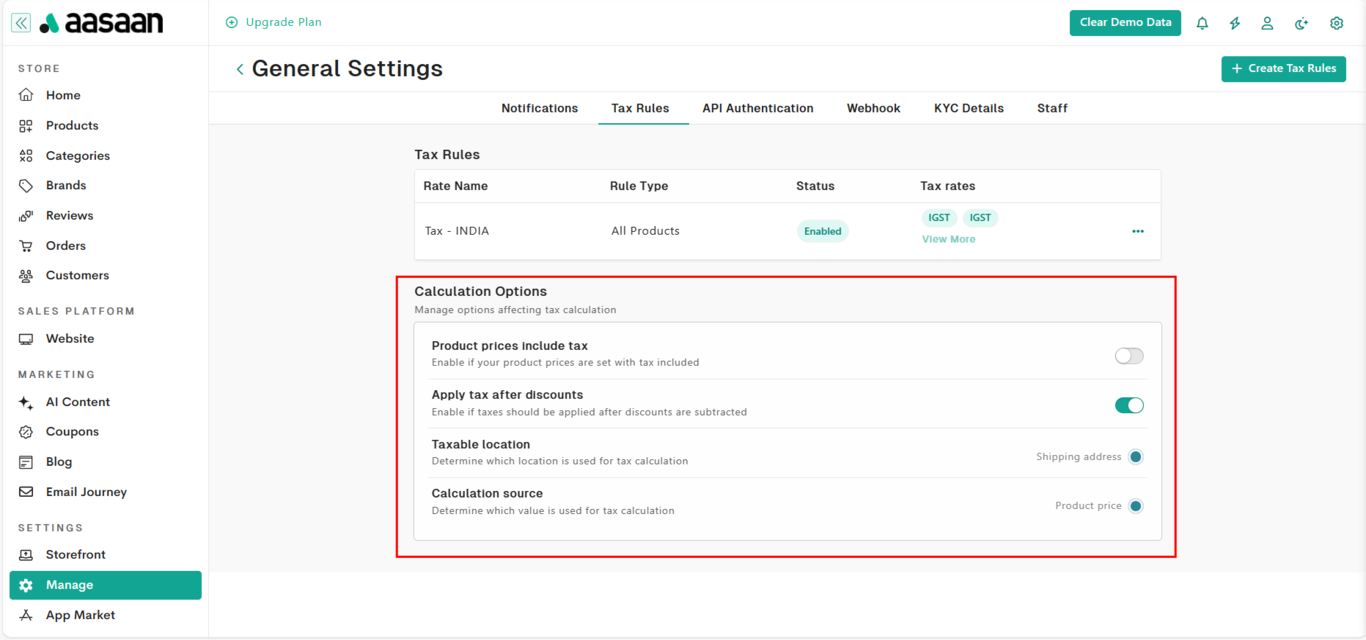 1. **Product prices include tax** : Enable this option if all your products price is inclusive of taxes.
2. **Apply tax after discounts** : Enable this option to apply taxes after the discount amount is deducted.
3. **Taxable location** : Determining which location is used for tax calculations. As of now "Shipping Address" is the only option available.
4. **Calculation source** : Determining which value is used for tax calculations. As of now "Product Price" is the only option available.
**STEP 3:**
Creating Tax Rules.
1. **Product prices include tax** : Enable this option if all your products price is inclusive of taxes.
2. **Apply tax after discounts** : Enable this option to apply taxes after the discount amount is deducted.
3. **Taxable location** : Determining which location is used for tax calculations. As of now "Shipping Address" is the only option available.
4. **Calculation source** : Determining which value is used for tax calculations. As of now "Product Price" is the only option available.
**STEP 3:**
Creating Tax Rules.
 **STEP 4:**
Enter the rule name and choose if the rule applies to all products or individual products.
**STEP 4:**
Enter the rule name and choose if the rule applies to all products or individual products.
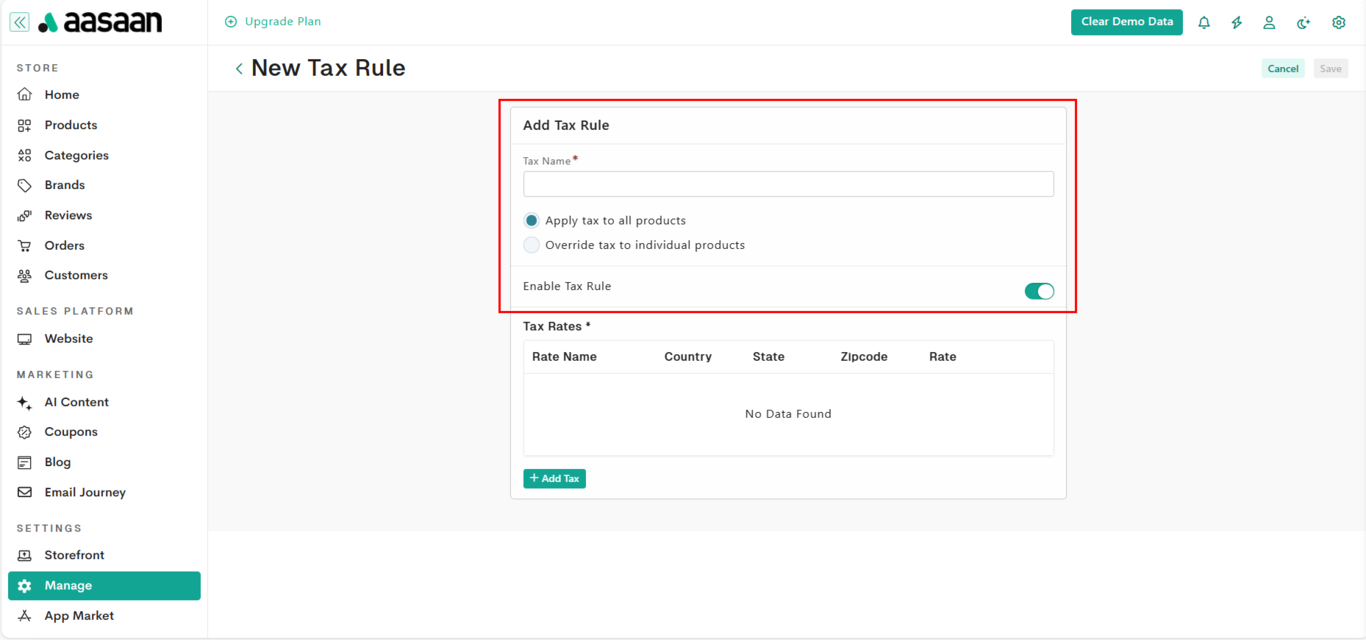 If you choose that the rule is applicable for individual products, you need to include the rule at the product's tax override section. Otherwise those rules will not be considered during tax calculations.
**STEP 5:**
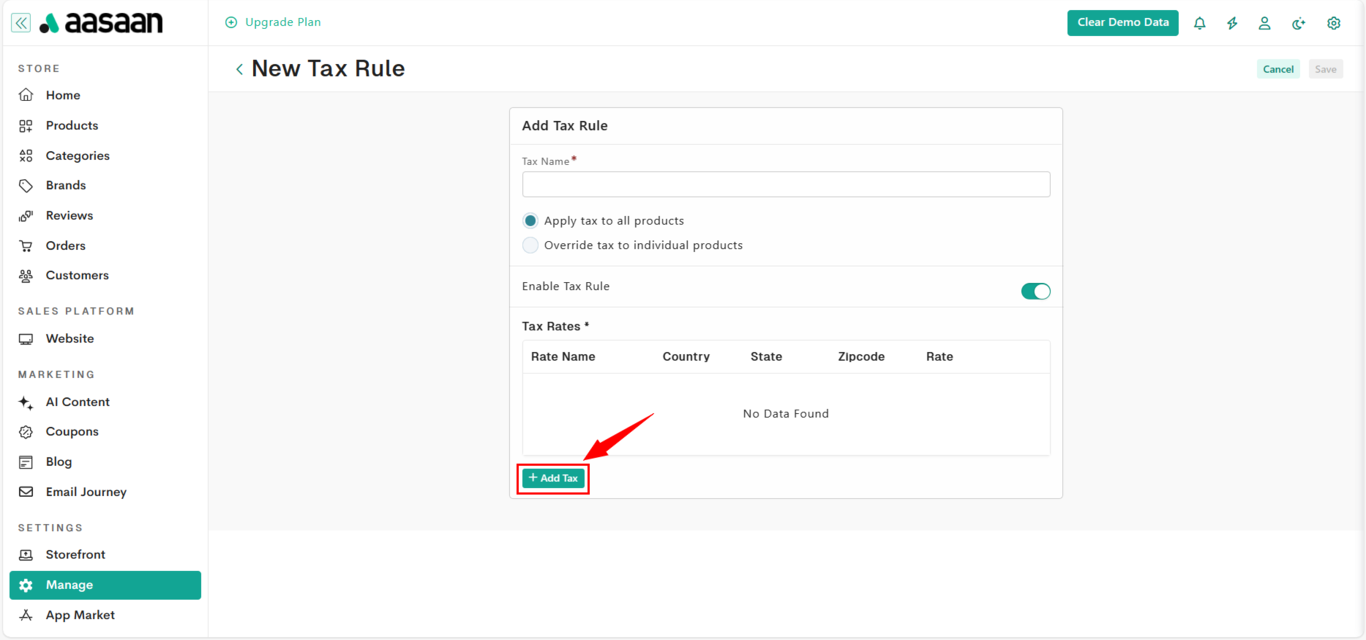
Creating Tax Rates.
If you choose that the rule is applicable for individual products, you need to include the rule at the product's tax override section. Otherwise those rules will not be considered during tax calculations.
**STEP 5:**
Creating Tax Rates.
 **STEP 6:**
Enter the rate name, choose country & state and the applicable tax rate %. Press the **Save** button. To provide multiple tax rates repeat steps 5 & 6.
**STEP 6:**
Enter the rate name, choose country & state and the applicable tax rate %. Press the **Save** button. To provide multiple tax rates repeat steps 5 & 6.
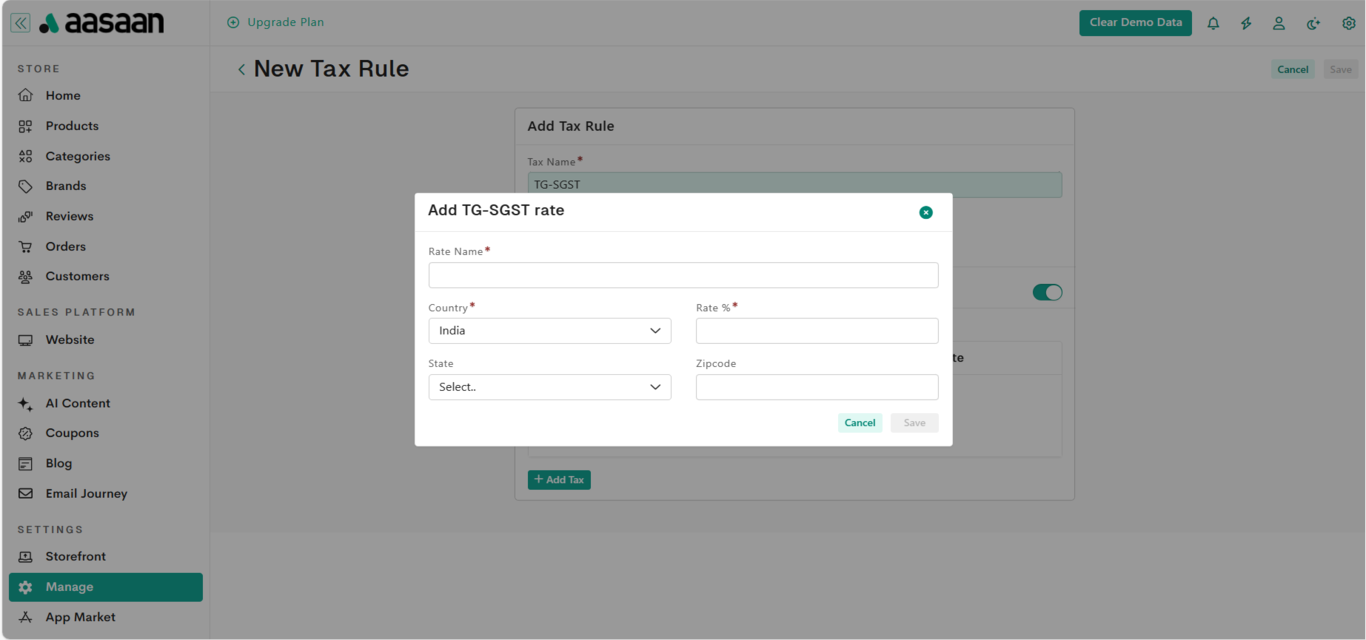 If you choose to apply tax at a zipcode/pincode level, provide the appropriate zipcode while creating the tax rate.
**Example:**
Let's take a simple scenario -
Business operating from - Telangana\
Shipping to - Maharashtra/Andhra Pradesh etc - **IGST** needs to be applied\
Shipping to - Telangana - **CGST**, **SGST** needs to be applied\
GST applicable is - 18%
Three tax rules need to be created -
1. **Tax - IGST**\
Rate Name - **IGST**\
Country - India\
State/Province - Andhra Pradesh/Maharastra/Tamilnadu/Kerala etc. (Except Telangana all other states should be included)\
Zipcode/Pincode - optional\
Rate - 18%
2. **Tax - CGST**\
Rate Name - **CGST**\
Country - India\
State/Province - Telangana\
Zipcode/Pincode - optional\
Rate - 9%
3. **Tax - SGST**\
Rate Name - **SGST**\
Country - India\
State/Province - Telangana\
Zipcode/Pincode - optional\
Rate - 9%
### API Authentication
* API Authentication content
### Webhooks
* Webhooks Content
### KYC
KYC verification is a mandatory step for Indian merchants using aasaan. Merchants need to verify their Aadhaar, PAN, and GST details.
In this section, you will learn the guidelines for proper document submission and how to verify your details.
Here are the guidelines for submitting your KYC documents.
**Aadhaar Card**
1. The accepted formats for Aadhaar card submission are jpg and png.
2. This is how the image should look. The image should be of reasonable quality, and the Aadhaar number should be legible.
If you choose to apply tax at a zipcode/pincode level, provide the appropriate zipcode while creating the tax rate.
**Example:**
Let's take a simple scenario -
Business operating from - Telangana\
Shipping to - Maharashtra/Andhra Pradesh etc - **IGST** needs to be applied\
Shipping to - Telangana - **CGST**, **SGST** needs to be applied\
GST applicable is - 18%
Three tax rules need to be created -
1. **Tax - IGST**\
Rate Name - **IGST**\
Country - India\
State/Province - Andhra Pradesh/Maharastra/Tamilnadu/Kerala etc. (Except Telangana all other states should be included)\
Zipcode/Pincode - optional\
Rate - 18%
2. **Tax - CGST**\
Rate Name - **CGST**\
Country - India\
State/Province - Telangana\
Zipcode/Pincode - optional\
Rate - 9%
3. **Tax - SGST**\
Rate Name - **SGST**\
Country - India\
State/Province - Telangana\
Zipcode/Pincode - optional\
Rate - 9%
### API Authentication
* API Authentication content
### Webhooks
* Webhooks Content
### KYC
KYC verification is a mandatory step for Indian merchants using aasaan. Merchants need to verify their Aadhaar, PAN, and GST details.
In this section, you will learn the guidelines for proper document submission and how to verify your details.
Here are the guidelines for submitting your KYC documents.
**Aadhaar Card**
1. The accepted formats for Aadhaar card submission are jpg and png.
2. This is how the image should look. The image should be of reasonable quality, and the Aadhaar number should be legible.
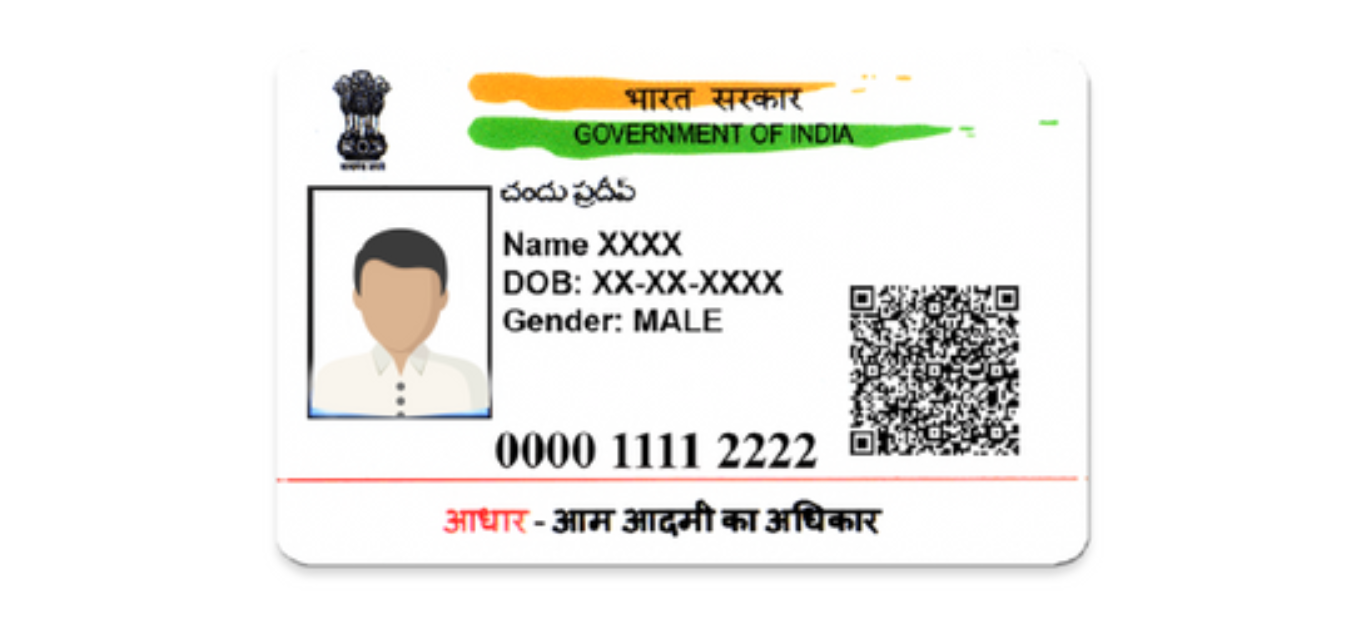 *Unacceptable Aadhaar Card Submissions*
* Aadhaar card submissions in the long format will NOT be accepted.
* Aadhaar cards oriented vertically will NOT be accepted.
**PAN Card**
1. The accepted formats for PAN card submission are jpg and png.
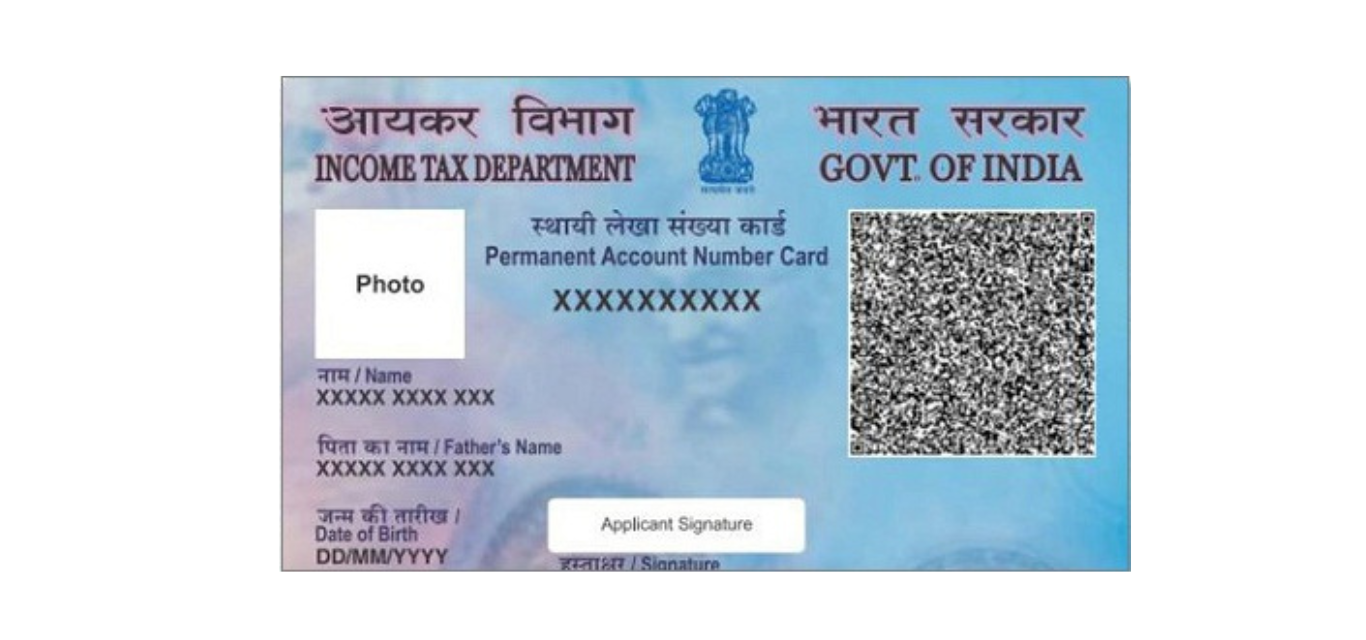
2. This is how the image should look. The image should be of reasonable quality, and the PAN number should be legible.
*Unacceptable Aadhaar Card Submissions*
* Aadhaar card submissions in the long format will NOT be accepted.
* Aadhaar cards oriented vertically will NOT be accepted.
**PAN Card**
1. The accepted formats for PAN card submission are jpg and png.
2. This is how the image should look. The image should be of reasonable quality, and the PAN number should be legible.
 **GST Certificate**
1. The accepted GST certificate is the Form GST REG-06.
2. The accepted format for the GST certificate is pdf.
Submitting documents for KYC verification is mandatory for aasaan sellers. In aasaan, you can submit your Aadhaar card, PAN card, and GST certificate. Aadhaar and PAN verification are mandatory.
Here's how you do it:
**STEP 1:**
Login to your aasaan app and click on Manage.
**GST Certificate**
1. The accepted GST certificate is the Form GST REG-06.
2. The accepted format for the GST certificate is pdf.
Submitting documents for KYC verification is mandatory for aasaan sellers. In aasaan, you can submit your Aadhaar card, PAN card, and GST certificate. Aadhaar and PAN verification are mandatory.
Here's how you do it:
**STEP 1:**
Login to your aasaan app and click on Manage.
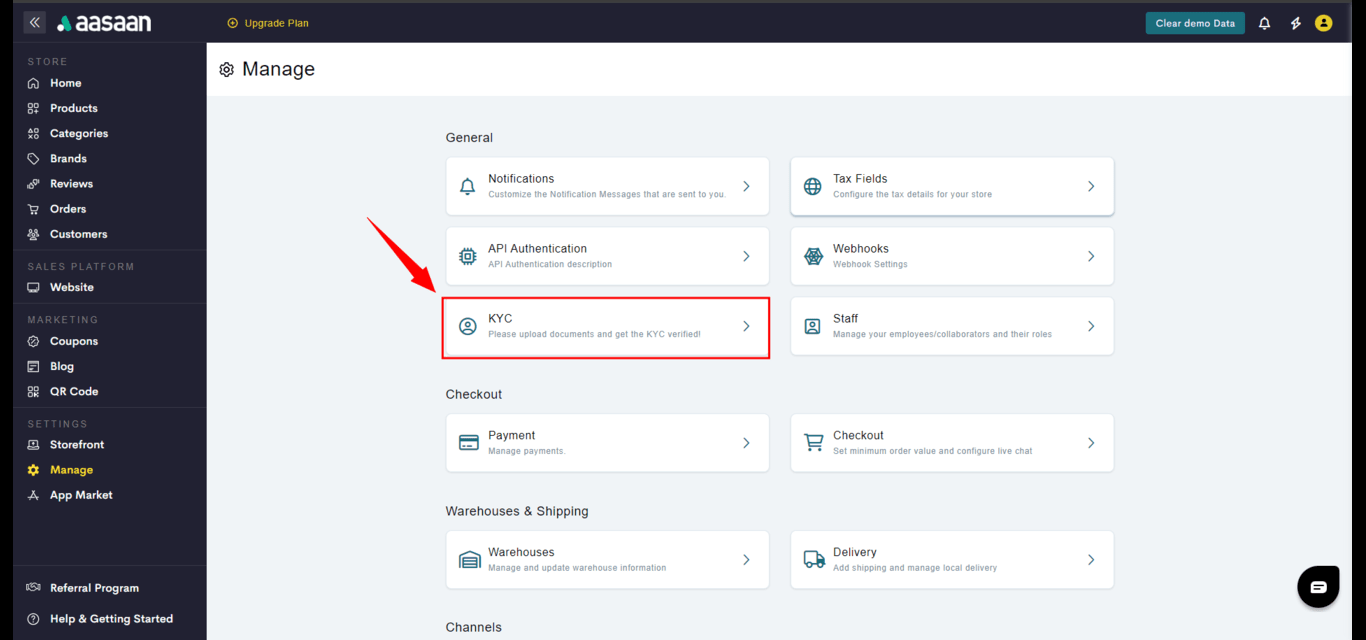
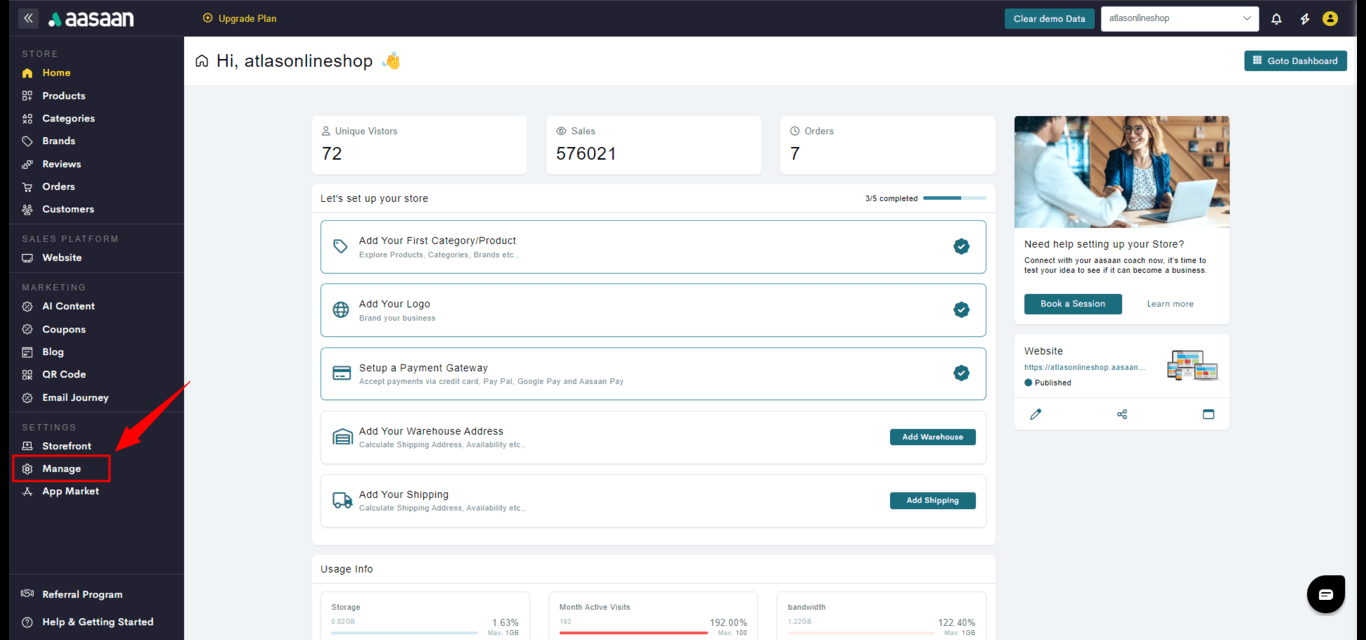 **STEP 2:**
Click on KYC Details.
**STEP 2:**
Click on KYC Details.
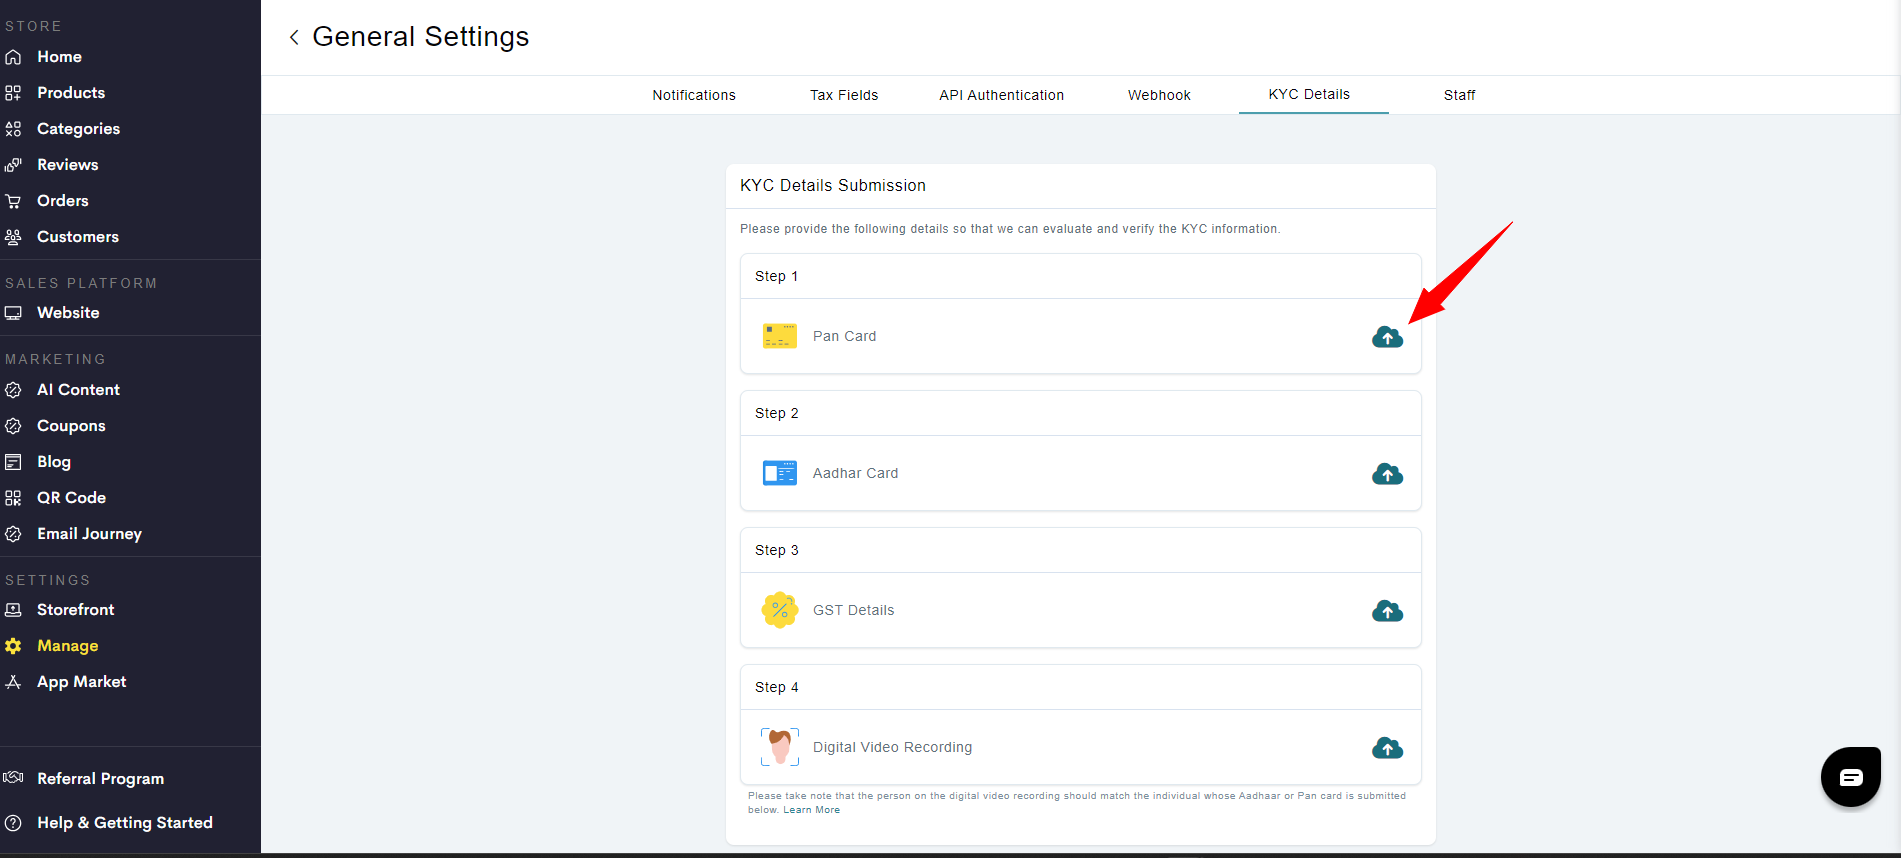
 **STEP 3:**
First verify your PAN card details. Click on Pan Card Verification.
**STEP 3:**
First verify your PAN card details. Click on Pan Card Verification.
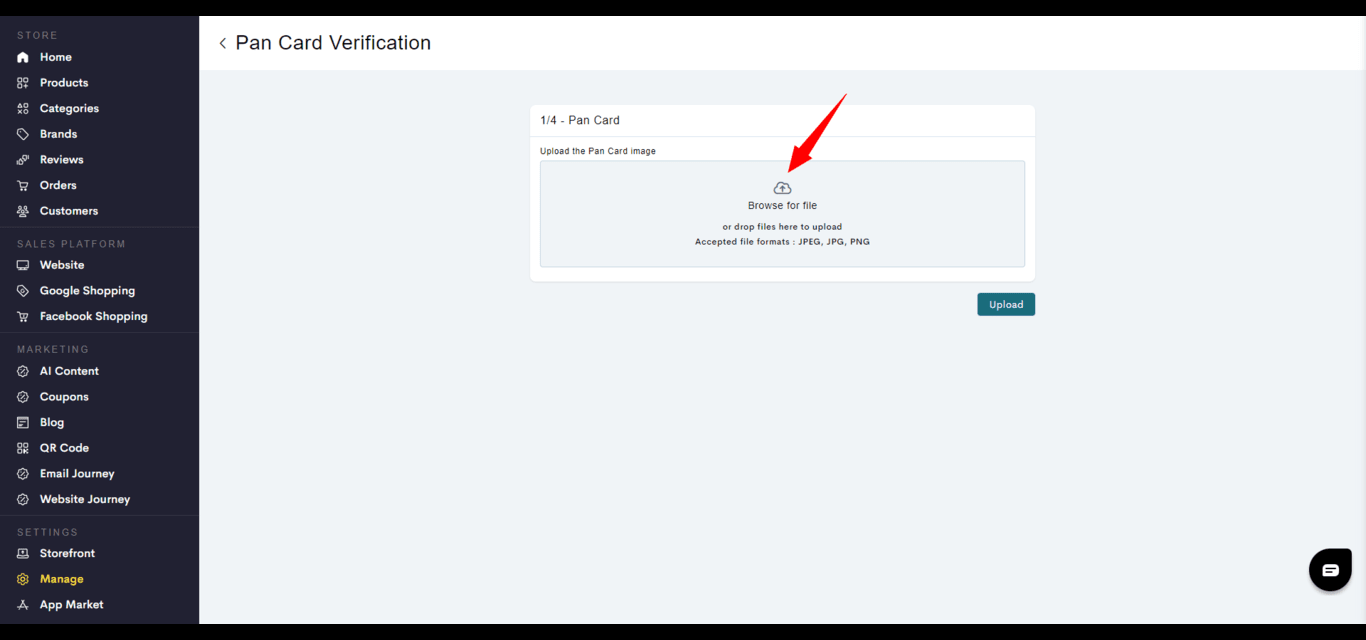
 **STEP 4:**
Upload an image of your PAN card.
**STEP 4:**
Upload an image of your PAN card.
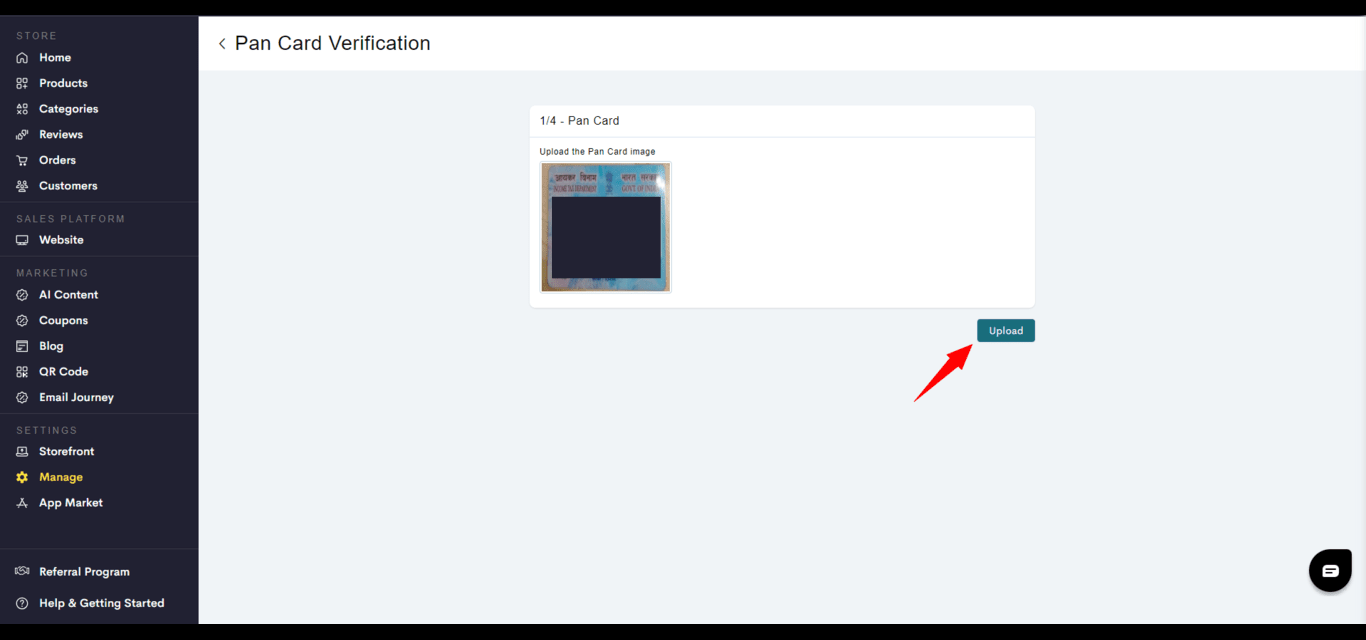
 Click on Upload.
 Confirm your PAN number on your card by clicking on Verify.
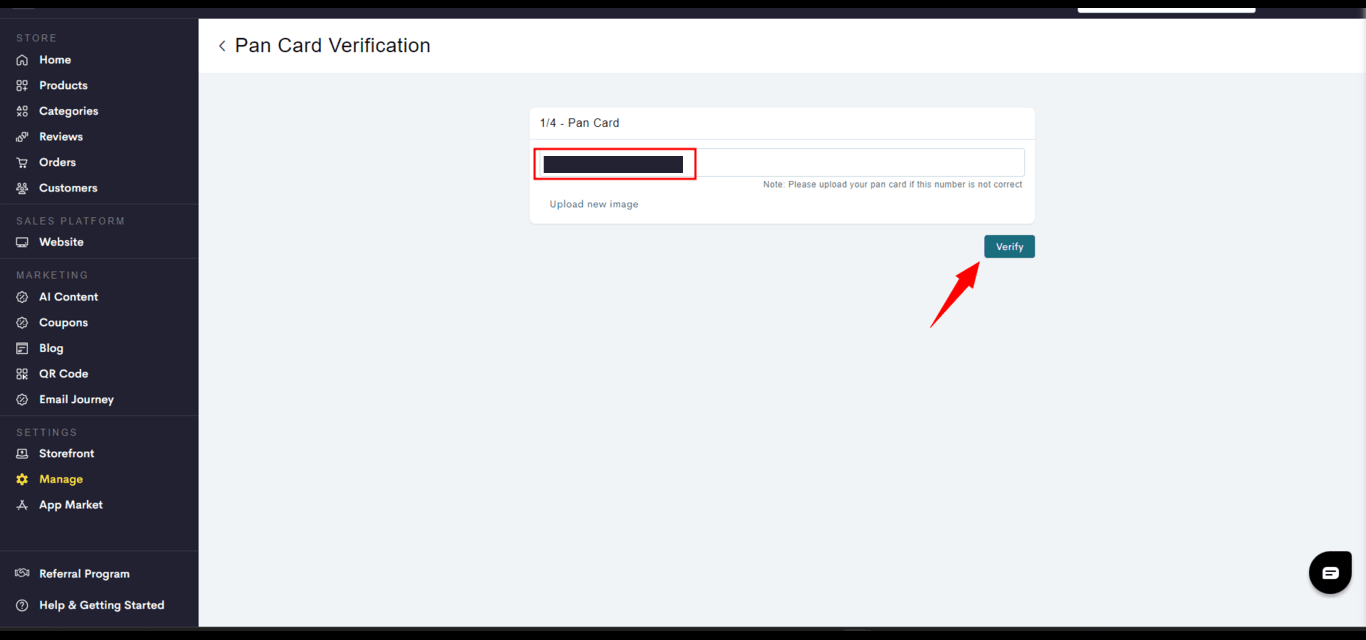 It should be successfully verified.
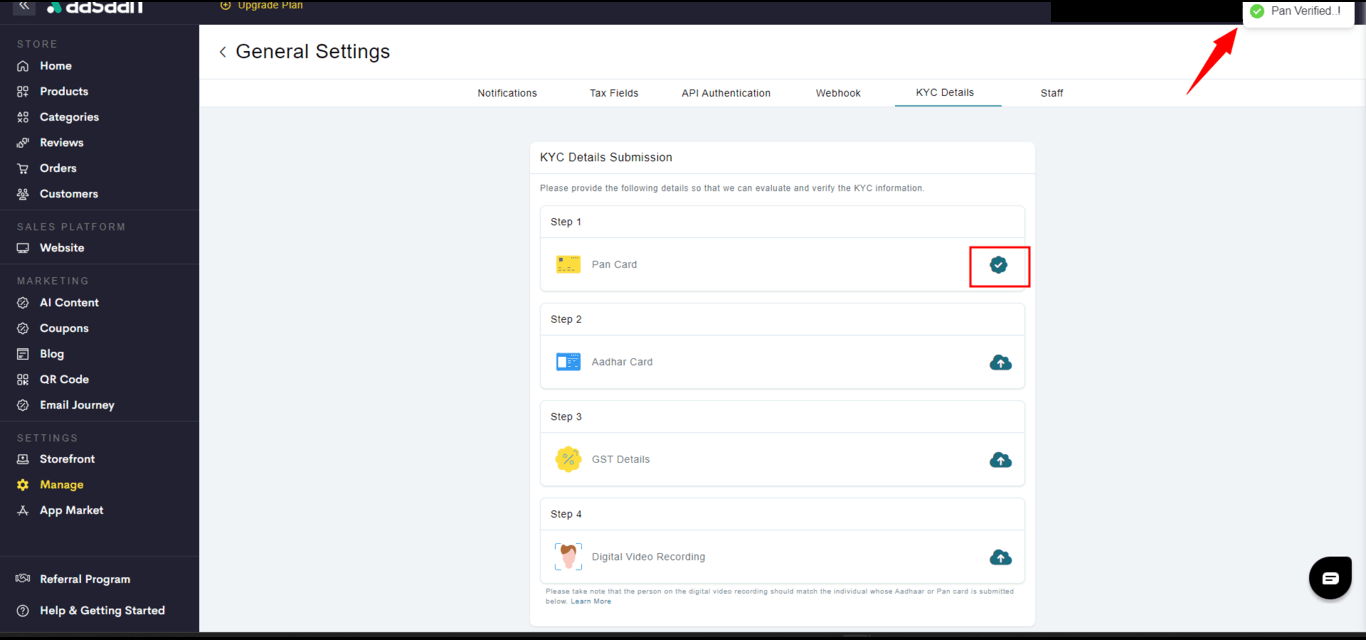 **STEP 5:**
You will be taken to the main KYC page. Next, click on Aadhar Card.
**STEP 5:**
You will be taken to the main KYC page. Next, click on Aadhar Card.
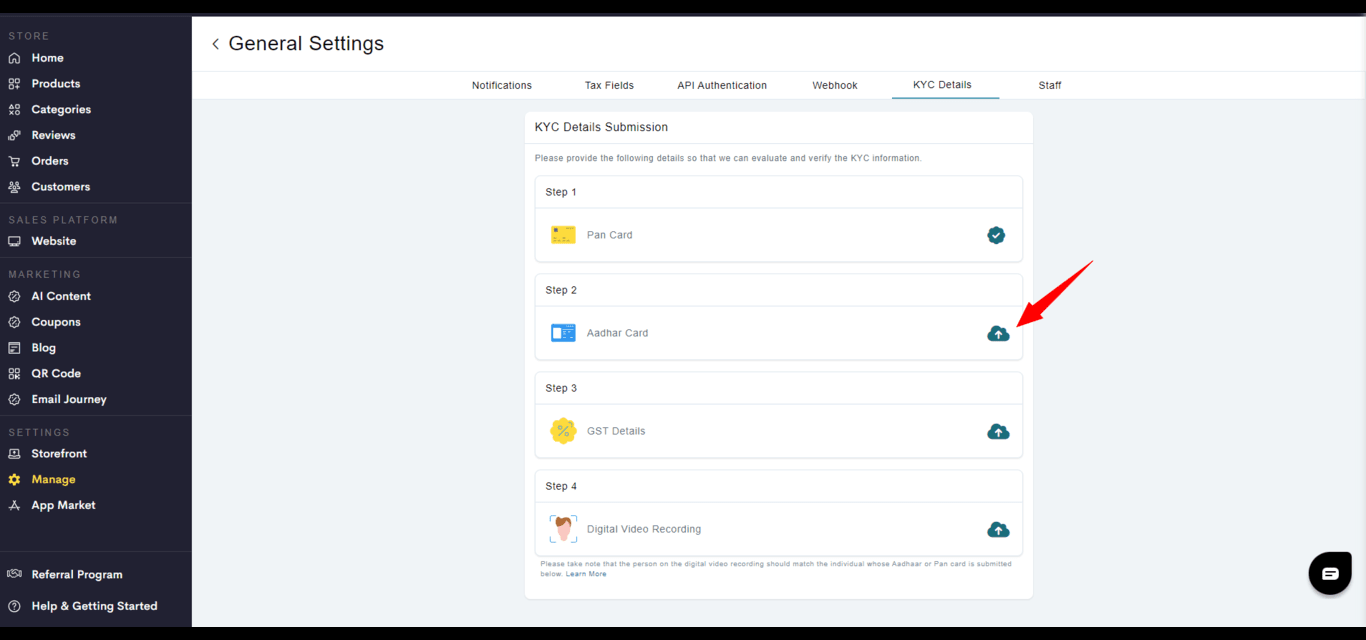 **STEP 6:**
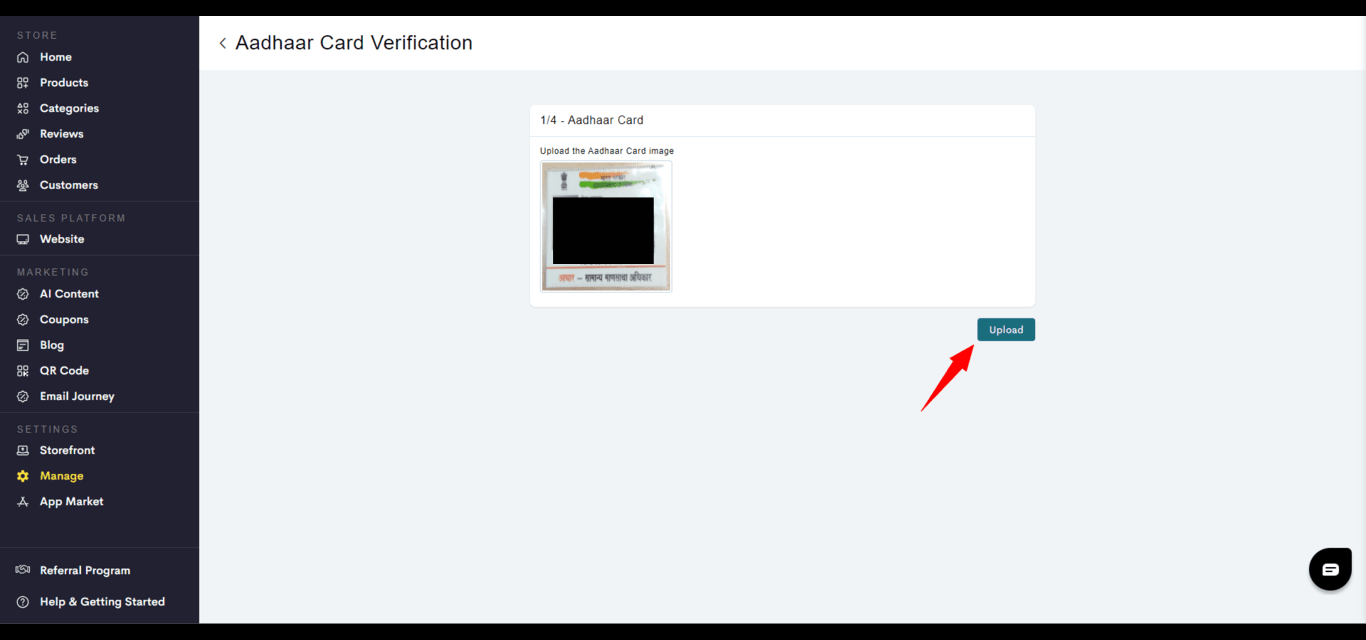
Upload a photo of your Aadhaar card(front).
**STEP 6:**
Upload a photo of your Aadhaar card(front).
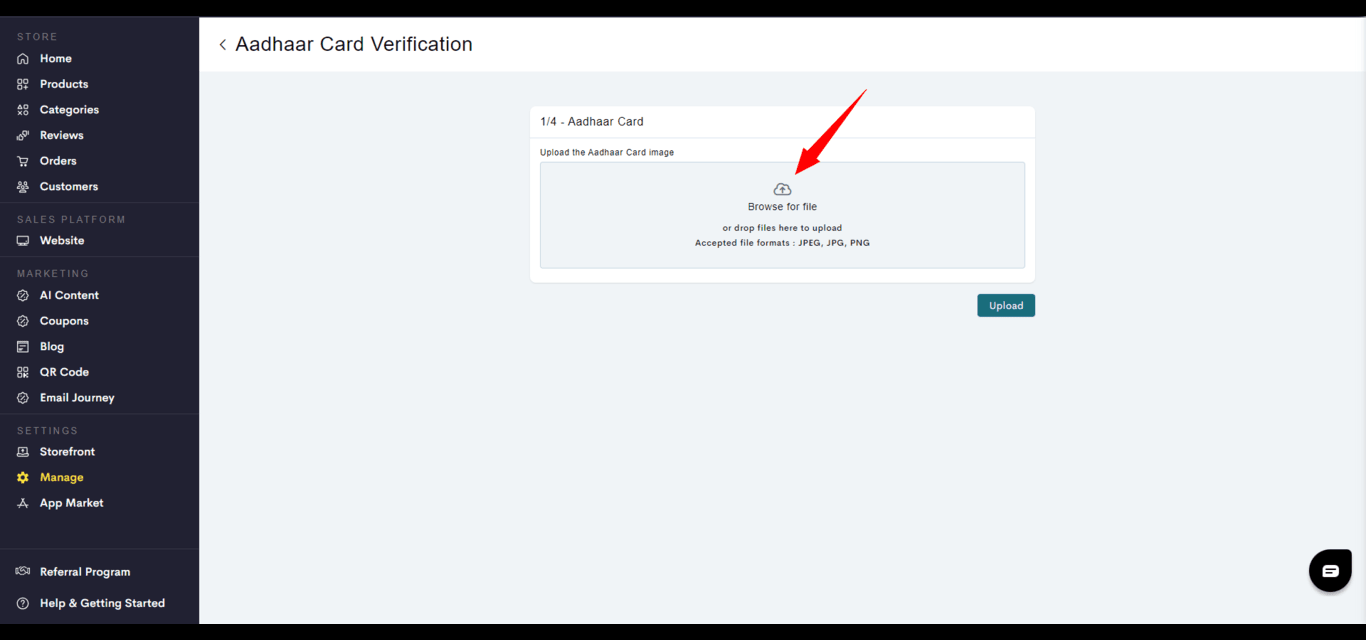 Click on Upload.
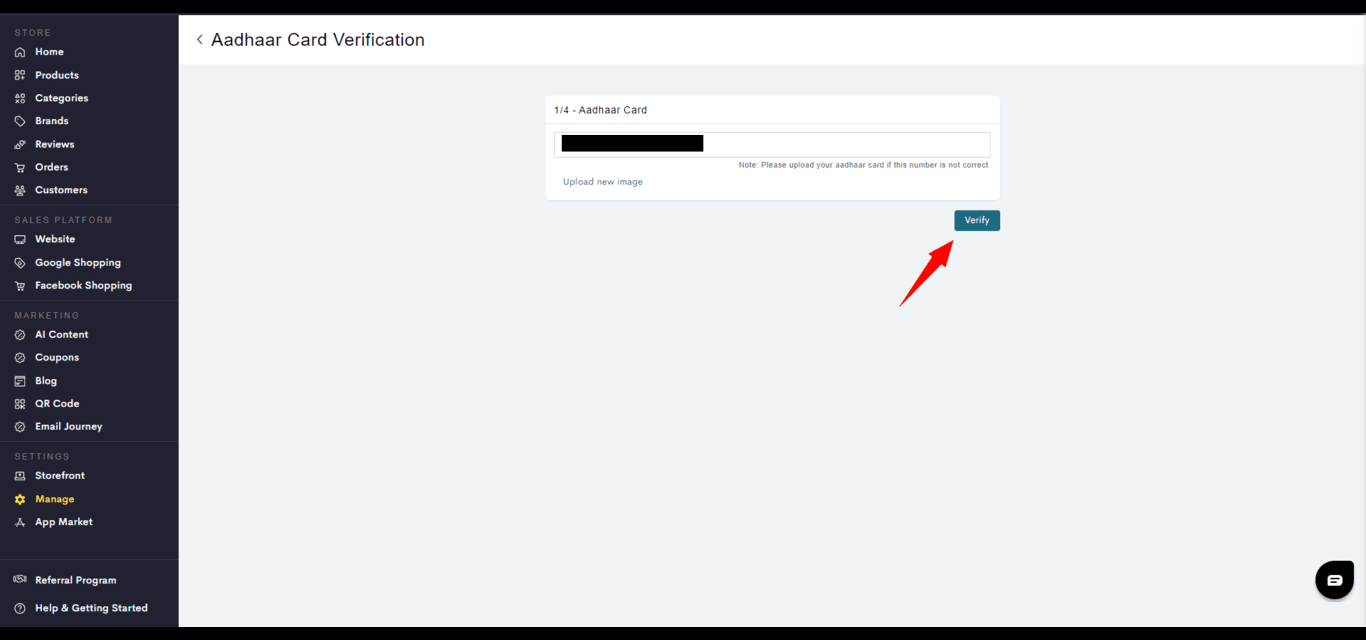
 Confirm your Aadhaar number on your card by clicking on Verify.
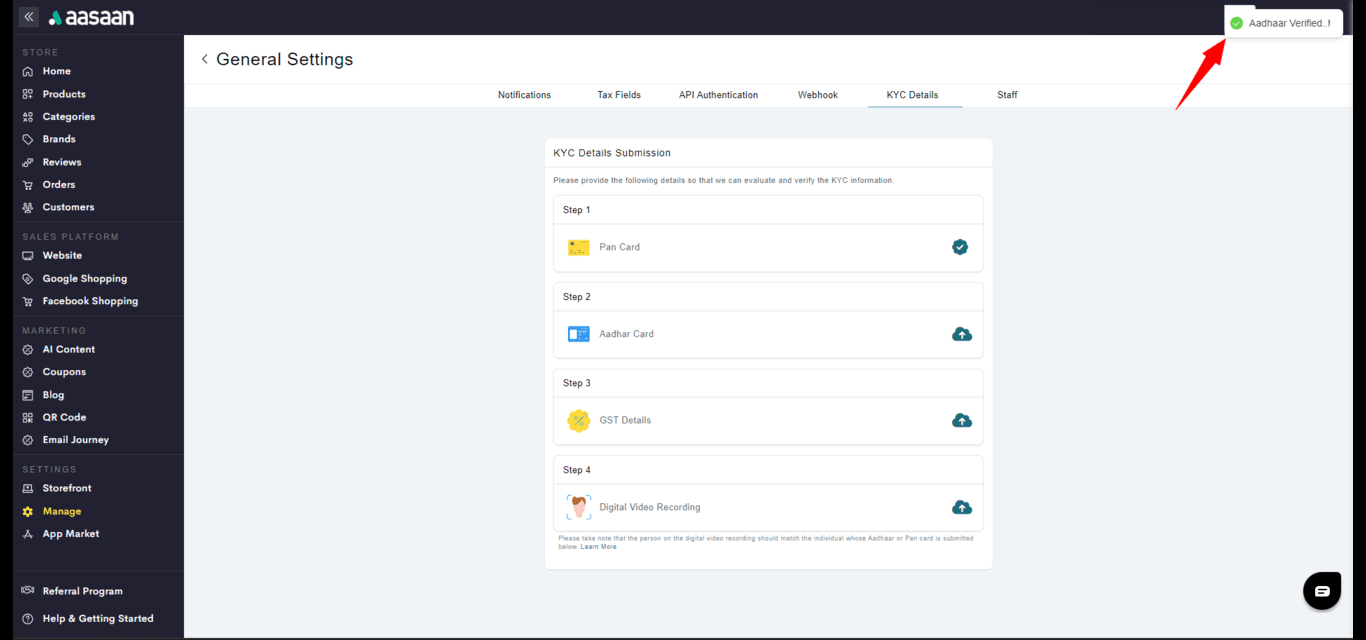
 It should be successfully verified.
 **STEP 7:**
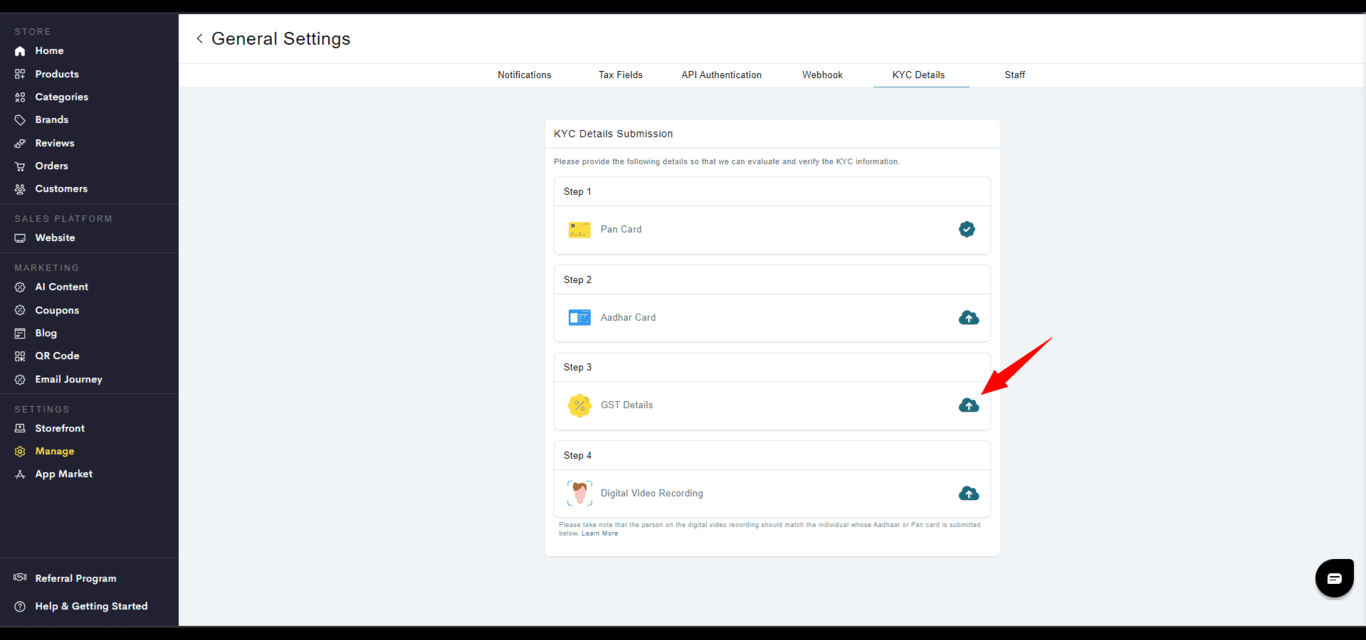
Once again, you will be taken to the main KYC page. Click on GST Details.
**STEP 7:**
Once again, you will be taken to the main KYC page. Click on GST Details.
 **STEP 8:**
Upload a soft copy of your GST certificate(Form Reg 06).
**STEP 8:**
Upload a soft copy of your GST certificate(Form Reg 06).
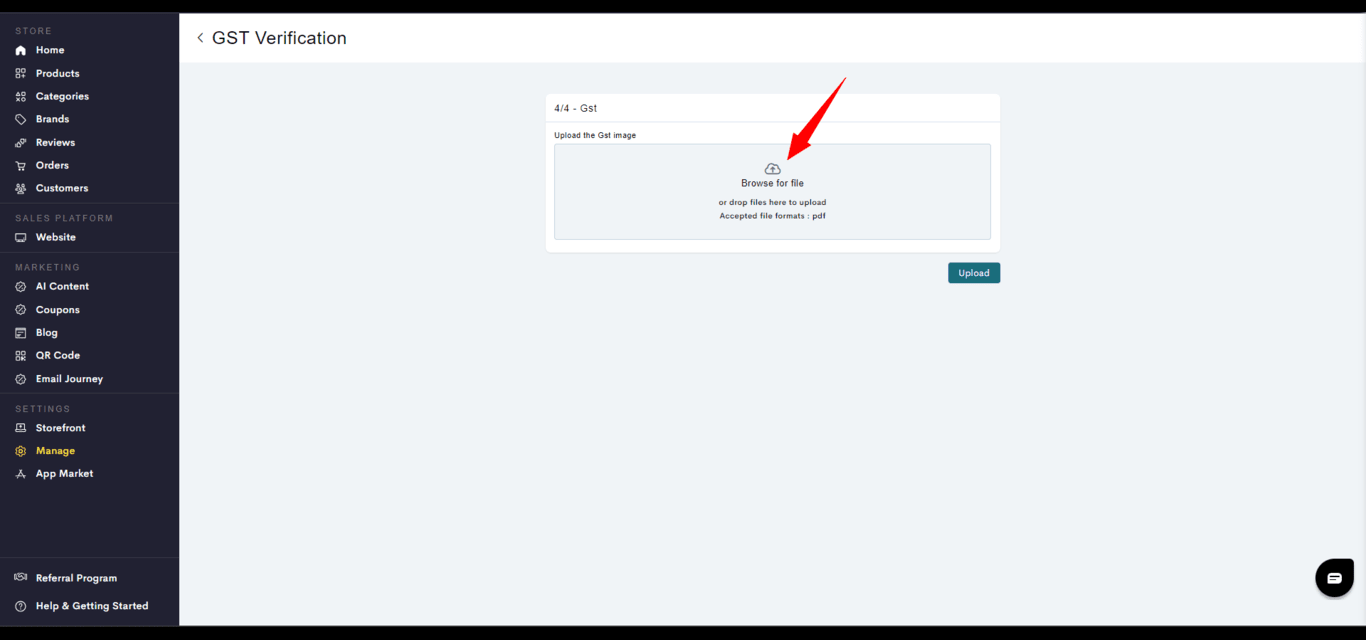 Click on Upload.
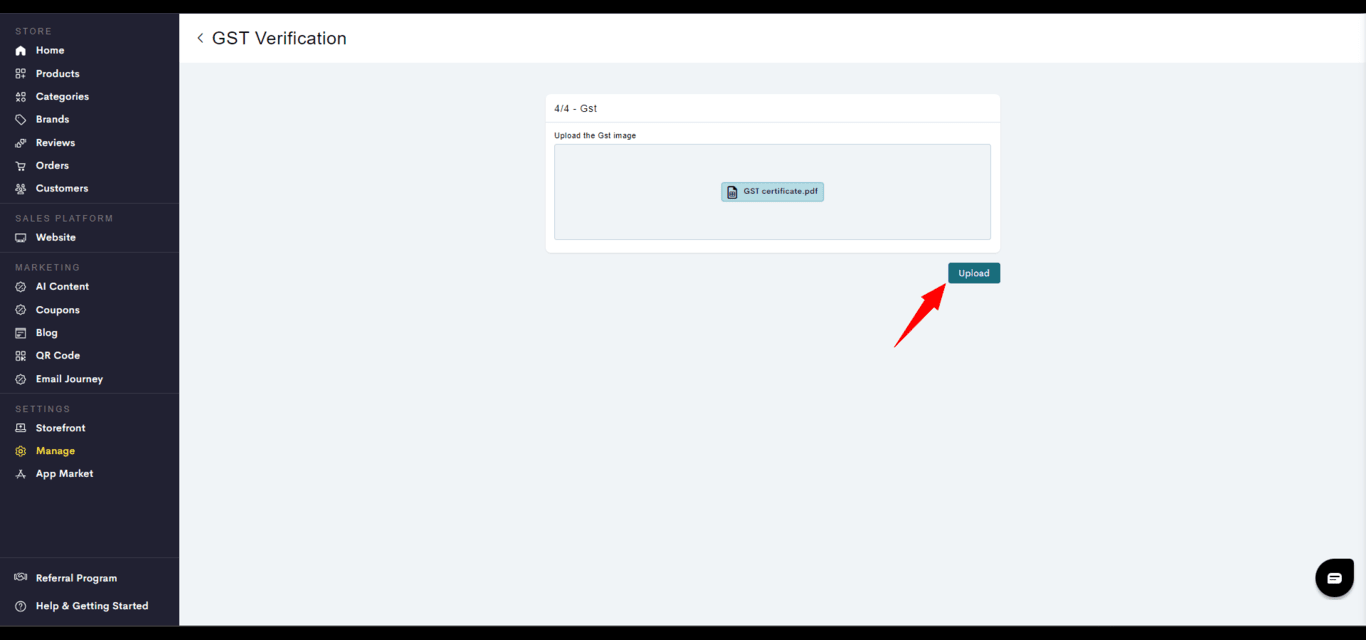 Confirm your GST number in your certificate by clicking on Verify.
It should be successfully verified.
Confirm your GST number in your certificate by clicking on Verify.
It should be successfully verified.
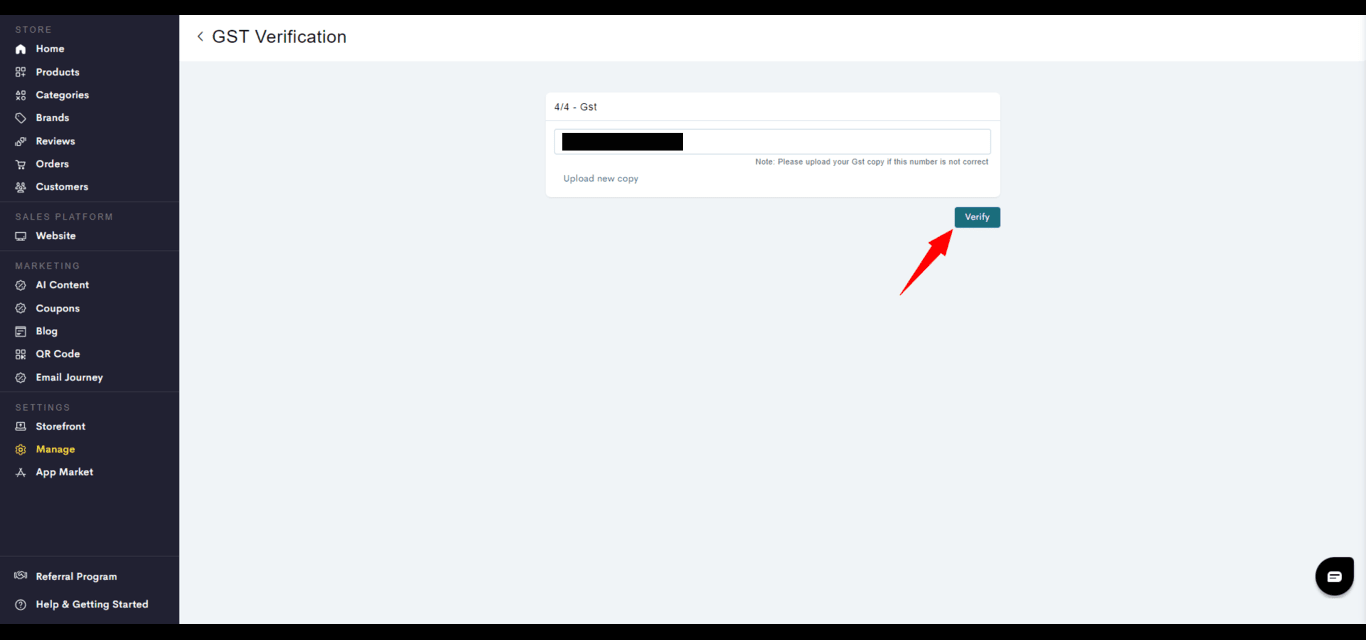 **STEP 9:**
You will be taken to the main KYC page. Finally, click on Digital Video Recording.
**STEP 9:**
You will be taken to the main KYC page. Finally, click on Digital Video Recording.
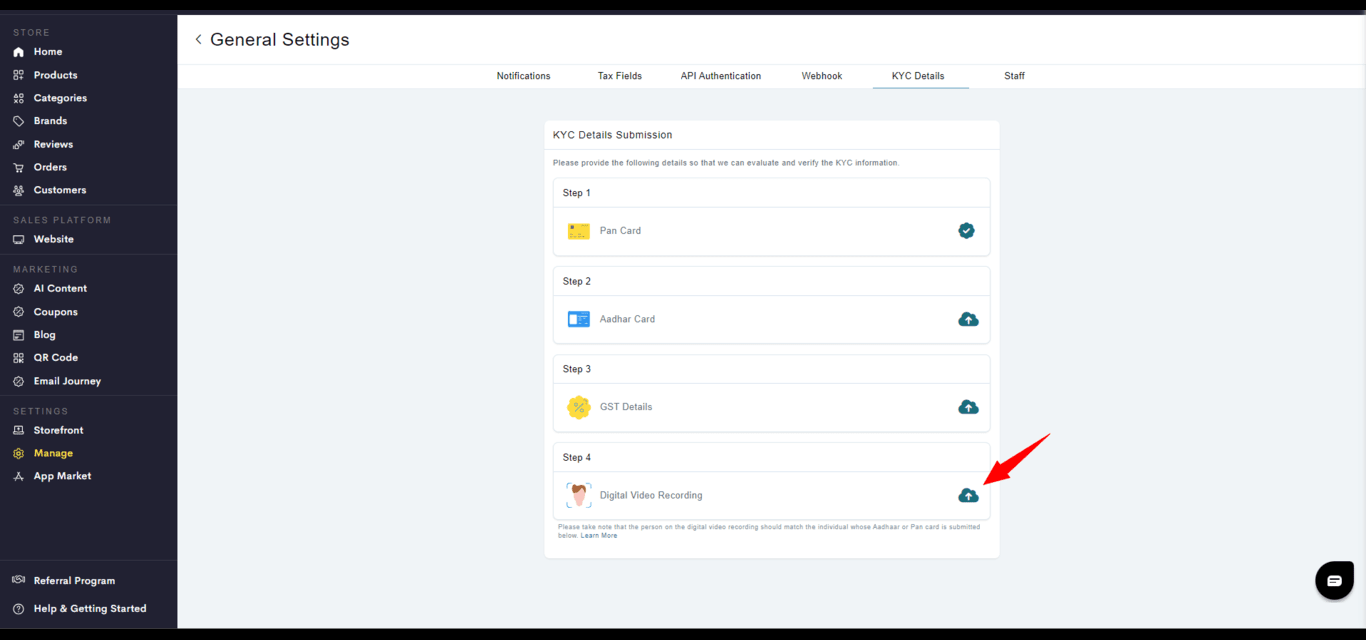 **STEP 10:**
Upload a video of you holding up your Aadhaar/PAN card next to your face for a few seconds.
**STEP 10:**
Upload a video of you holding up your Aadhaar/PAN card next to your face for a few seconds.
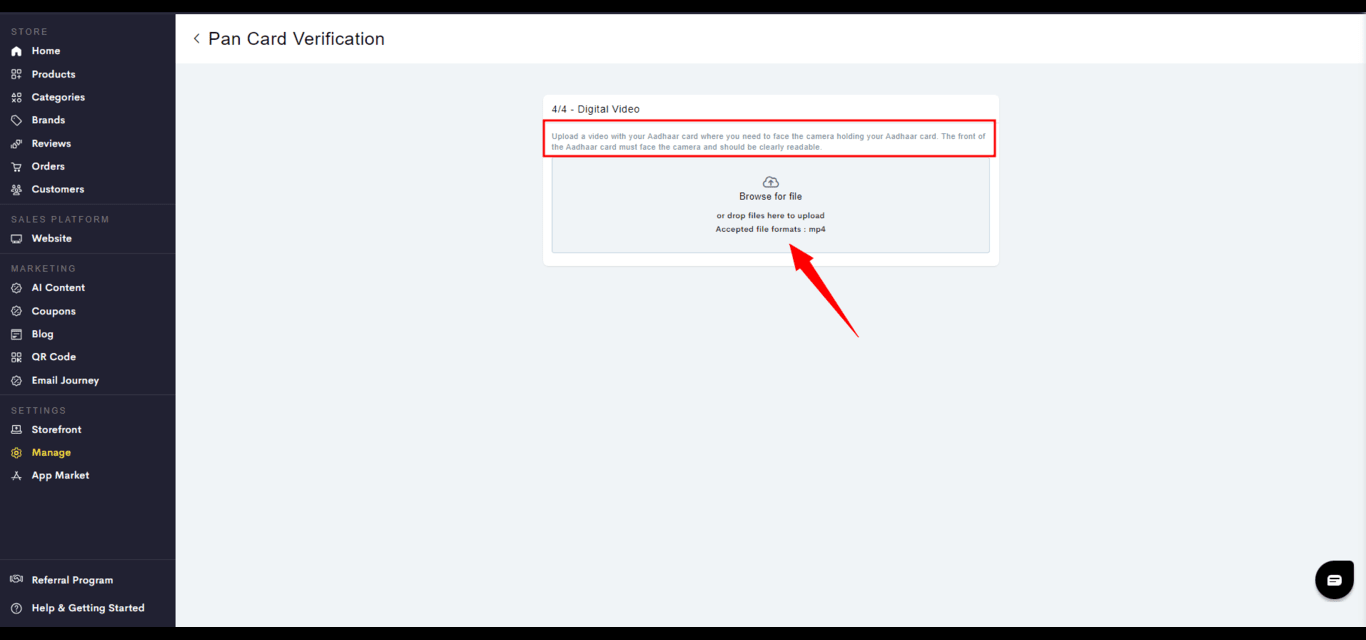 **STEP 11:**
If done properly, the video upload should be verified instantly.
**STEP 11:**
If done properly, the video upload should be verified instantly.
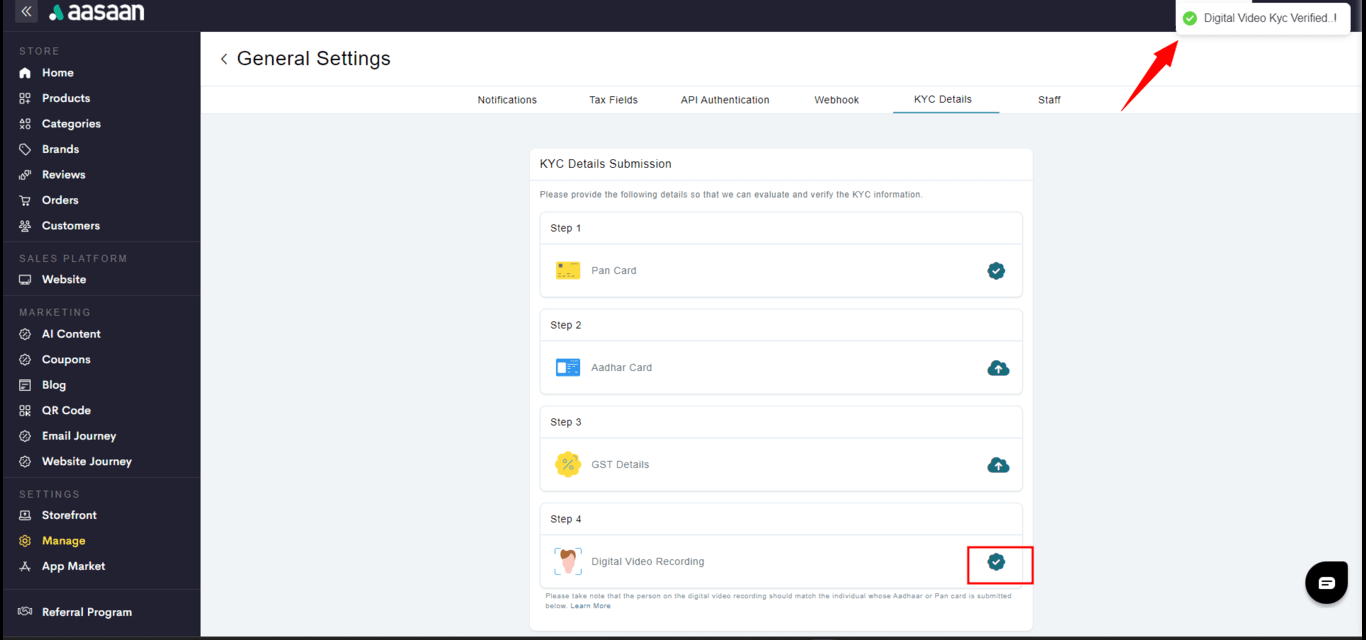 You have successfully submitted your KYC details.
### Staff
As a store owner, you can add staff members to your so that they can complete specific tasks in the admin panel. You can determine what sections of your store they get to access by assigning them specific roles. Furthermore, you can also create custom roles to fit your business needs.
In this section, you will learn how to add staff members and create custom roles for them in your admin panel.
In aasaan, you can add your employees and assign them specific roles for managing your store. Here's how you do it:
**STEP 1:**
Login to your aasaan app and click on Manage.
You have successfully submitted your KYC details.
### Staff
As a store owner, you can add staff members to your so that they can complete specific tasks in the admin panel. You can determine what sections of your store they get to access by assigning them specific roles. Furthermore, you can also create custom roles to fit your business needs.
In this section, you will learn how to add staff members and create custom roles for them in your admin panel.
In aasaan, you can add your employees and assign them specific roles for managing your store. Here's how you do it:
**STEP 1:**
Login to your aasaan app and click on Manage.
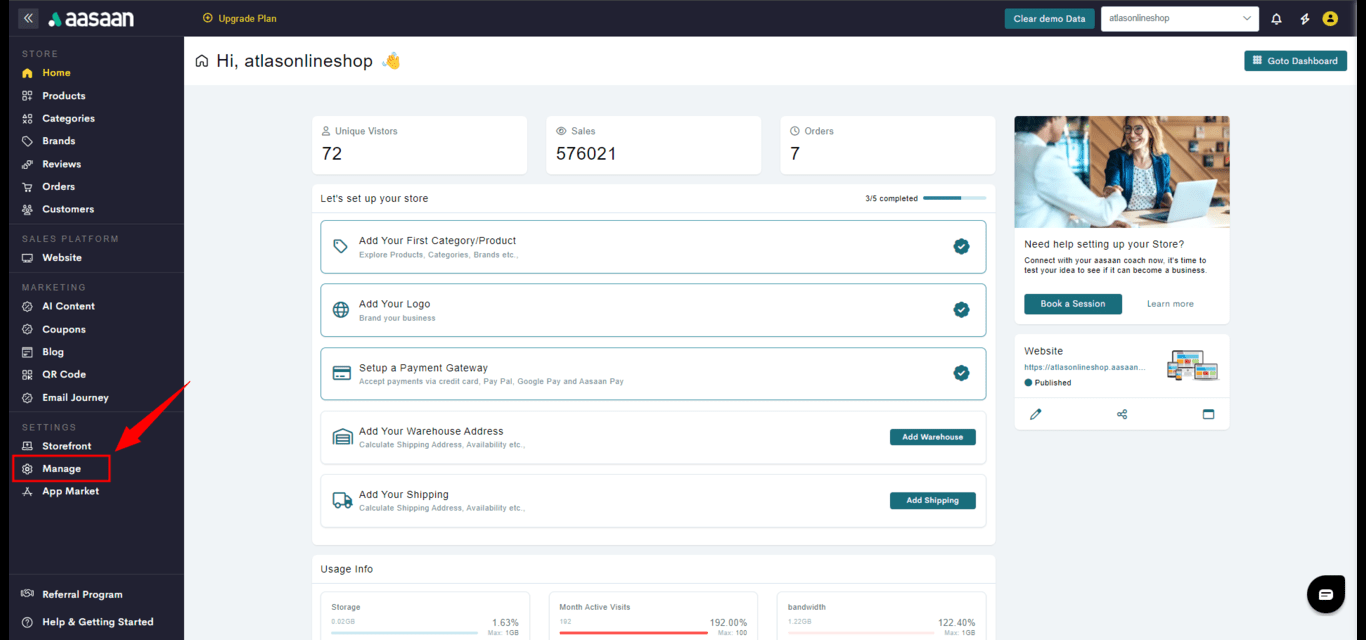 **STEP 2:**
Click on Manage Staff.
**STEP 2:**
Click on Manage Staff.
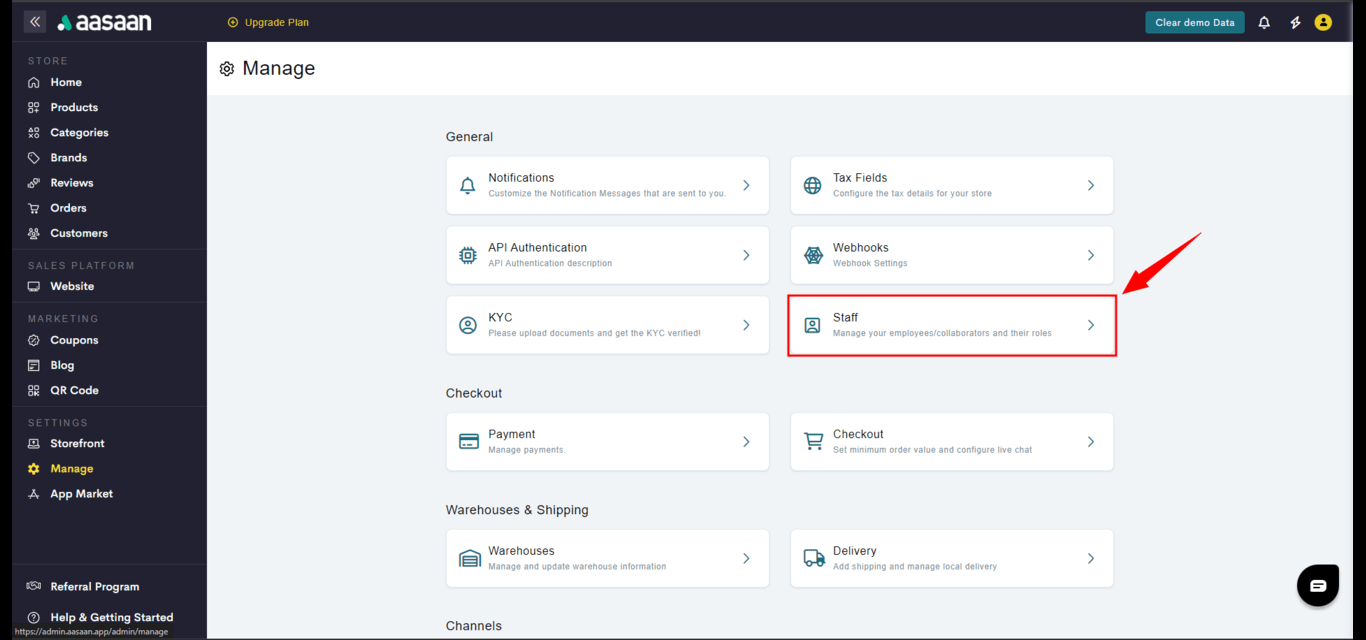 **STEP 3:**
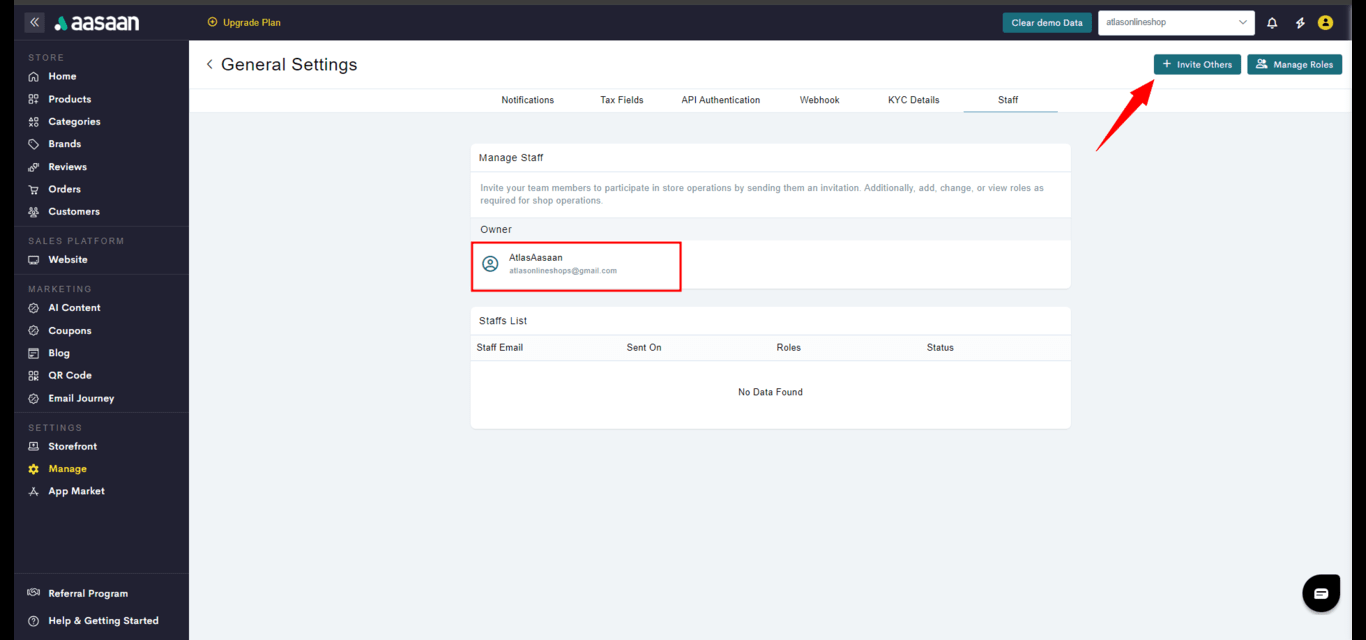
You are taken to the staff page. Here you can see that you are the owner of this store. This means that you have access to every single feature of running the store. To add a staff member, click on the button **+ Invite Others**.
**STEP 3:**
You are taken to the staff page. Here you can see that you are the owner of this store. This means that you have access to every single feature of running the store. To add a staff member, click on the button **+ Invite Others**.
 **STEP 4:**
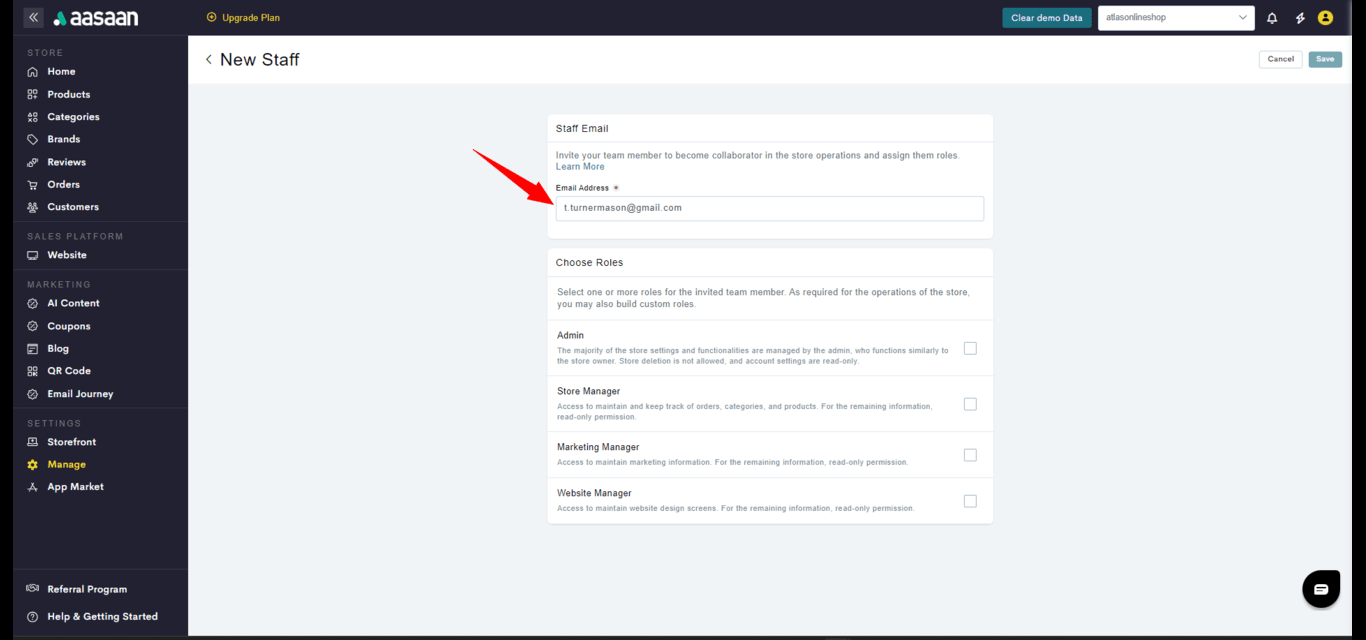
Enter the staff member's email address.
**STEP 4:**
Enter the staff member's email address.
 **STEP 5:**
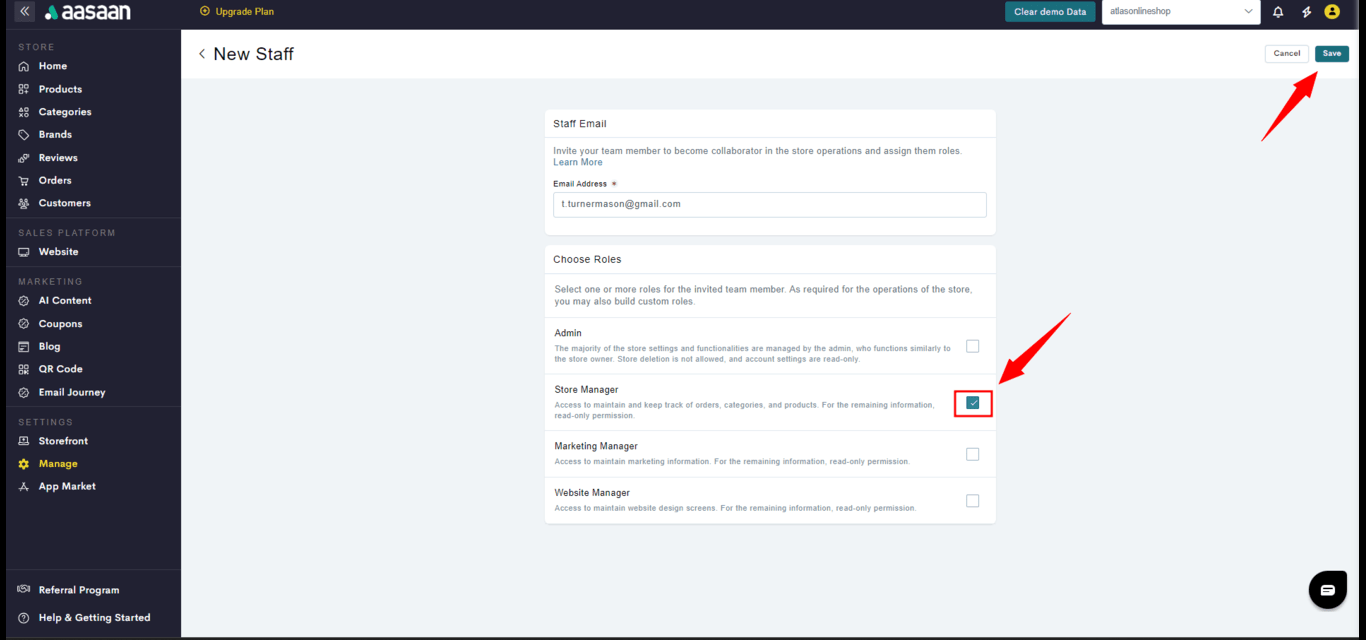
Assign a particular role to the staff member. Each role has specified permissions; they are allowed to manage/view only certain features. You can either use the pre-existing roles or create new roles of your own based on your needs.
Here we will choose the role "Store Manager". Check that box and click on Save.
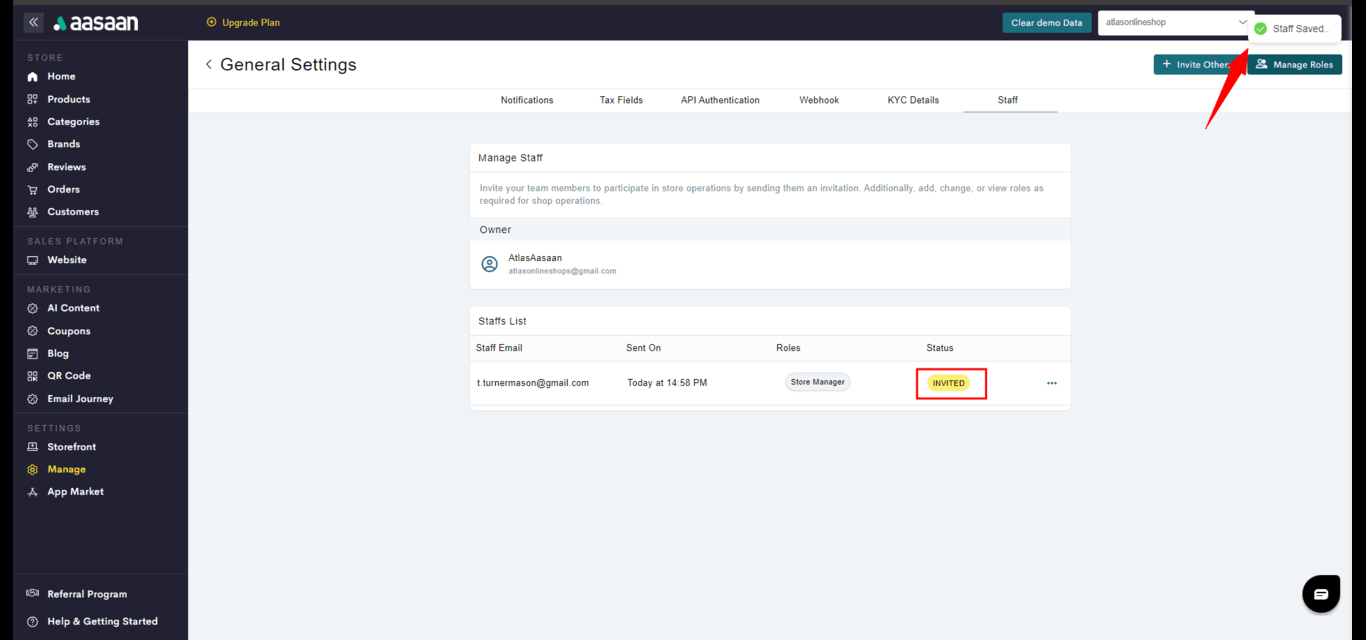
The staff member should be visible and their status should be "Invited".
**STEP 5:**
Assign a particular role to the staff member. Each role has specified permissions; they are allowed to manage/view only certain features. You can either use the pre-existing roles or create new roles of your own based on your needs.
Here we will choose the role "Store Manager". Check that box and click on Save.
The staff member should be visible and their status should be "Invited".
 **STEP 6:**
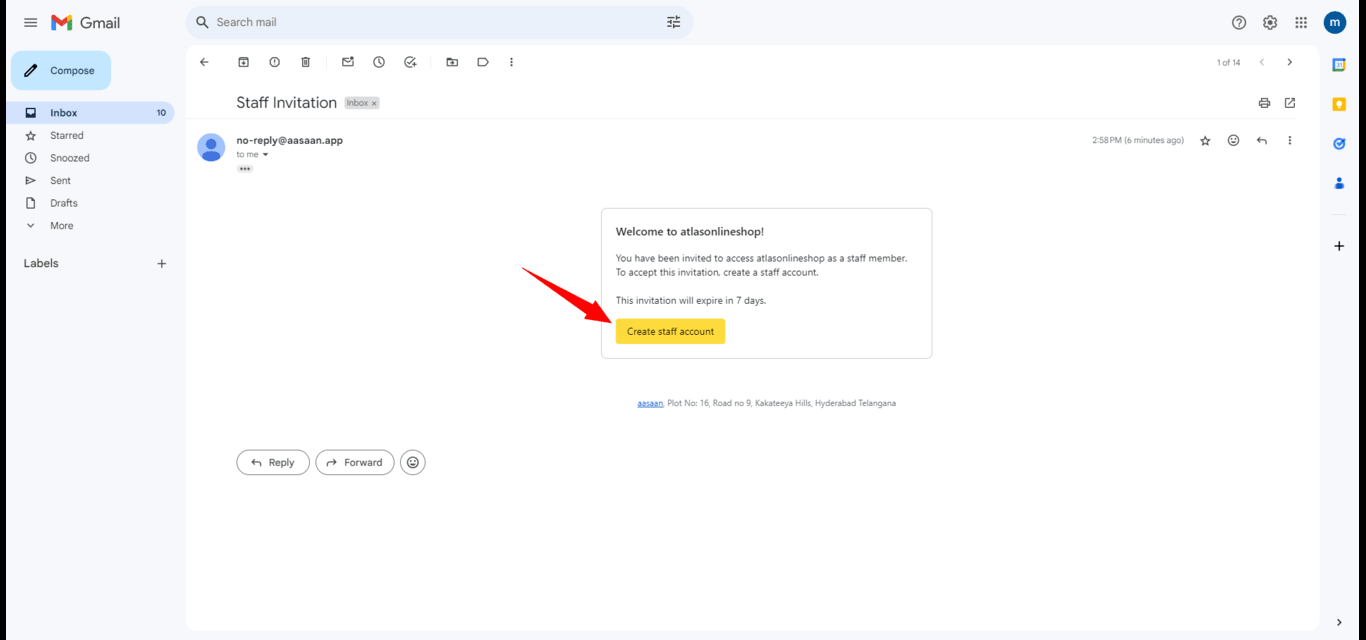
Now the staff member needs to accept the invitation.
So they need to open the invite email, and click on Create Staff Account.
**STEP 6:**
Now the staff member needs to accept the invitation.
So they need to open the invite email, and click on Create Staff Account.
 **STEP 7:**
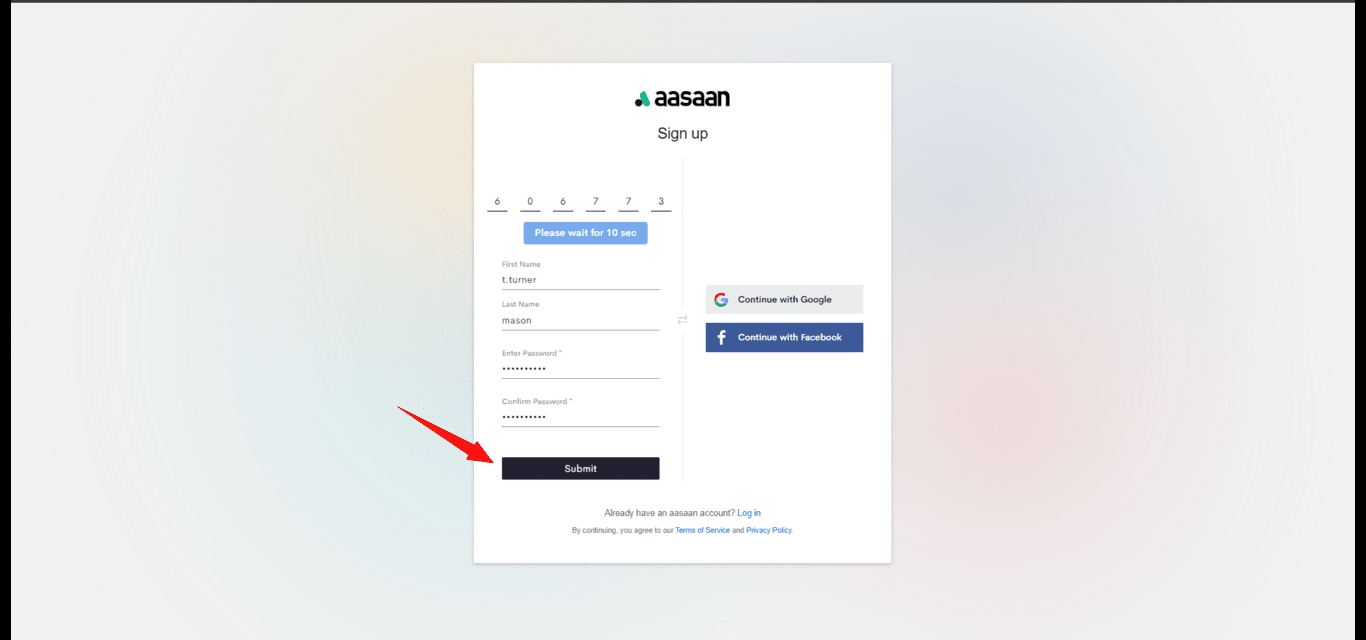
They will be prompted to signup to aasaan.
They need to enter the authentication code sent to their email address, their personal information, and click on Submit.
**STEP 7:**
They will be prompted to signup to aasaan.
They need to enter the authentication code sent to their email address, their personal information, and click on Submit.
 **STEP 8:**
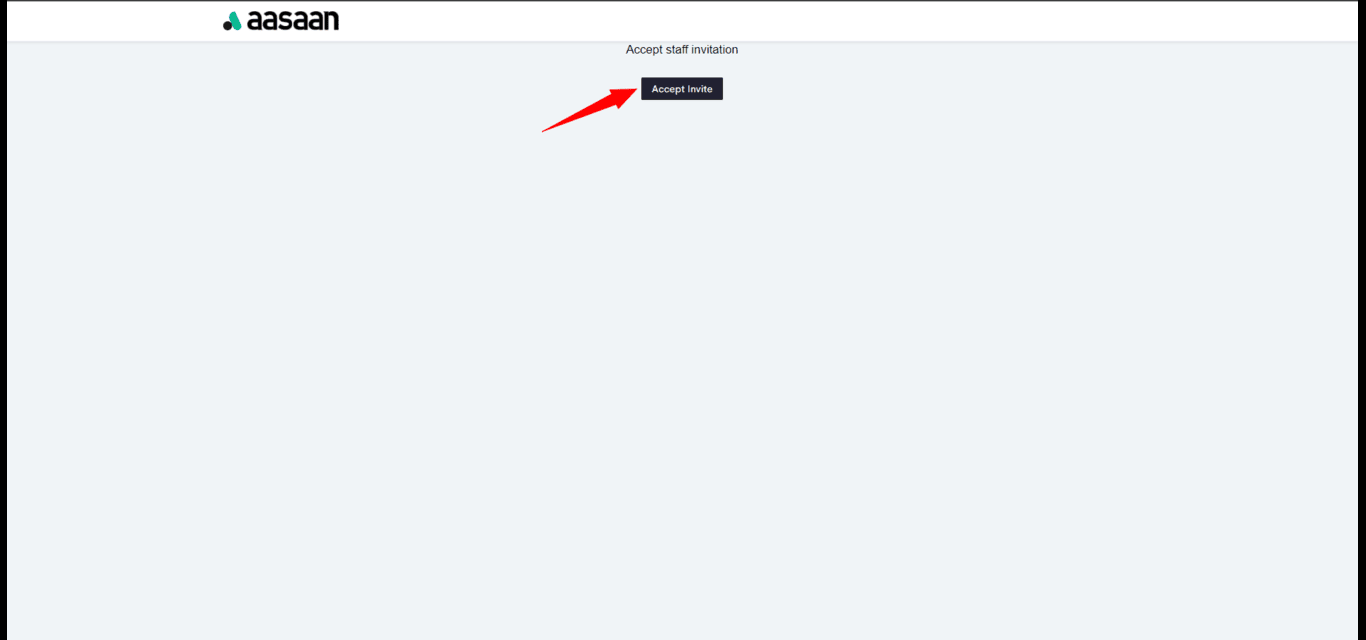
Once they enter their details, they will be prompted to click on **Accept Invite**.
Upon accepting the invitation, they will be able to see the admin panel.
**STEP 8:**
Once they enter their details, they will be prompted to click on **Accept Invite**.
Upon accepting the invitation, they will be able to see the admin panel.
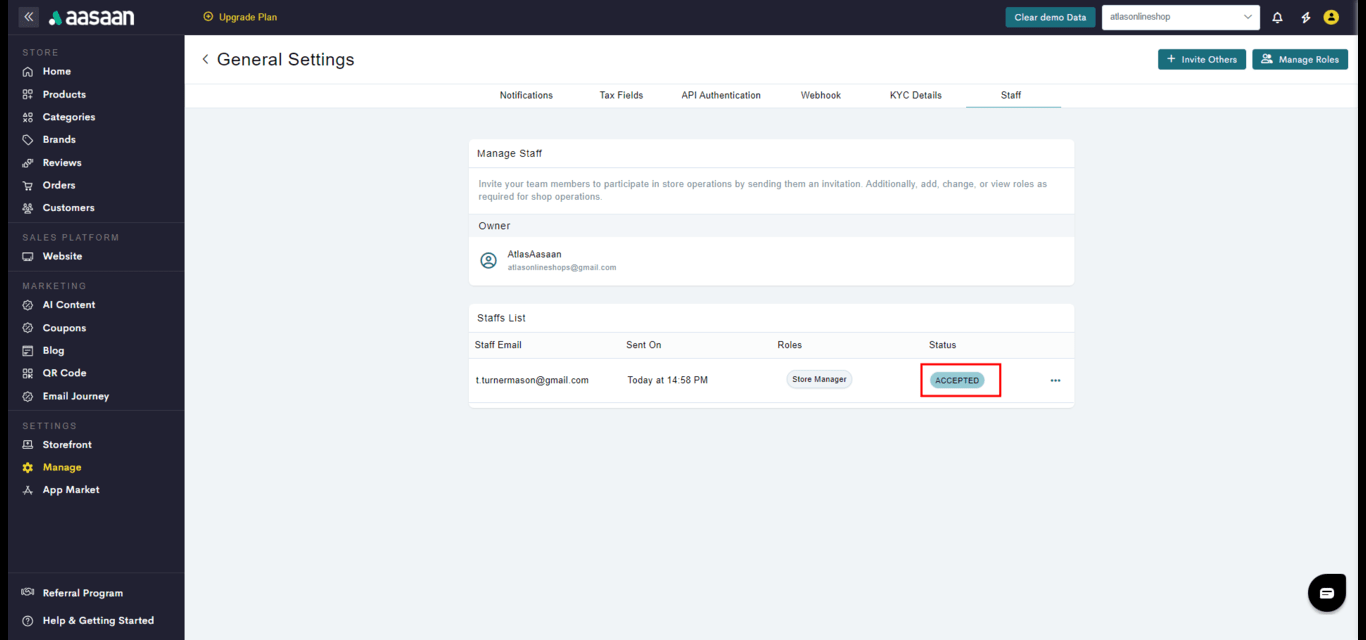
 In your admin panel, the status of your staff member will change to "Accepted".
You have successfully added a staff member to your store.
In your admin panel, the status of your staff member will change to "Accepted".
You have successfully added a staff member to your store.
 When you are adding your staff members to your aasaan store, you get a set of predefined roles to choose from. But you can also create your own custom roles. Here's how you do it:
**STEP 1:**
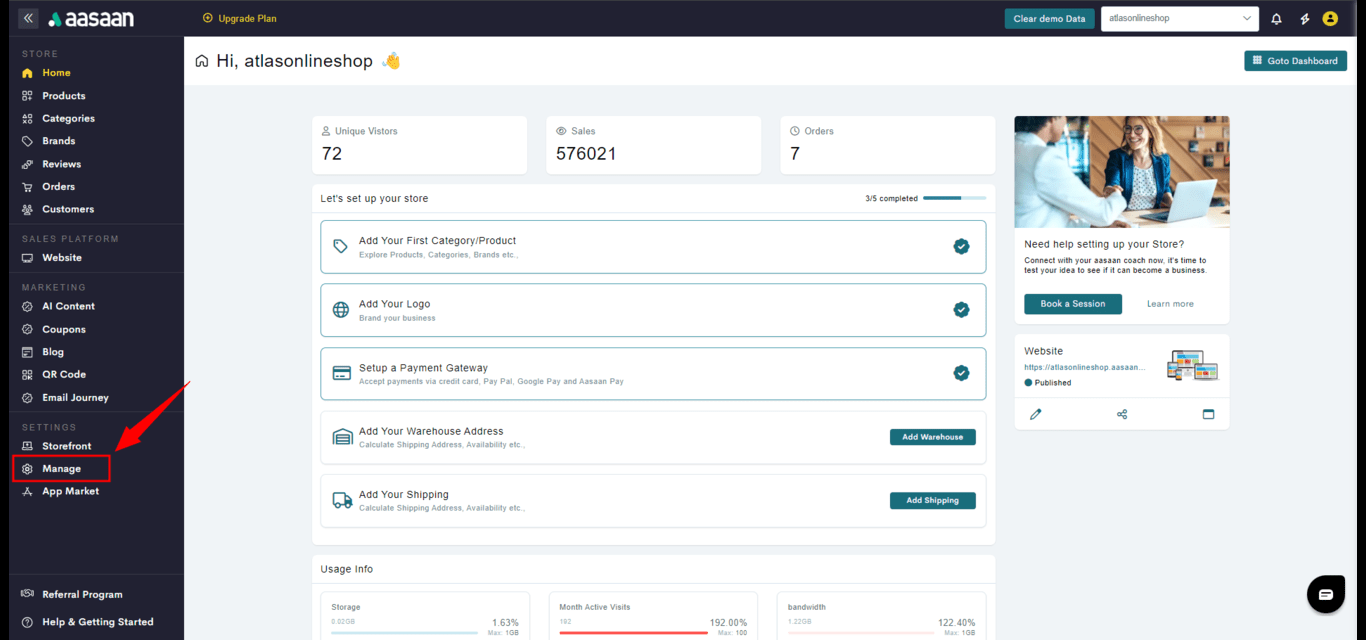
Login to your aasaan desktop admin panel and click on Manage.
When you are adding your staff members to your aasaan store, you get a set of predefined roles to choose from. But you can also create your own custom roles. Here's how you do it:
**STEP 1:**
Login to your aasaan desktop admin panel and click on Manage.
 **STEP 2:**
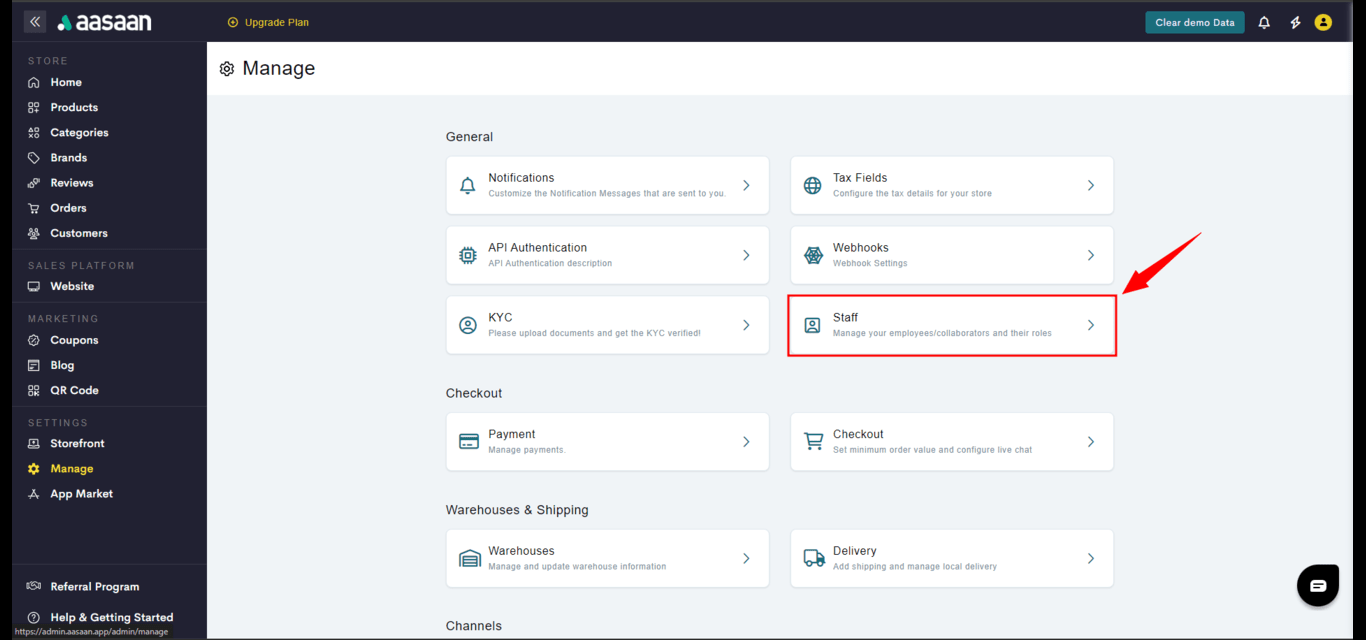
Click on Manage Staff.
**STEP 2:**
Click on Manage Staff.
 **STEP 3:**
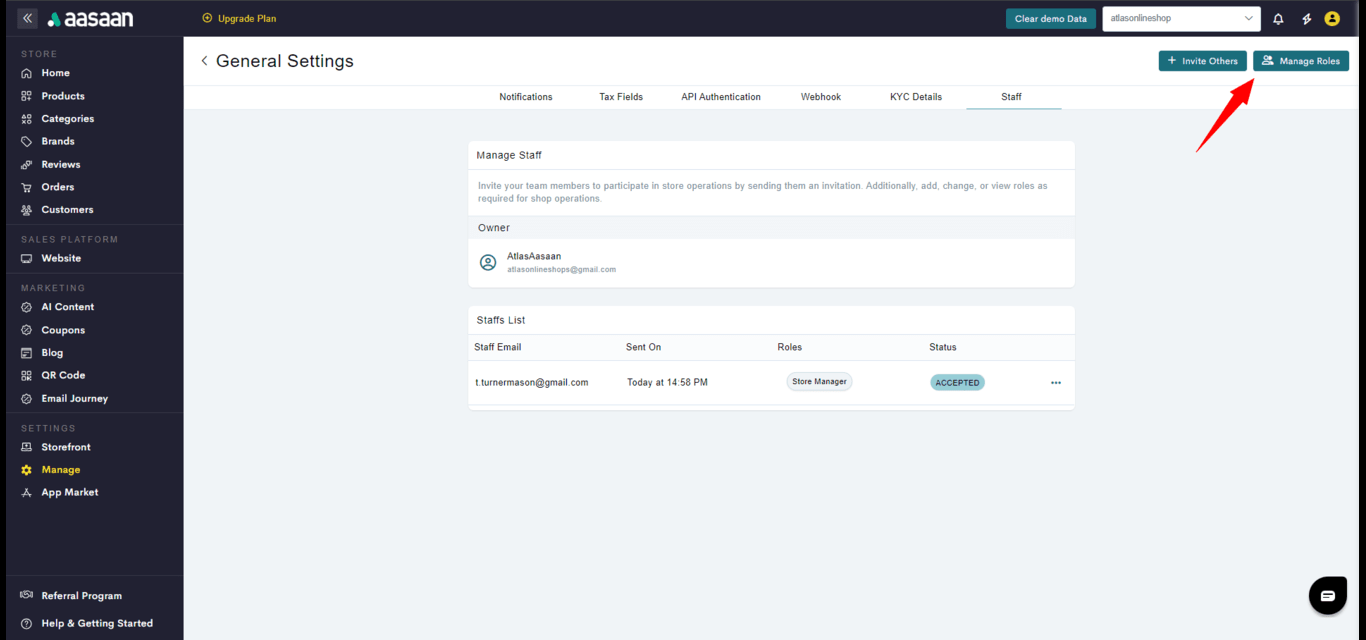
You are taken to the staff page. Click on Manage Roles.
**STEP 3:**
You are taken to the staff page. Click on Manage Roles.
 **STEP 4:**
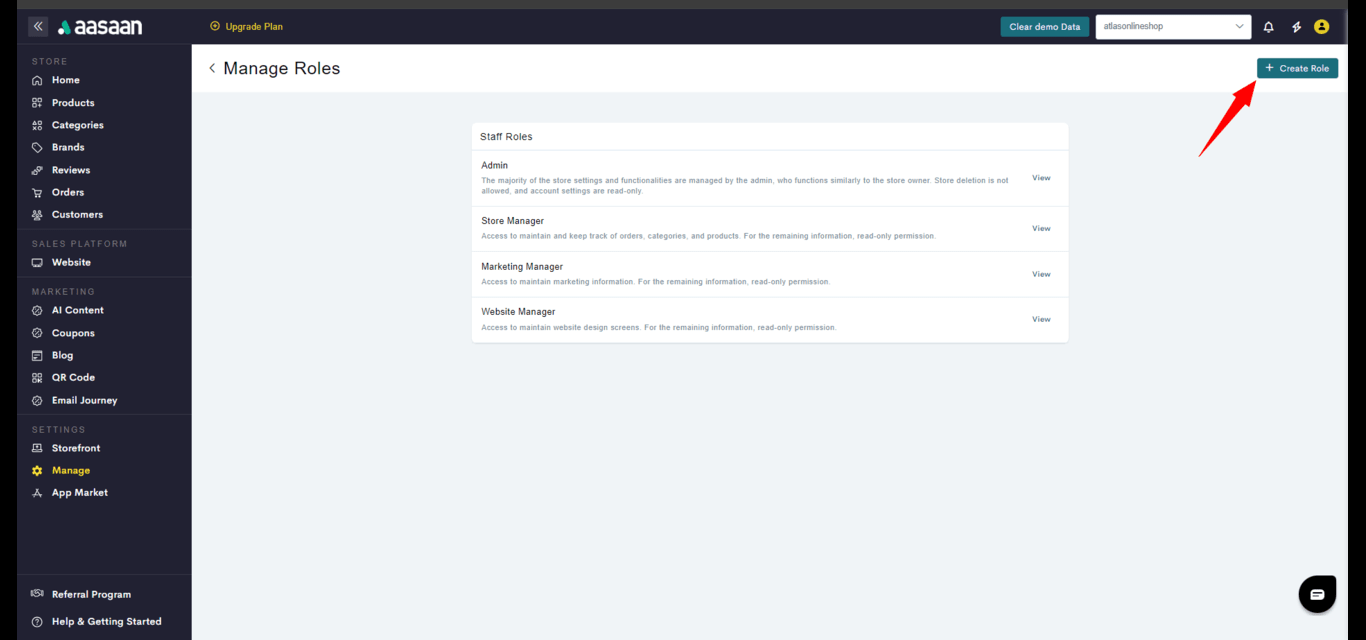
Click on Add Role.
**STEP 4:**
Click on Add Role.
 **STEP 5:**
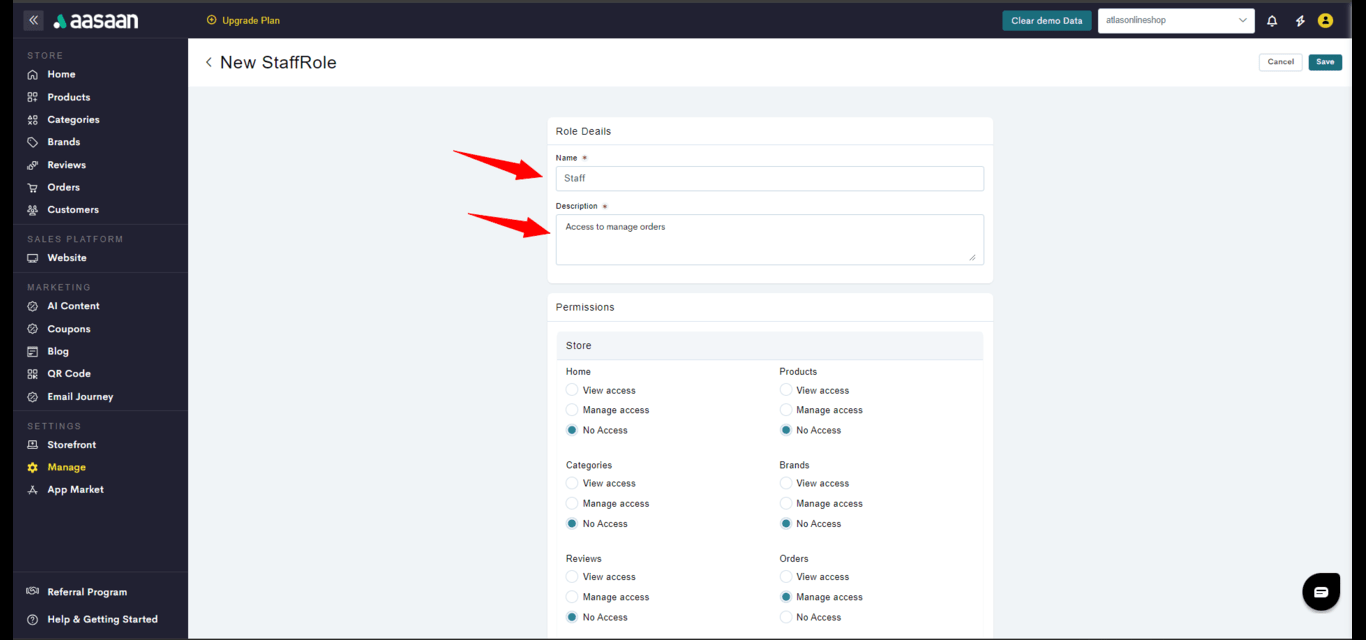
Enter the role name and description.
**STEP 5:**
Enter the role name and description.
 **STEP 6:**
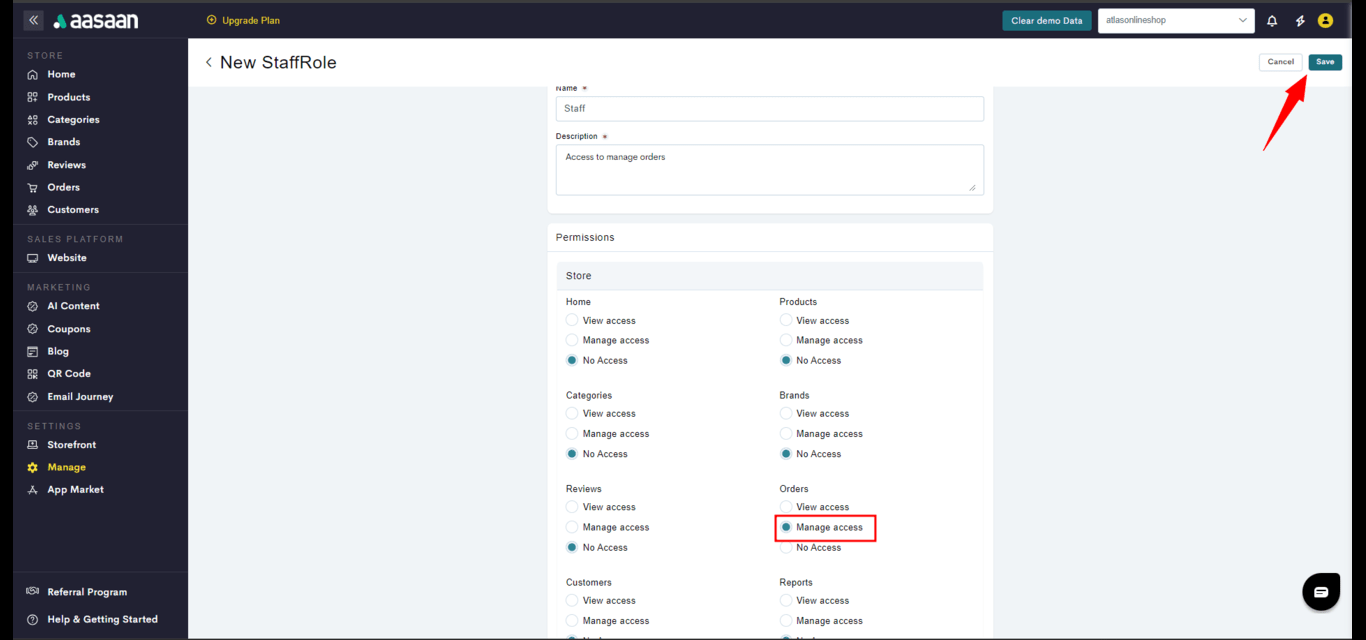
Now we have to set the appropriate permissions. When it comes to permissions, the default setting for each part of the app is "No access". This means the staff member cannot view or edit that particular part of the app.
For a particular feature, you can set the permission as "View Access" or "Manage Access".
"View Access" means that the staff member assigned to this role can only view that particular feature.
"Manage Access" means that the staff member assigned to this role can manage or make changes in that particular feature.
If you wish, you can configure features as "No Access" which will prevent them from accessing that feature altogether.
**STEP 6:**
Now we have to set the appropriate permissions. When it comes to permissions, the default setting for each part of the app is "No access". This means the staff member cannot view or edit that particular part of the app.
For a particular feature, you can set the permission as "View Access" or "Manage Access".
"View Access" means that the staff member assigned to this role can only view that particular feature.
"Manage Access" means that the staff member assigned to this role can manage or make changes in that particular feature.
If you wish, you can configure features as "No Access" which will prevent them from accessing that feature altogether.
 **STEP 7:**
When you are done configuring the permissions for the role, click on Save.
**STEP 7:**
When you are done configuring the permissions for the role, click on Save.
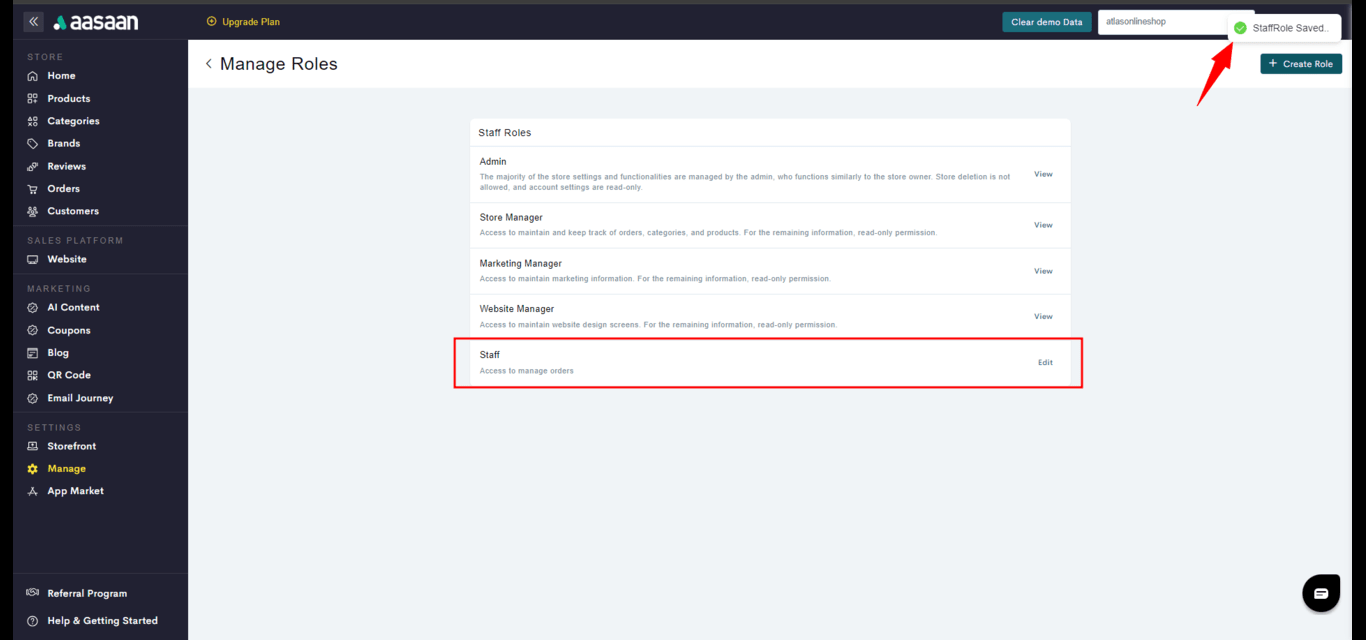 Your custom role has been successfully saved.
## Checkout Settings
In this section, you will learn how to manage payment and checkout settings.
### Payment
In this guide, you will learn how to manage payment settings on your Aasaan store from your desktop admin panel.
**STEP 1:**
Log in to your aasaan admin panel and click on Manage.
Your custom role has been successfully saved.
## Checkout Settings
In this section, you will learn how to manage payment and checkout settings.
### Payment
In this guide, you will learn how to manage payment settings on your Aasaan store from your desktop admin panel.
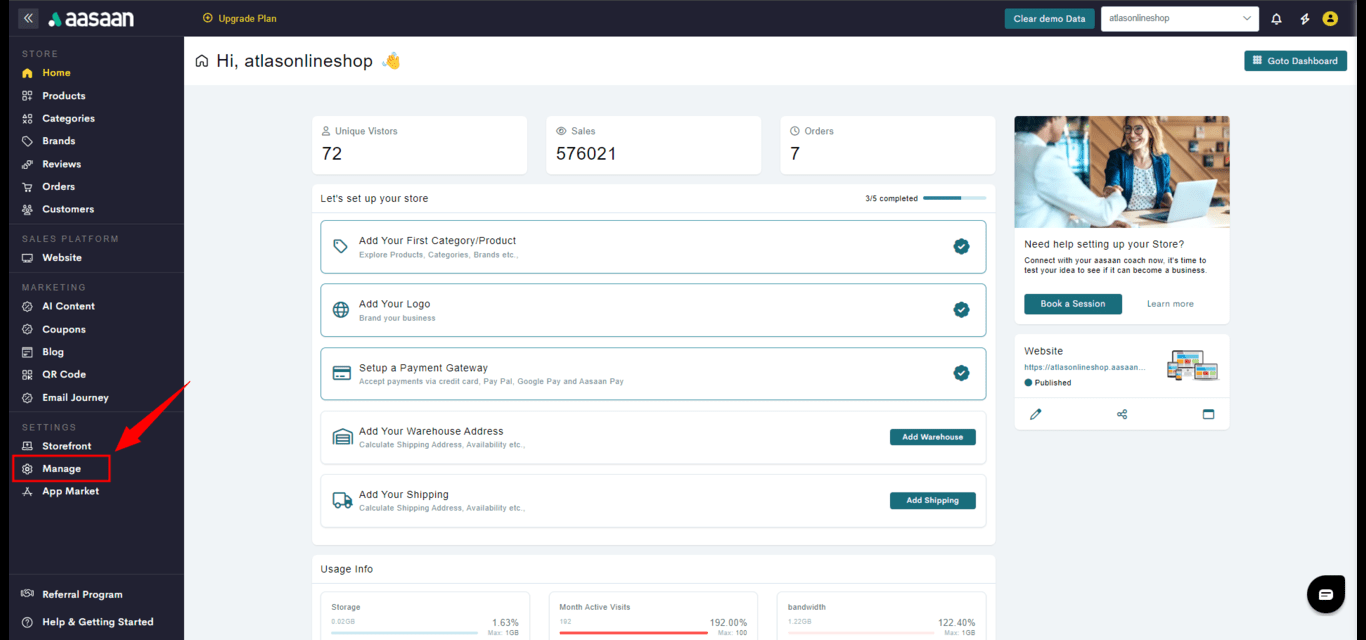
**STEP 1:**
Log in to your aasaan admin panel and click on Manage.
 **STEP 2:**
Click on Payment Settings.
**STEP 2:**
Click on Payment Settings.
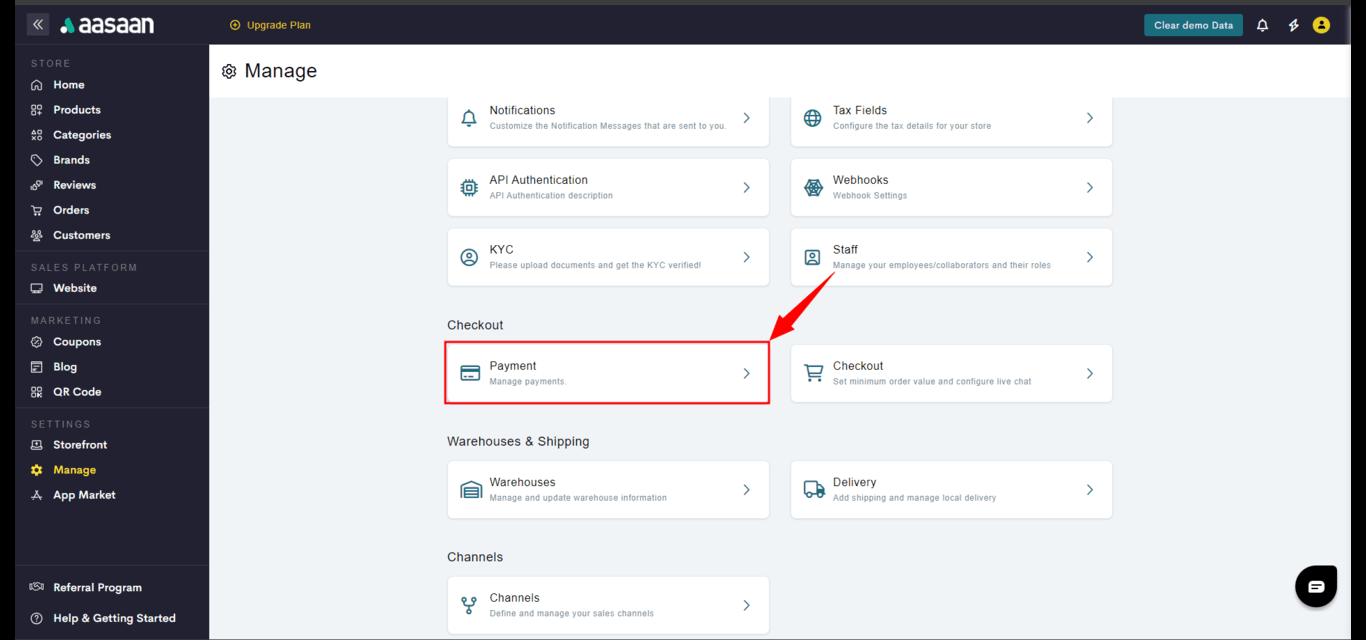 **STEP 3:**
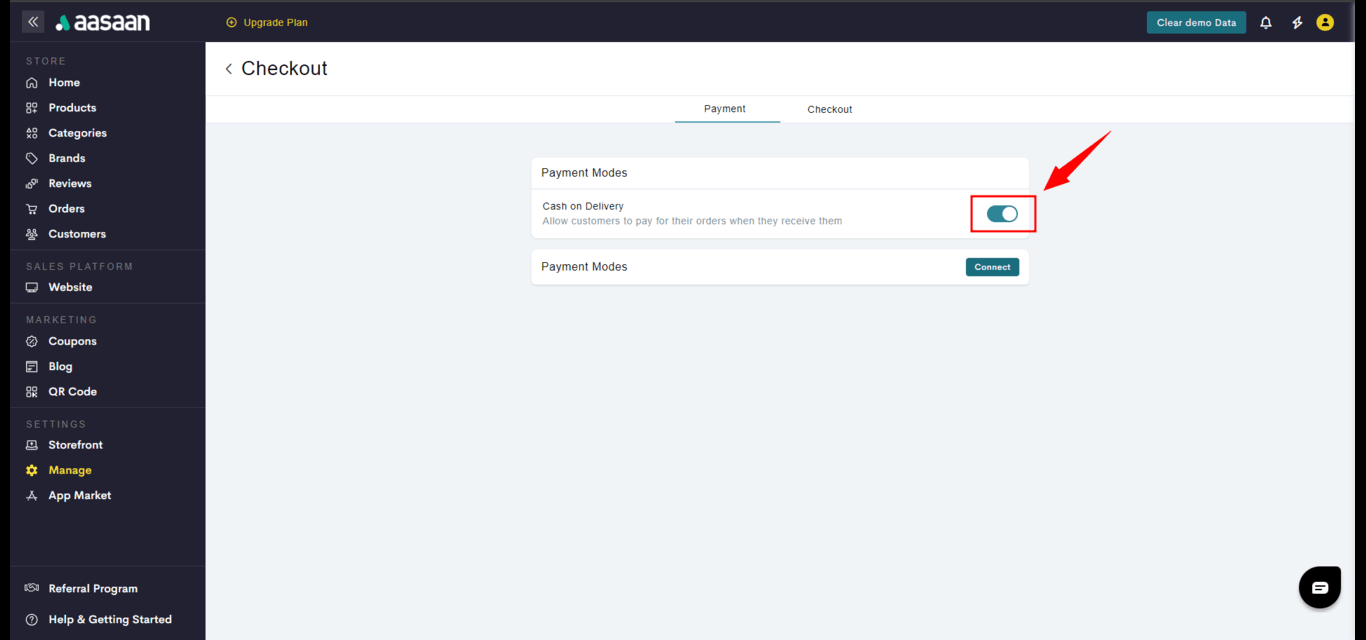
Click on the toggle to enable Cash on Delivery if you wish to offer that payment method.
*Note: If you have not integrated any online payment gateway to your store, cash on delivery is available on the website by default even if it is disabled.*
You have successfully enabled Cash on Delivery on your store.
**STEP 3:**
Click on the toggle to enable Cash on Delivery if you wish to offer that payment method.
*Note: If you have not integrated any online payment gateway to your store, cash on delivery is available on the website by default even if it is disabled.*
You have successfully enabled Cash on Delivery on your store.
 You have successfully configured your store's payment settings.
### Checkout
Here's how you configure your store checkout settings.
**STEP 1:**
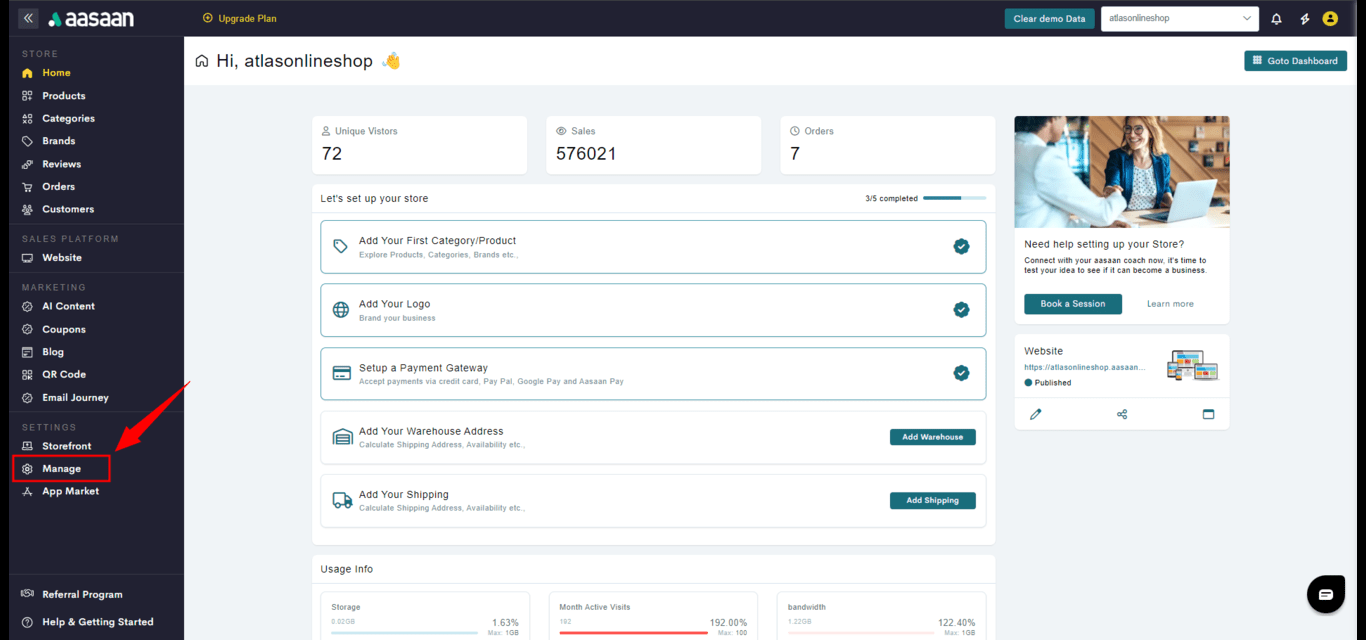
Log into the desktop version of your aasaan app and click on Manage.
You have successfully configured your store's payment settings.
### Checkout
Here's how you configure your store checkout settings.
**STEP 1:**
Log into the desktop version of your aasaan app and click on Manage.
 **STEP 2:**
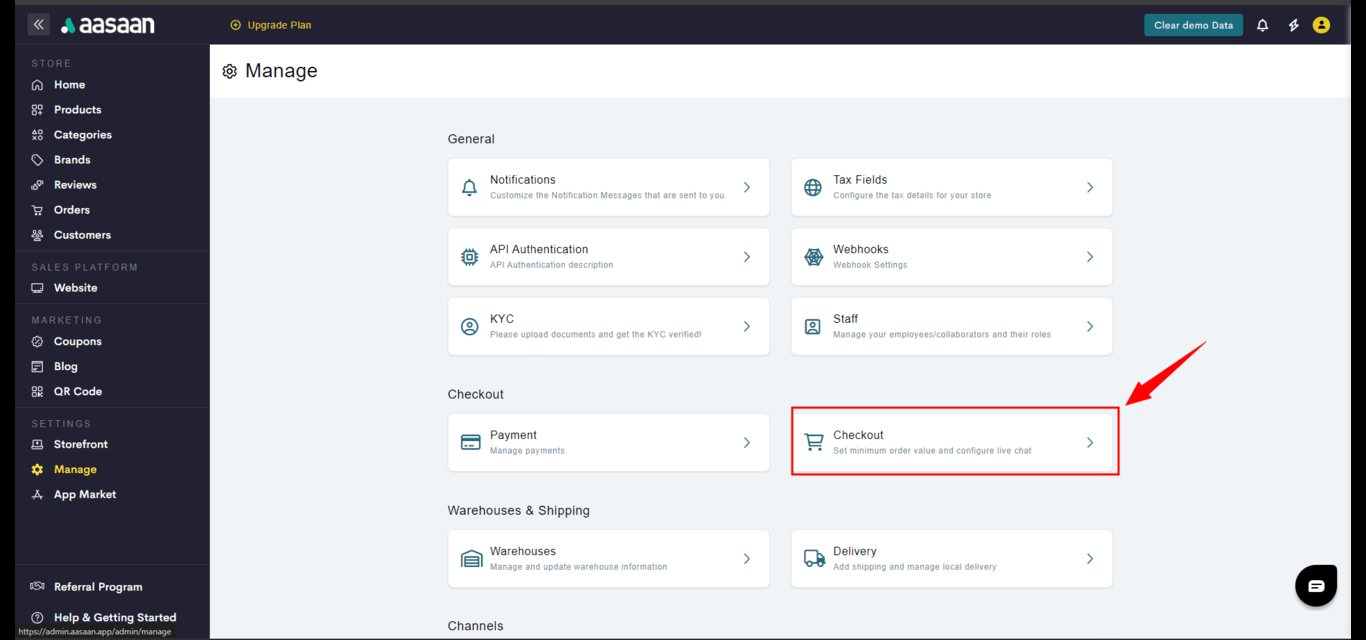
Click on Checkout Settings.
**STEP 2:**
Click on Checkout Settings.
 **STEP 3:**
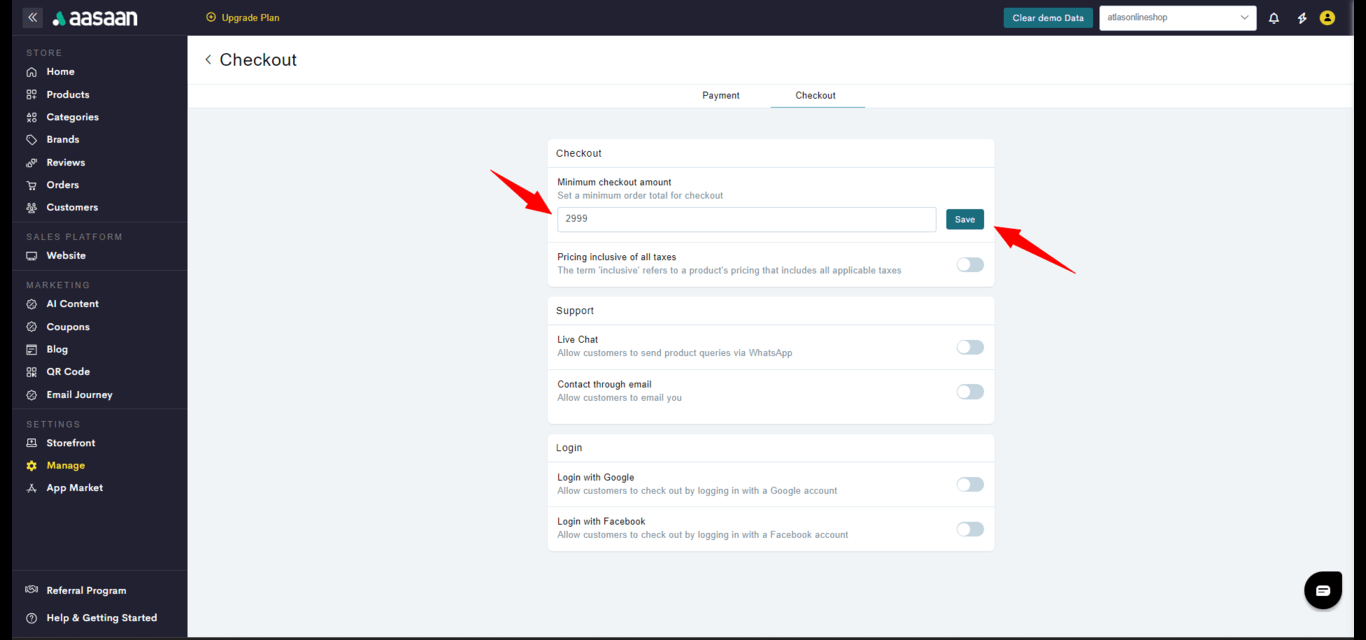
Enter the minimum checkout amount you would like to set for your orders.
Click on Save.
**STEP 3:**
Enter the minimum checkout amount you would like to set for your orders.
Click on Save.
 **STEP 4:**
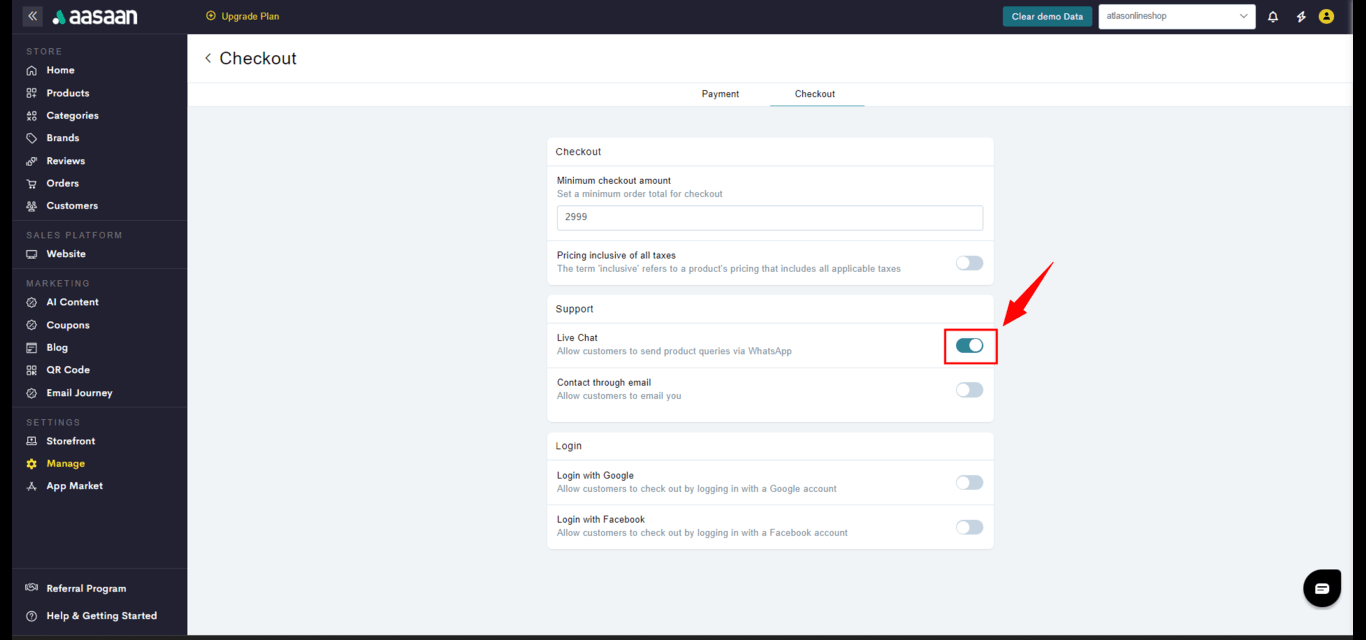
Click on the toggle to enable Live Chat.
If you enable this function, customers will be able to reach out to you through WhatsApp if they have any queries about a product.
**STEP 4:**
Click on the toggle to enable Live Chat.
If you enable this function, customers will be able to reach out to you through WhatsApp if they have any queries about a product.
 **STEP 5:**
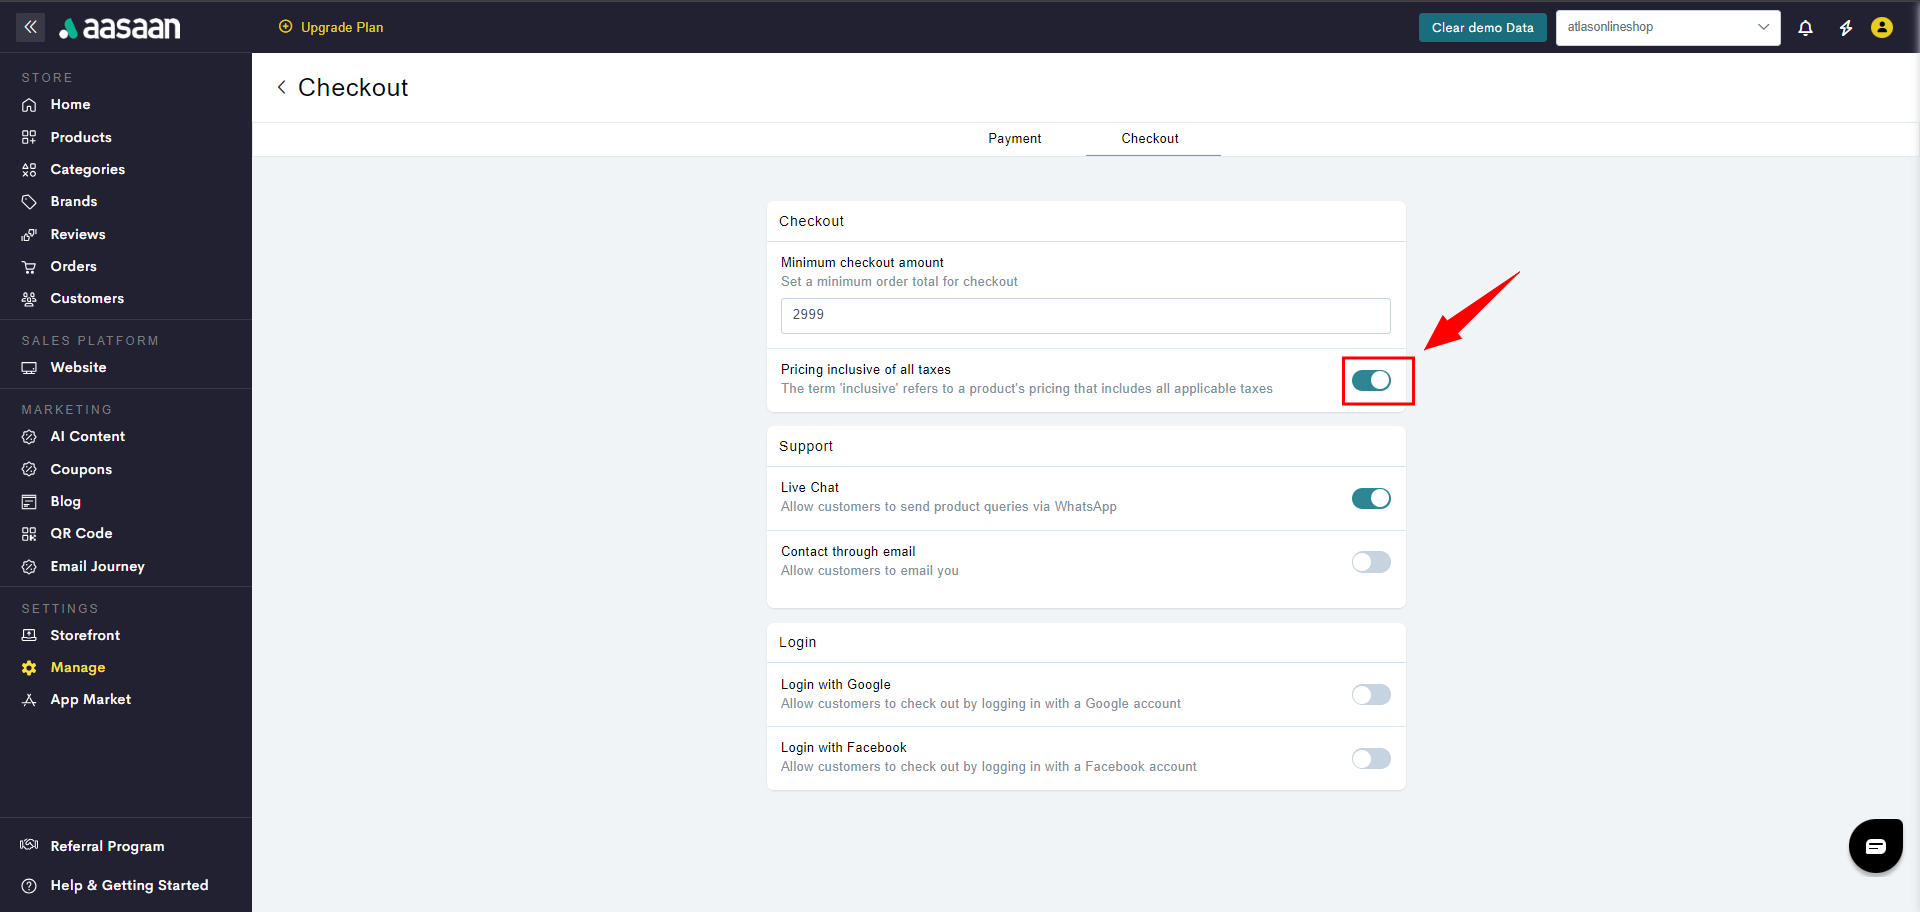
Click on the toggle button to enable Inclusive of All Taxes. If you enable this function, your product price will be displayed including GST on the product page itself.
To show you how it works, this is the price of a product before we enabled "Inclusive of all taxes".
Now this is the price after we enabled "Inclusive of all taxes".
**STEP 5:**
Click on the toggle button to enable Inclusive of All Taxes. If you enable this function, your product price will be displayed including GST on the product page itself.
To show you how it works, this is the price of a product before we enabled "Inclusive of all taxes".
Now this is the price after we enabled "Inclusive of all taxes".
 **STEP 6:**
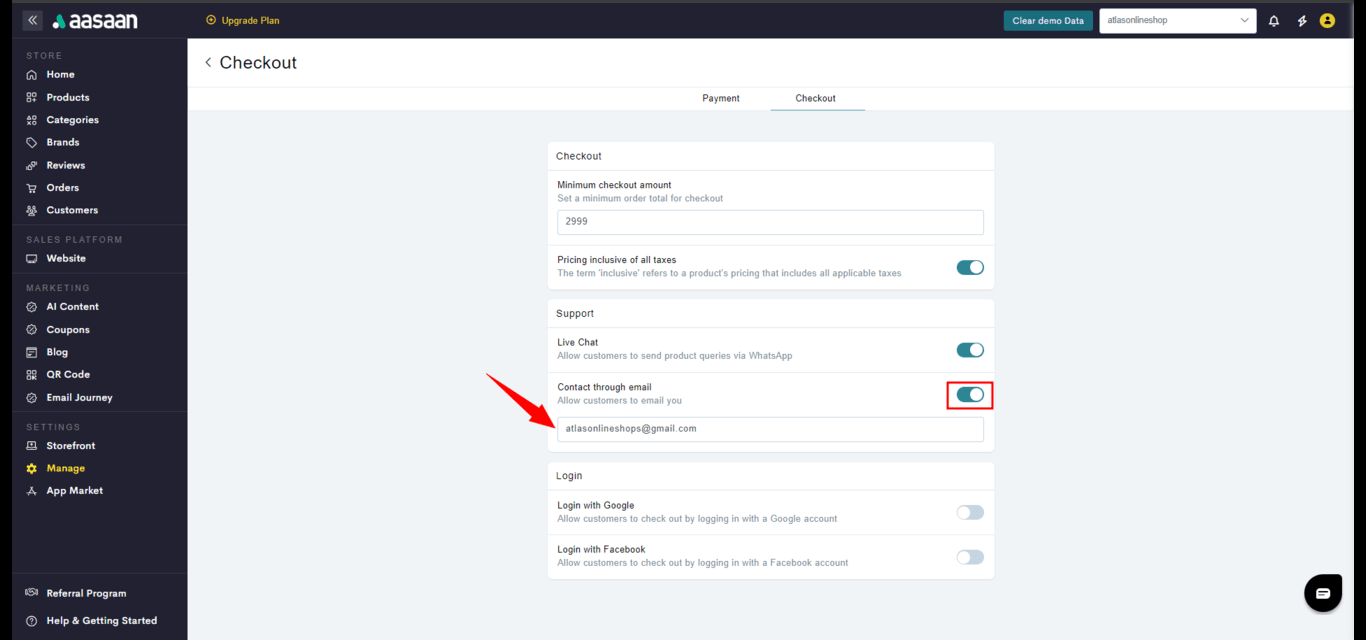
Click on the next toggle button to enable the Contact us with Email feature.
Enter your email address.
Click on Save. Customers will now be able to send you emails.
**STEP 6:**
Click on the next toggle button to enable the Contact us with Email feature.
Enter your email address.
Click on Save. Customers will now be able to send you emails.
 **STEP 7:**
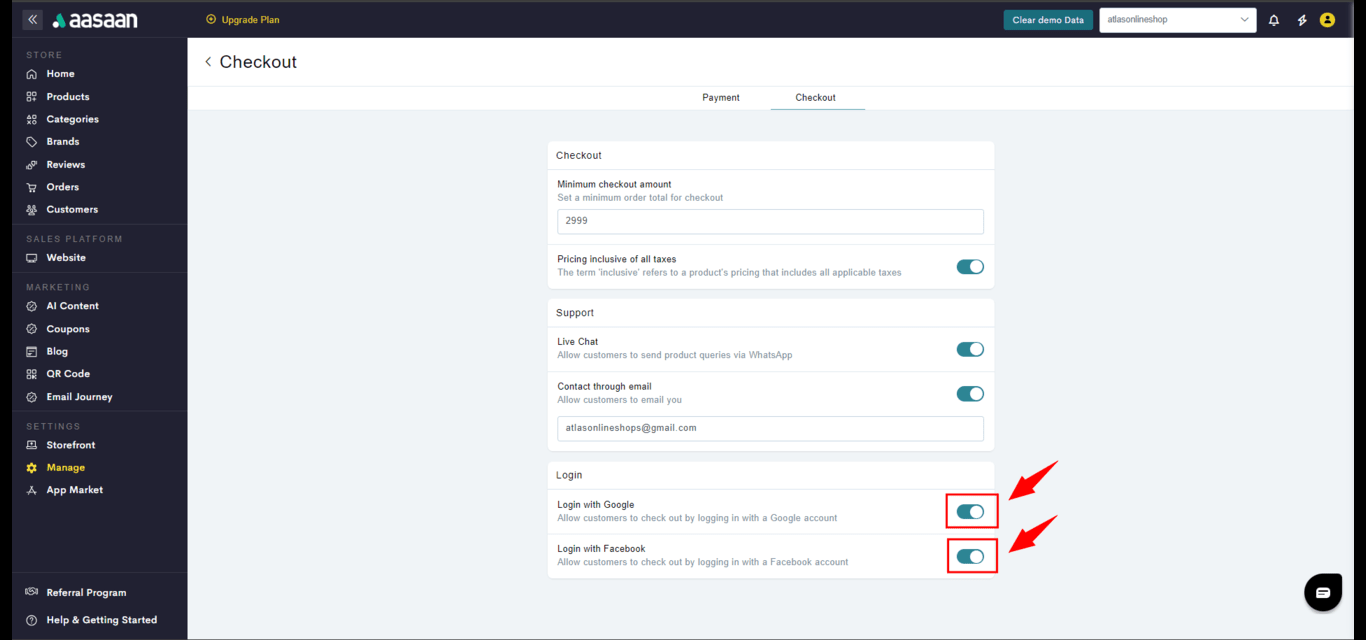
Click on the toggle to enable the Login with Phone Number.
Similarly, you can enable Signup with Email, Google and Facebook. This way, your customers will have multiple ways to login during checkout.
You have successfully configured your checkout settings.
**STEP 7:**
Click on the toggle to enable the Login with Phone Number.
Similarly, you can enable Signup with Email, Google and Facebook. This way, your customers will have multiple ways to login during checkout.
You have successfully configured your checkout settings.
 ## Warehouse & Shipping Settings
In this section, you will learn how to manage warehouses and shipping settings.
### Warehouses
Here is how you add your store location.
**STEP 1:**
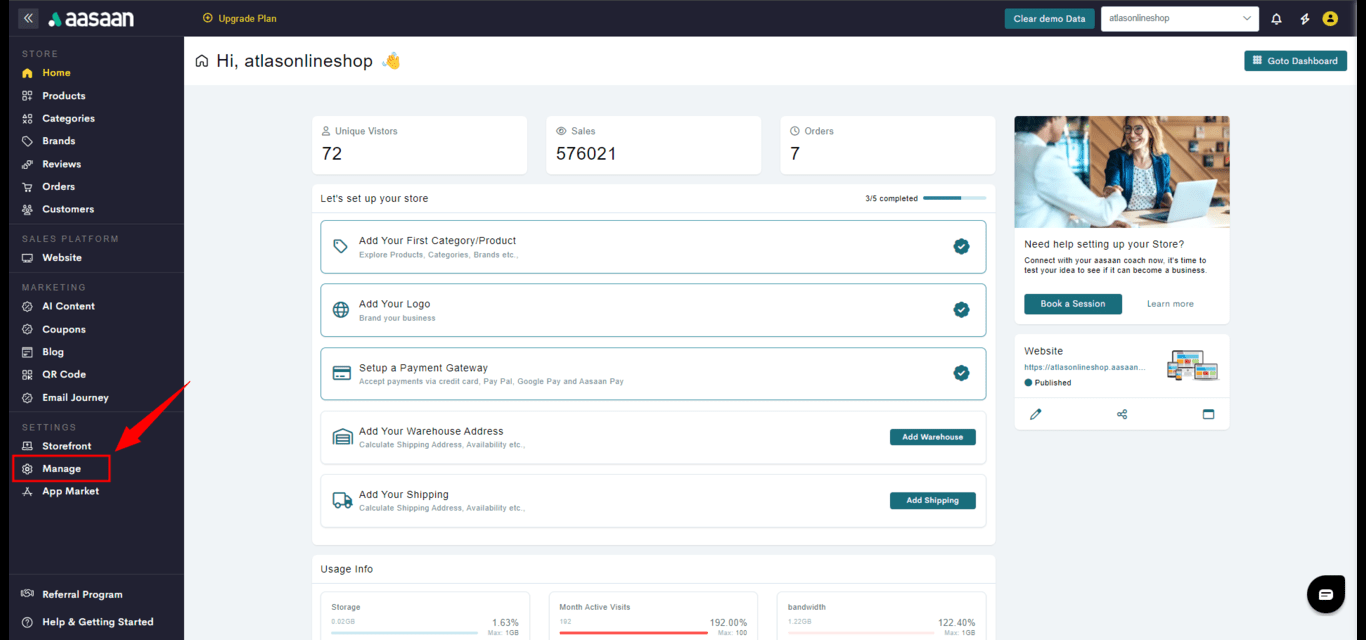
Login to your aasaan desktop admin panel and click on Manage.
## Warehouse & Shipping Settings
In this section, you will learn how to manage warehouses and shipping settings.
### Warehouses
Here is how you add your store location.
**STEP 1:**
Login to your aasaan desktop admin panel and click on Manage.
 **STEP 2:**
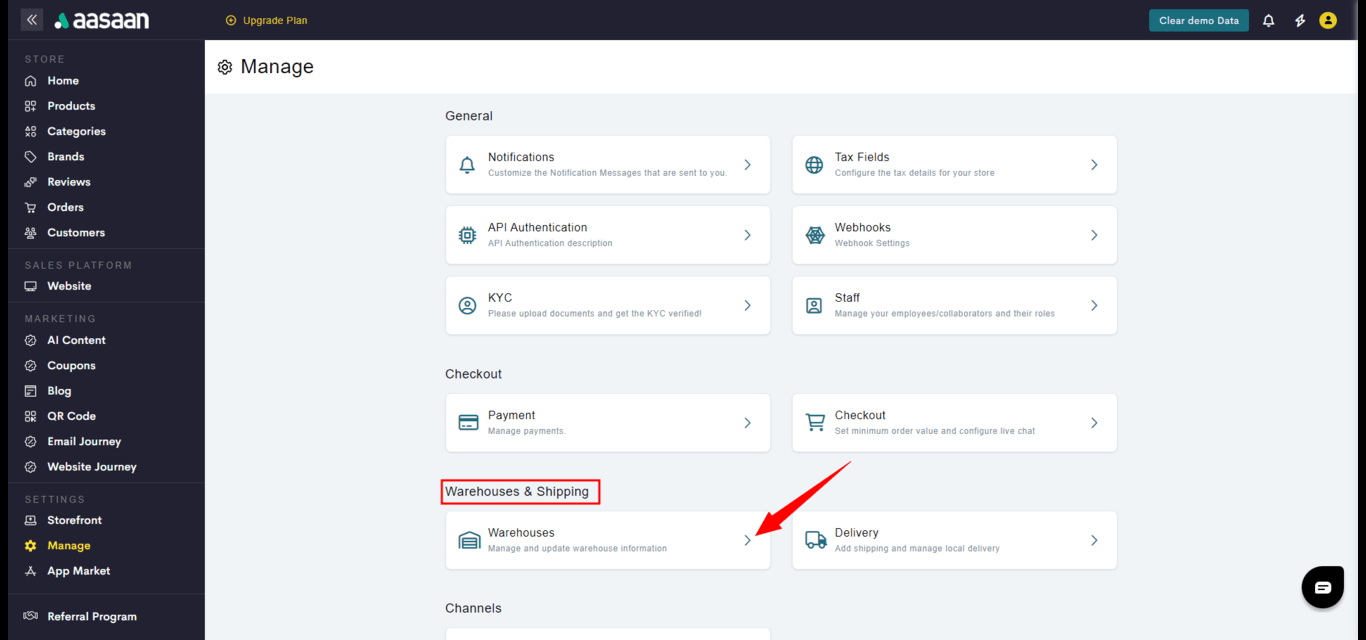
Click on Warehouses.
**STEP 2:**
Click on Warehouses.
 **STEP 3:**
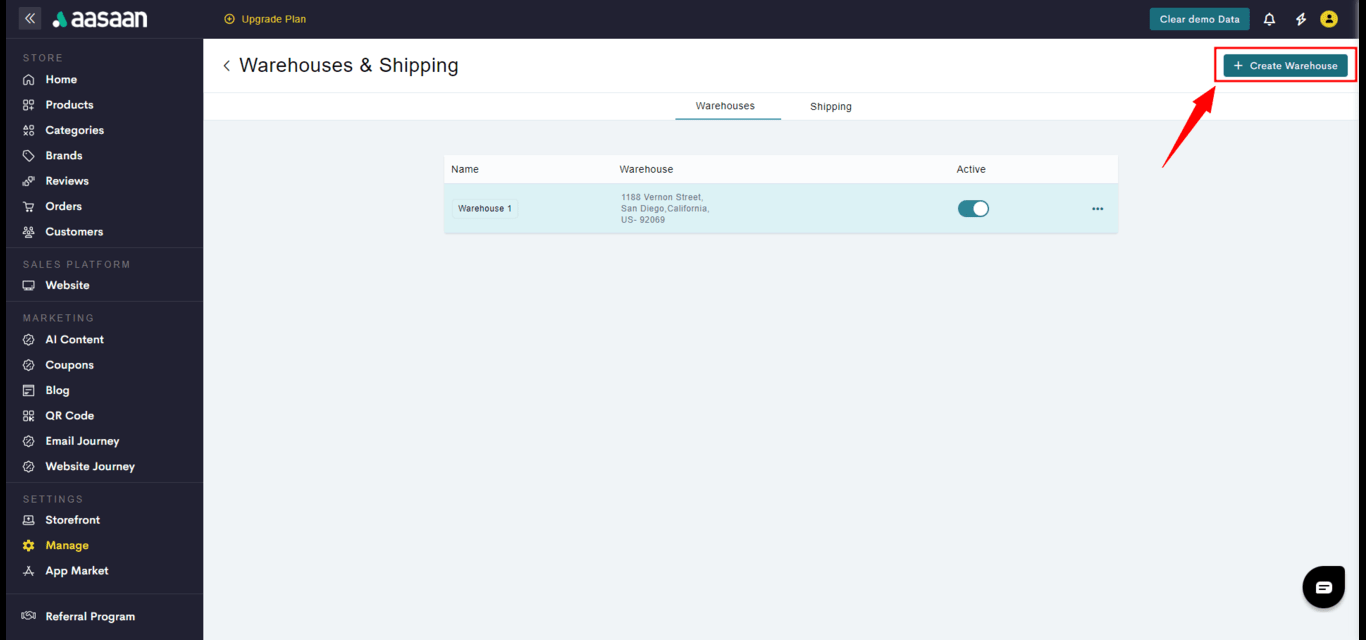
To create a warehouse, click the **+ Create Warehouse**
**STEP 3:**
To create a warehouse, click the **+ Create Warehouse**
 A warehouse would already be created by default during the signup process. To add the address, click on the Edit button.
**STEP 4:**
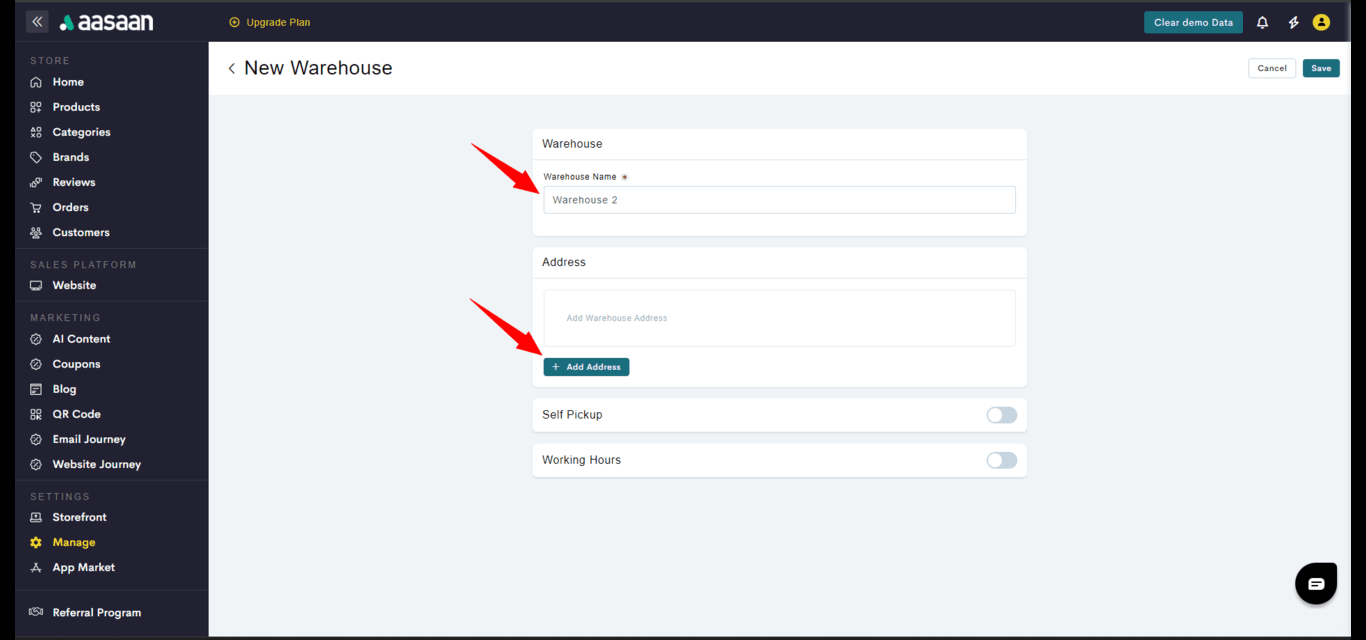
Click on Add Address to add your warehouse address. You can also edit the name of your warehouse.
A warehouse would already be created by default during the signup process. To add the address, click on the Edit button.
**STEP 4:**
Click on Add Address to add your warehouse address. You can also edit the name of your warehouse.
 **STEP 5:**
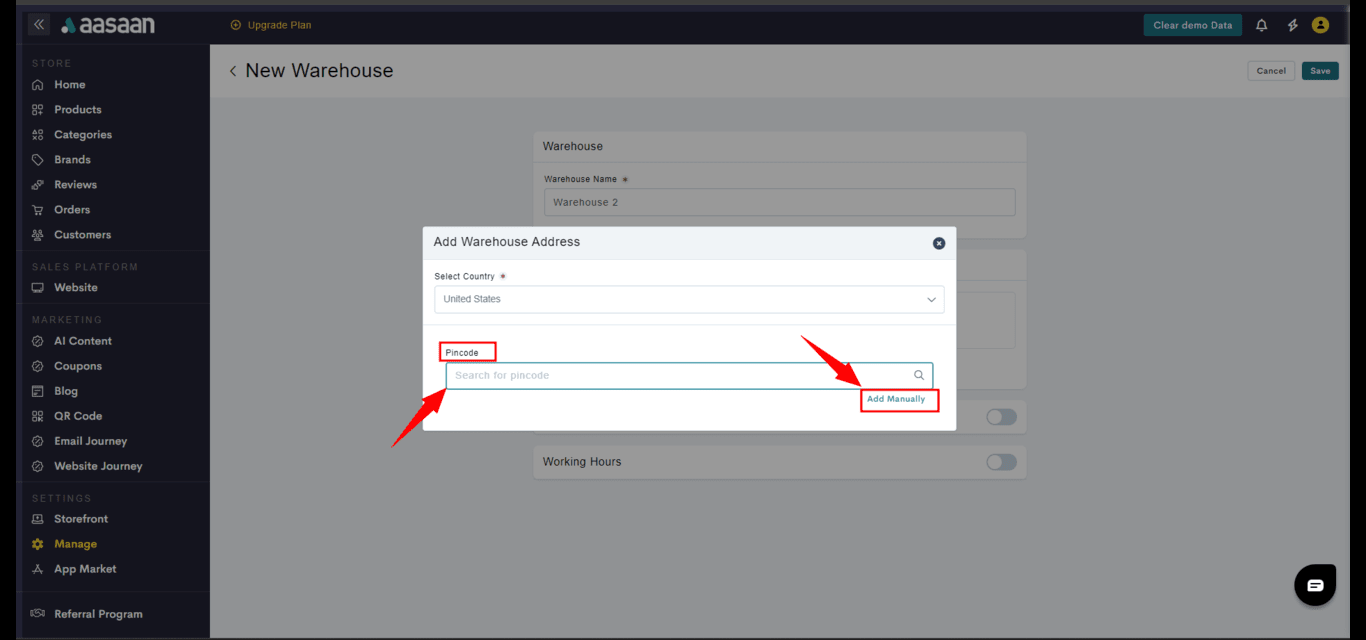
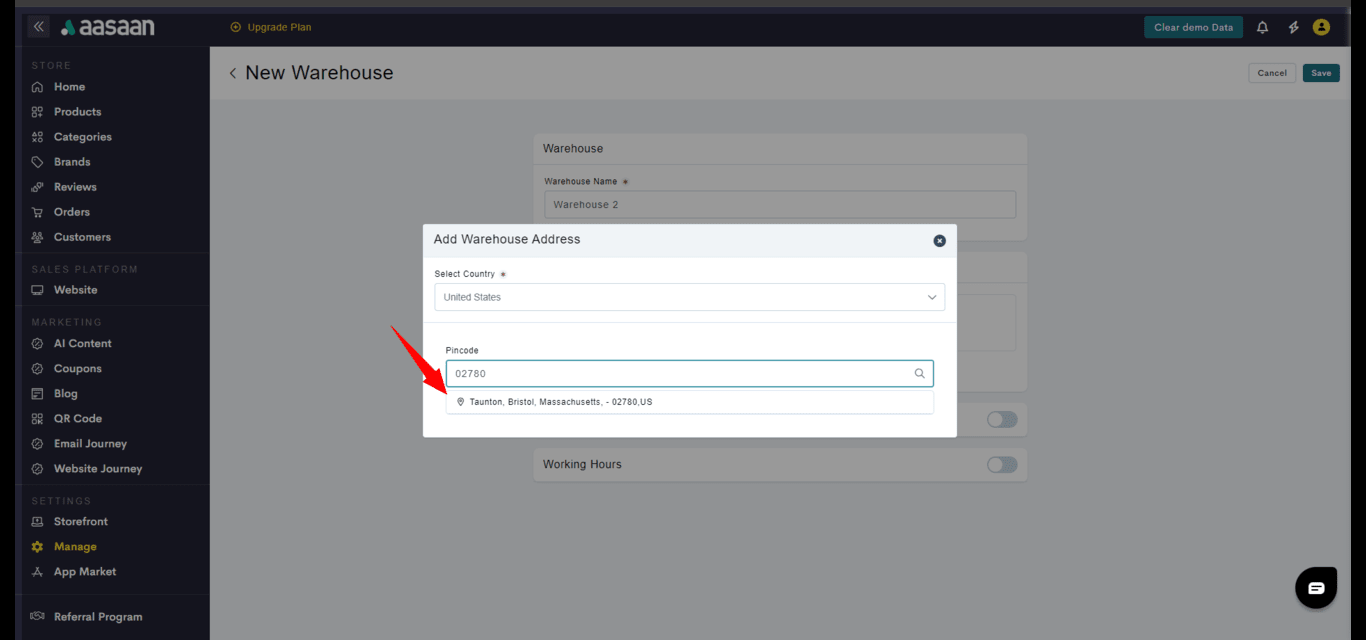
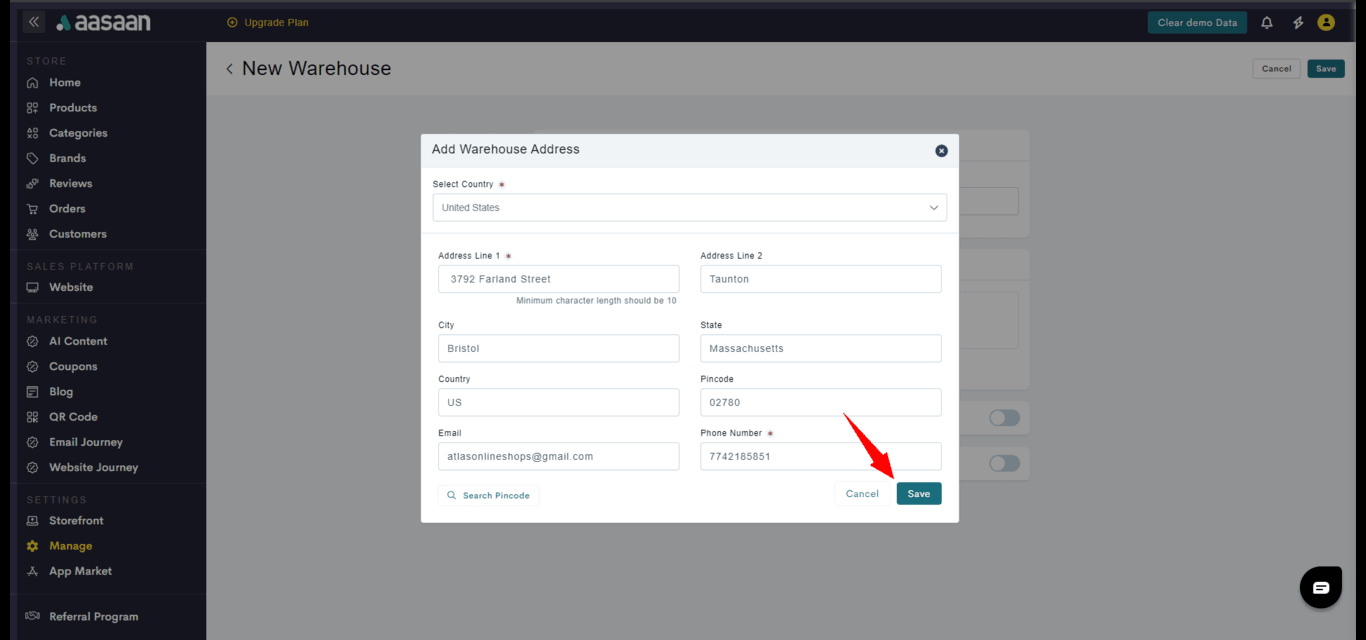
Enter your postal code and choose the appropriate locality. Enter your complete address and contact information and click on Save.
**STEP 5:**
Enter your postal code and choose the appropriate locality. Enter your complete address and contact information and click on Save.
 **STEP 6:**
Then click on Save.
**STEP 6:**
Then click on Save.
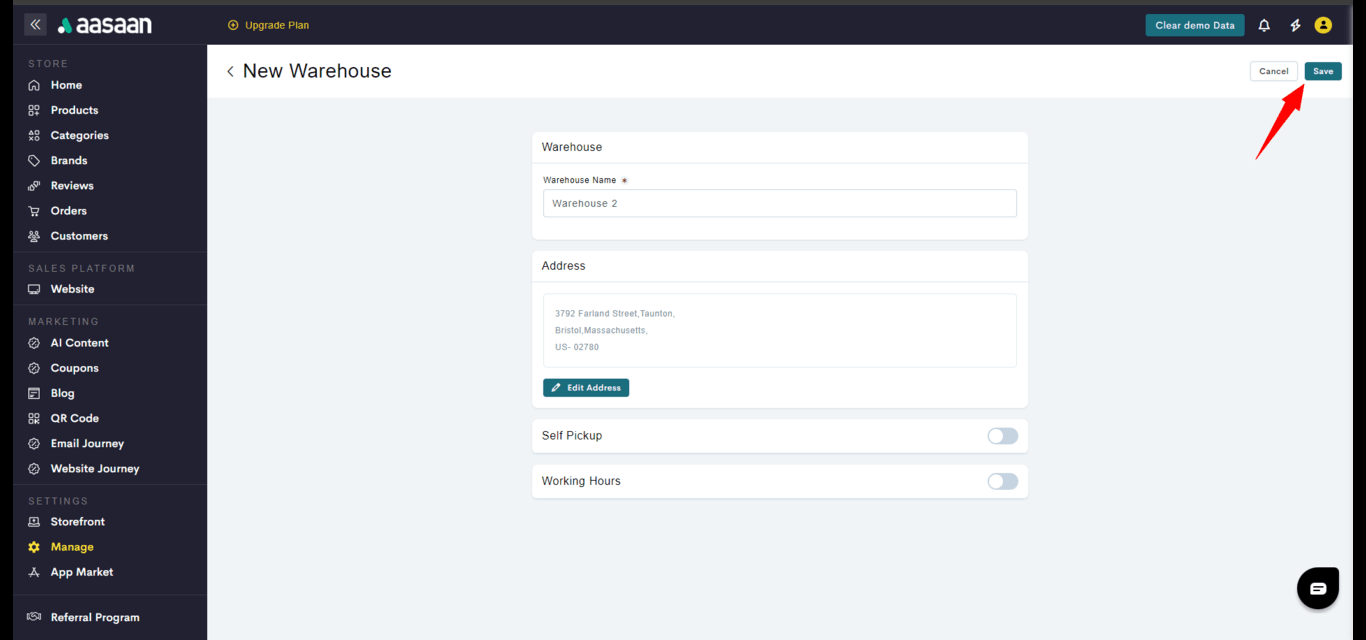 You can also enable store pickup option, if you want your customers to come and pickup the order at your warehouse address.
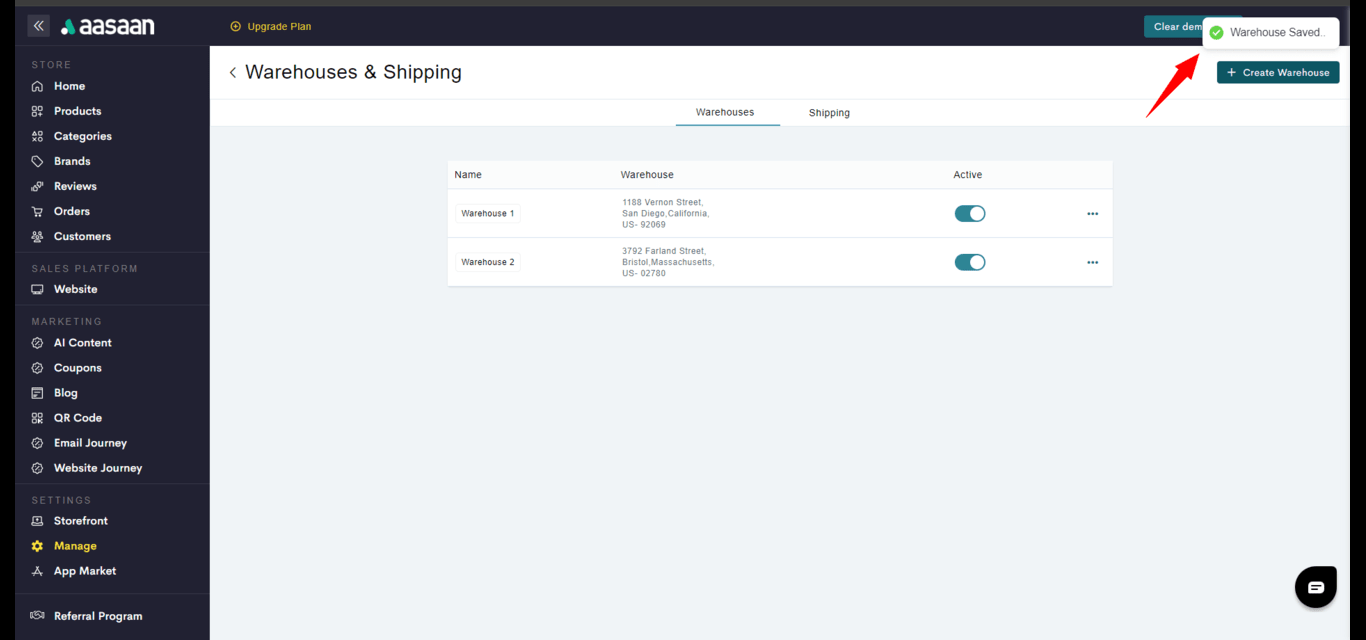
**STEP 7:**
Your have successfully added your store warehouse address.
You can also enable store pickup option, if you want your customers to come and pickup the order at your warehouse address.
**STEP 7:**
Your have successfully added your store warehouse address.
 ### Delivery
In this section, you will learn how to configure your delivery settings. The steps for doing so are as follows:
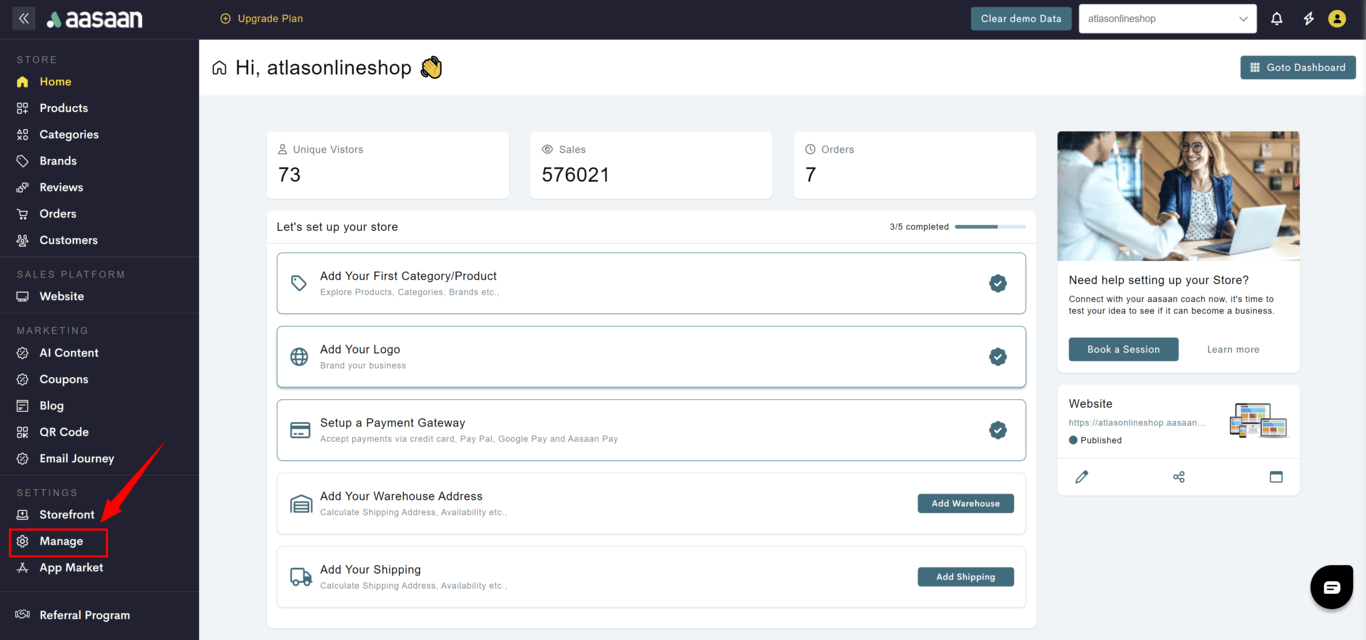
**STEP 1:**
Login to your aasaan desktop admin panel and click on Manage.
### Delivery
In this section, you will learn how to configure your delivery settings. The steps for doing so are as follows:
**STEP 1:**
Login to your aasaan desktop admin panel and click on Manage.
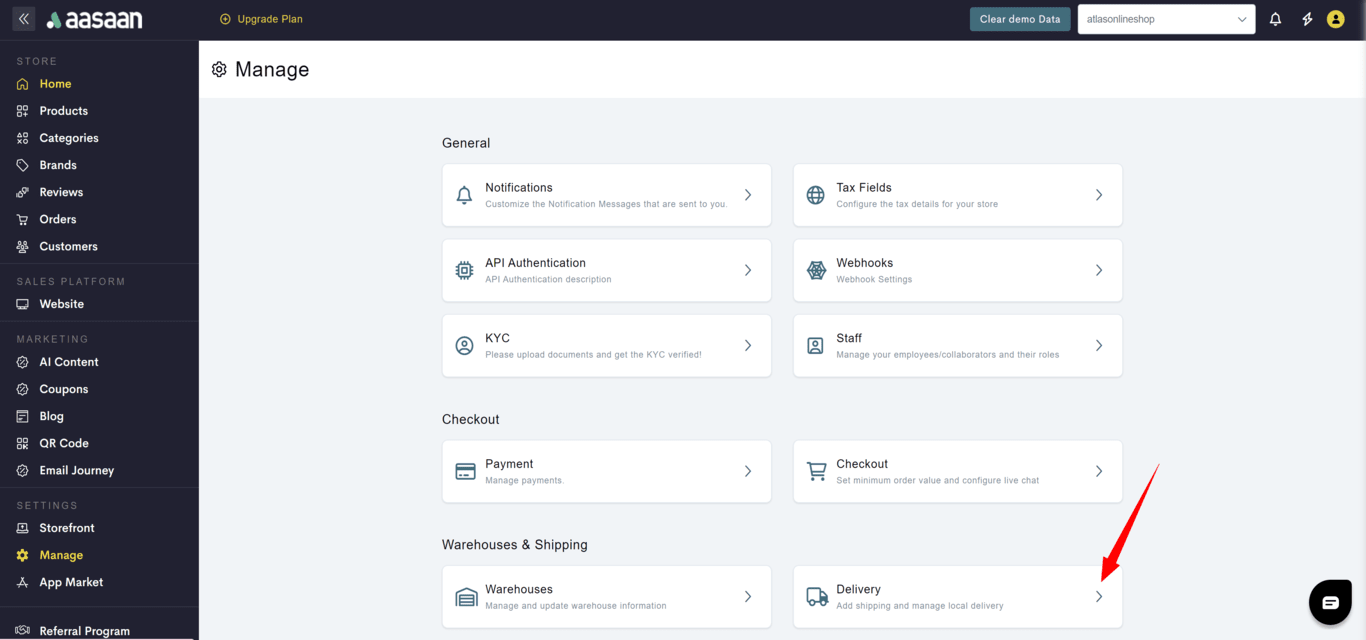
 **STEP 2:**
Click on Delivery Settings.
**STEP 2:**
Click on Delivery Settings.
 **STEP 3:**
Click on Add Shipping Method.
**STEP 3:**
Click on Add Shipping Method.
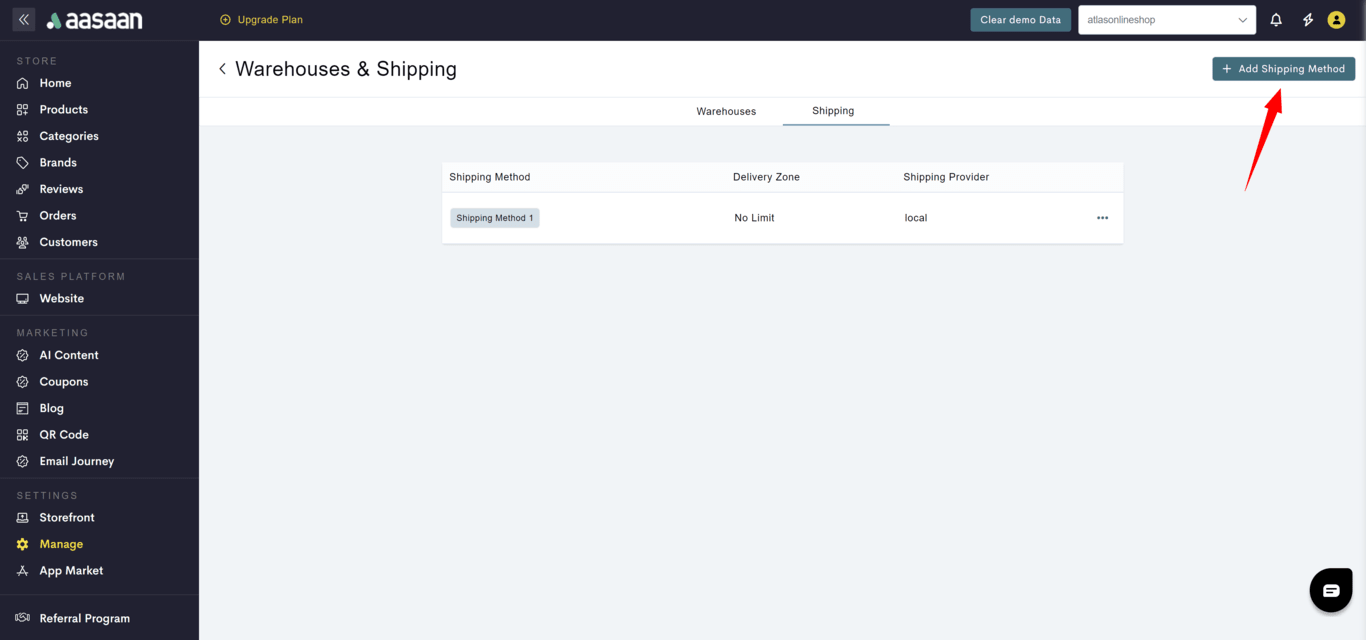 Here you can configure your delivery settings for your store. Enter the name of the shipping method, and select the warehouse(s) it will apply to.
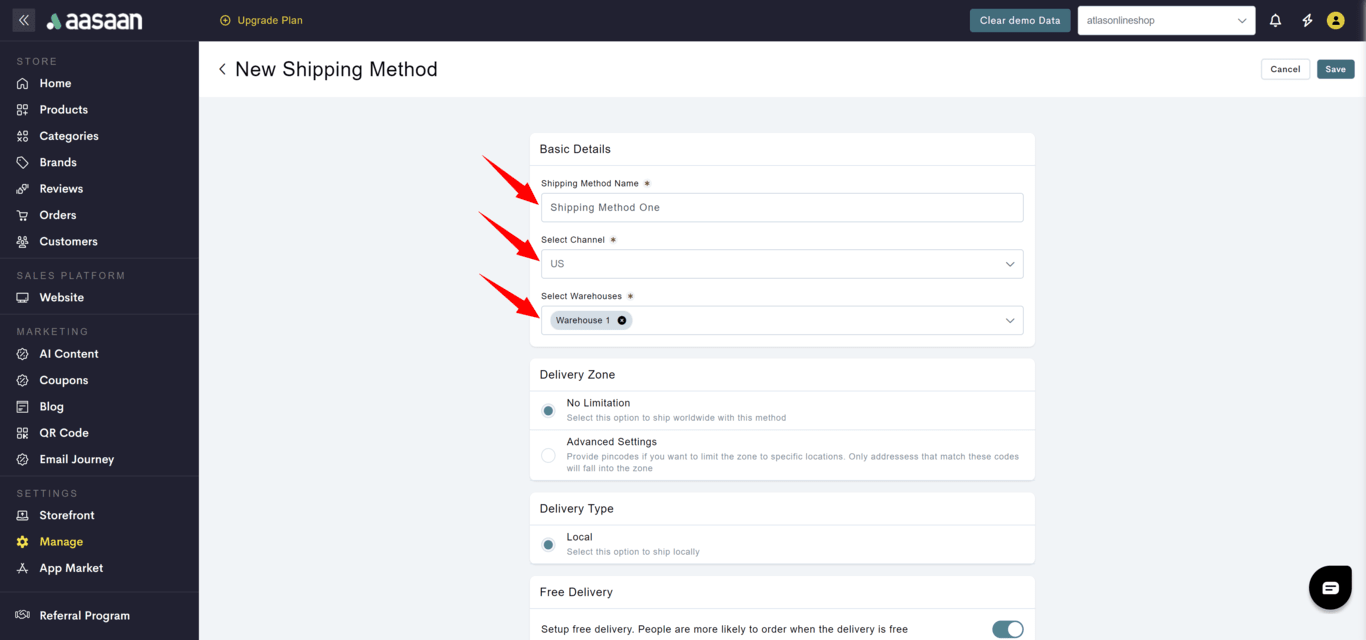 The below section provides information on how to setup:
If you want your shipping rates to be free, here is how you do it.
**STEP 1:**
Create a new shipping method. You can learn how to do so in the parent article of this section: [How to create a shipping method](#delivery).
**STEP 2:**
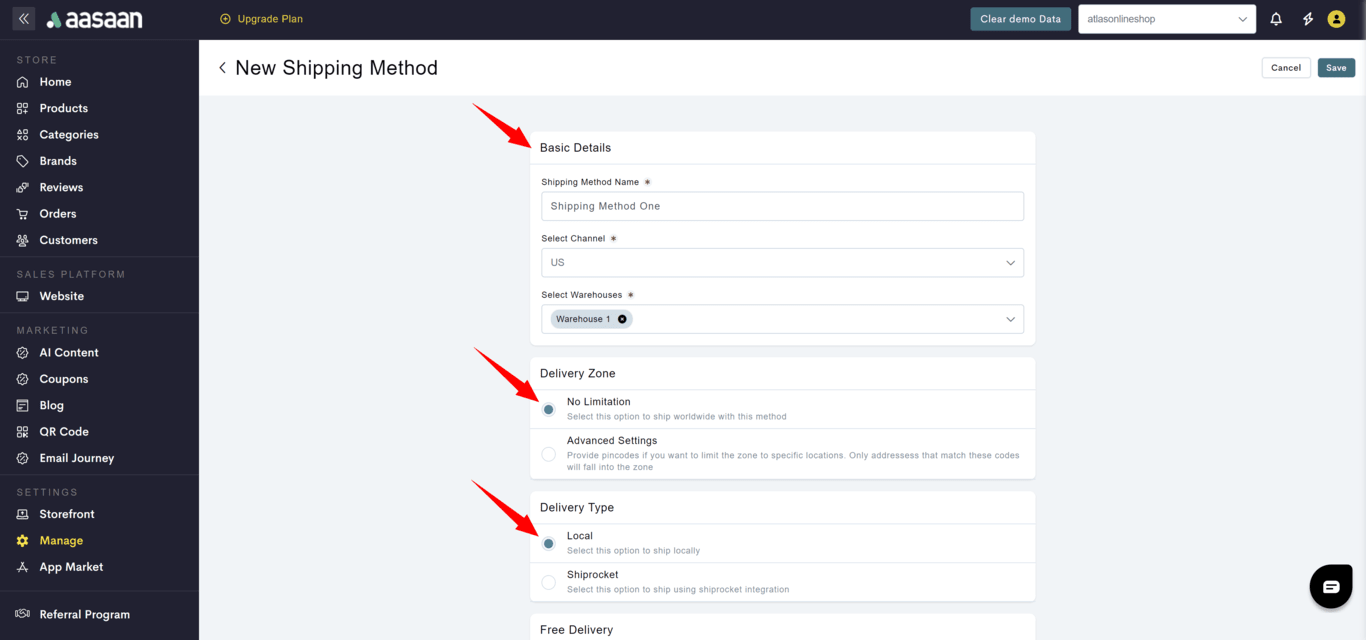
Enter the shipping method details (name and warehouse). Then specify the delivery zone. Since we are applying this shipping method worldwide, we will select No Limitation. Finally, we will select the delivery type. Here we will select Local. You can choose a shipping integration like Shiprocket if you prefer.
The below section provides information on how to setup:
If you want your shipping rates to be free, here is how you do it.
**STEP 1:**
Create a new shipping method. You can learn how to do so in the parent article of this section: [How to create a shipping method](#delivery).
**STEP 2:**
Enter the shipping method details (name and warehouse). Then specify the delivery zone. Since we are applying this shipping method worldwide, we will select No Limitation. Finally, we will select the delivery type. Here we will select Local. You can choose a shipping integration like Shiprocket if you prefer.
 **STEP 3:**
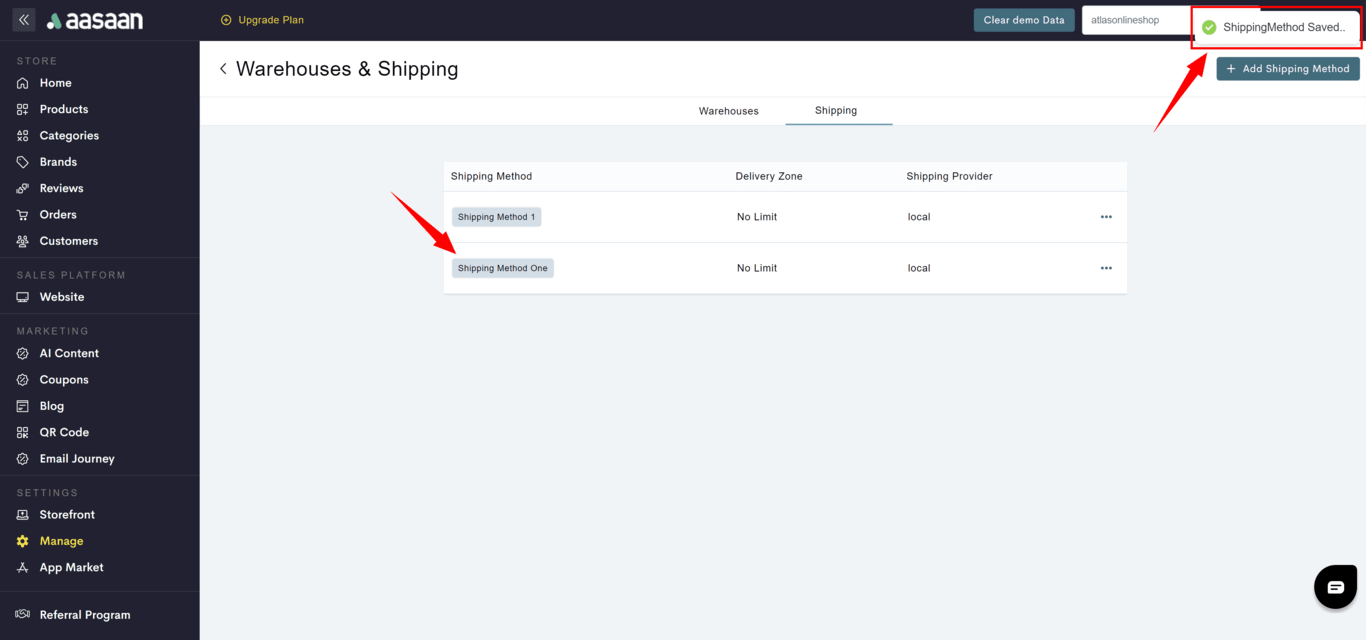
Since the Free Delivery toggle is enabled by default, click on Save.
**STEP 3:**
Since the Free Delivery toggle is enabled by default, click on Save.
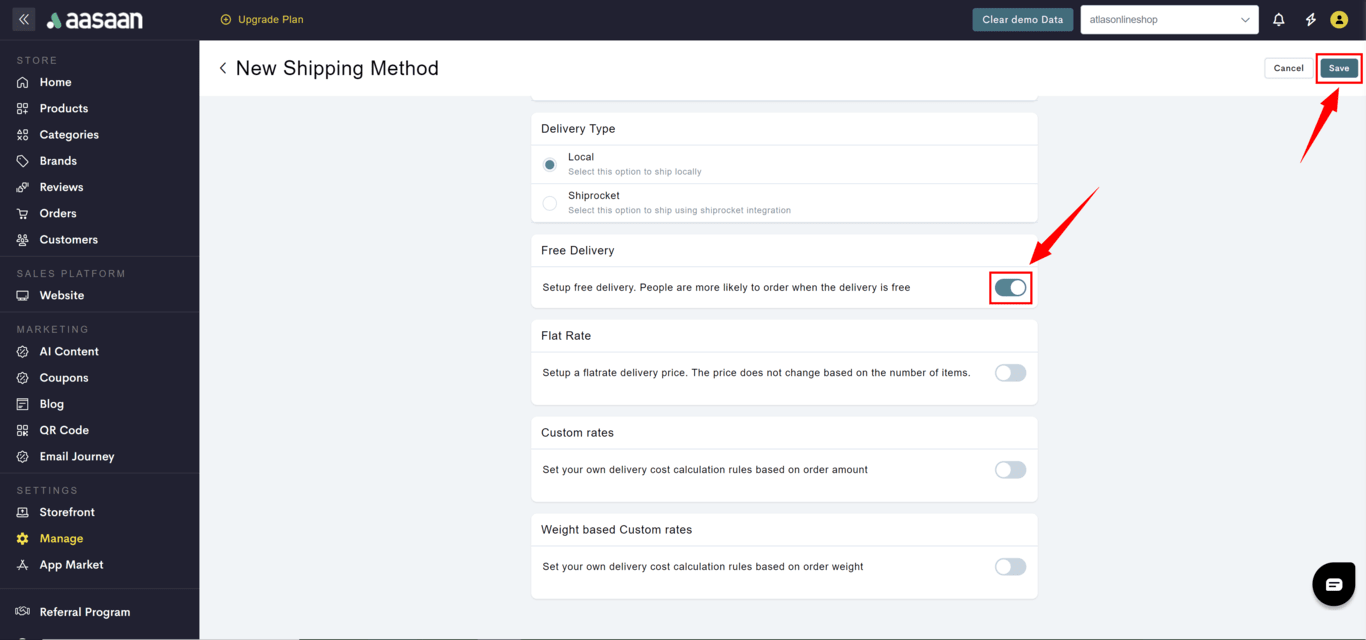 Your shipping method has been saved.
 If you want to set flat shipping rates, here is how you do it.
**STEP 1:**
Create a new shipping method. You can learn how to do so in the parent article of this section: [How to create a shipping method](#delivery).
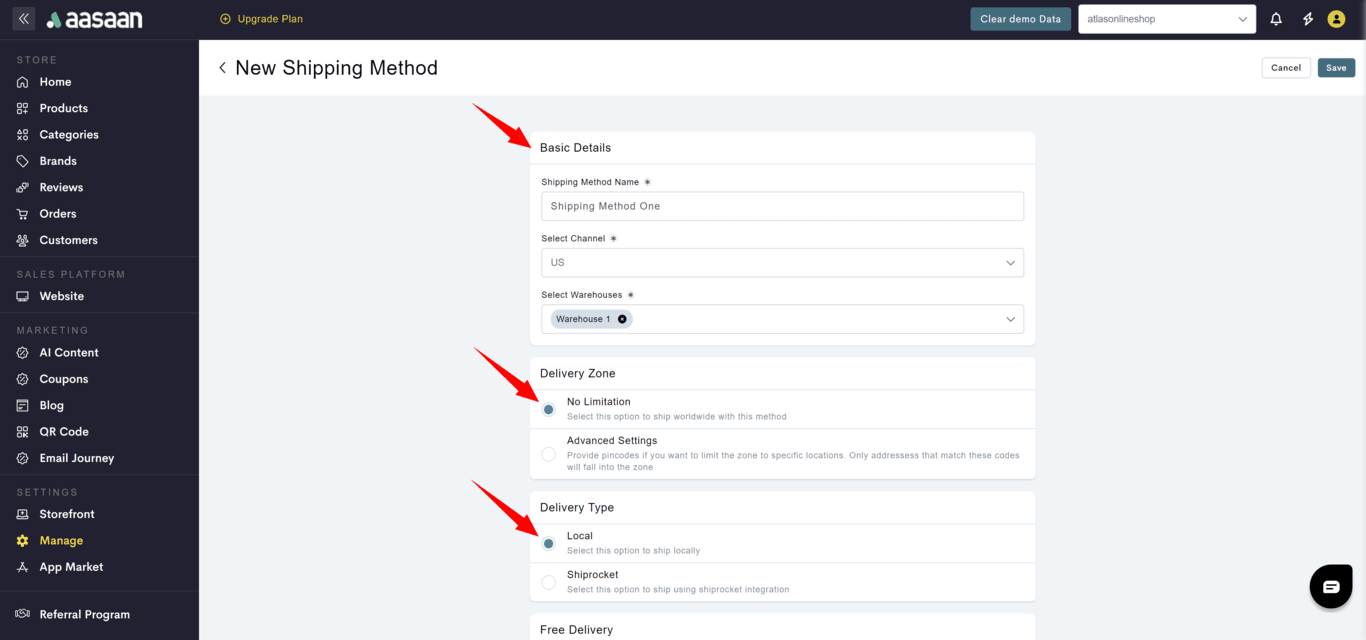
**STEP 2:**
Enter the shipping method details (name and warehouse). Then specify the delivery zone. Since we are applying this shipping method worldwide, we will select No Limitation. Finally, we will select the delivery type. Here we will select Local. You can choose a shipping integration like Shiprocket if you prefer.
If you want to set flat shipping rates, here is how you do it.
**STEP 1:**
Create a new shipping method. You can learn how to do so in the parent article of this section: [How to create a shipping method](#delivery).
**STEP 2:**
Enter the shipping method details (name and warehouse). Then specify the delivery zone. Since we are applying this shipping method worldwide, we will select No Limitation. Finally, we will select the delivery type. Here we will select Local. You can choose a shipping integration like Shiprocket if you prefer.
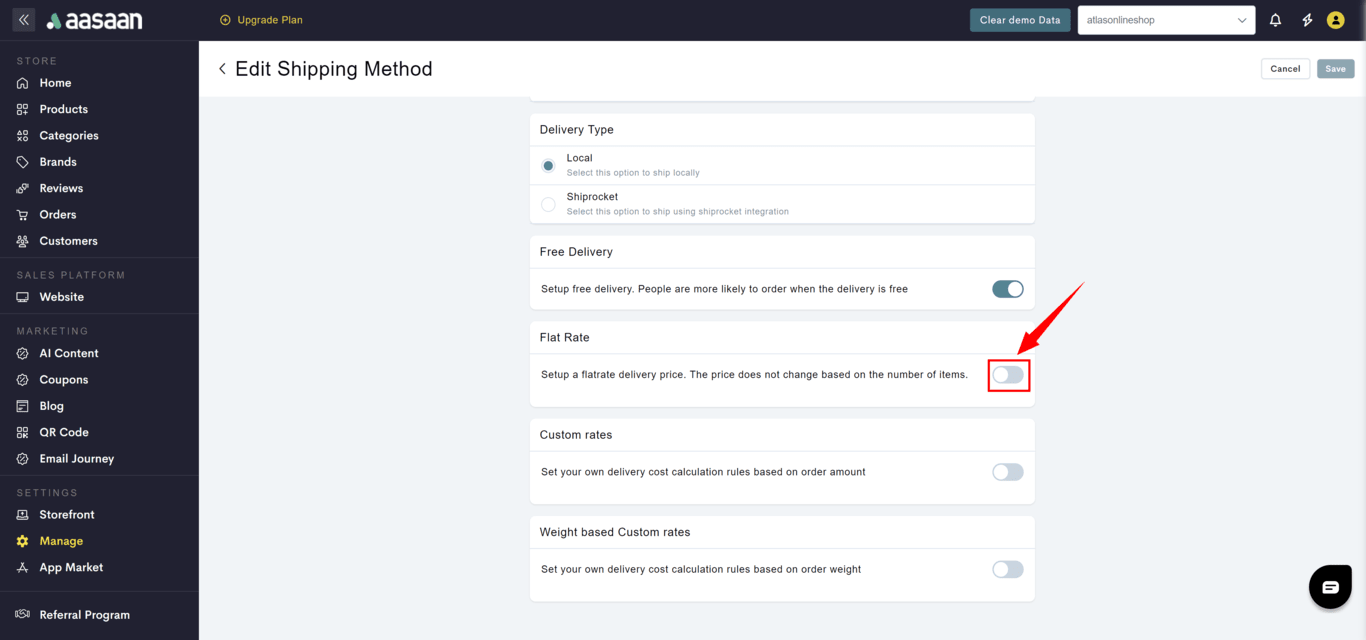
 **STEP 3:**
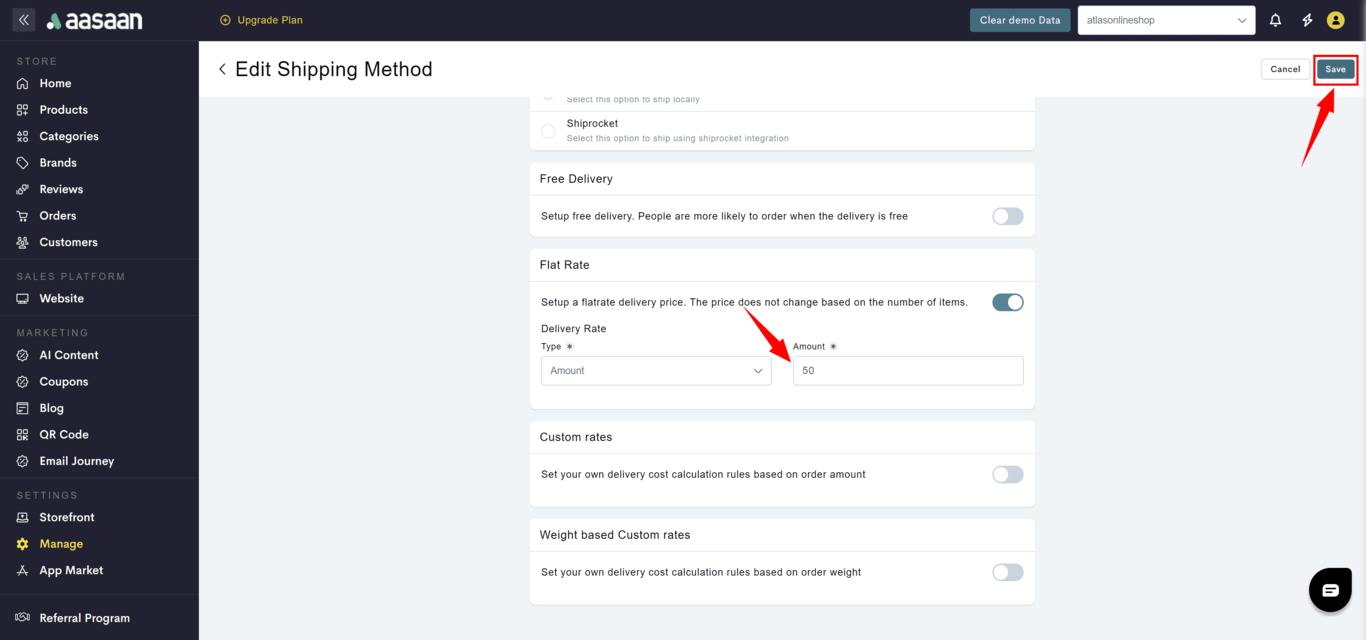
Enable Flat rate.
**STEP 3:**
Enable Flat rate.
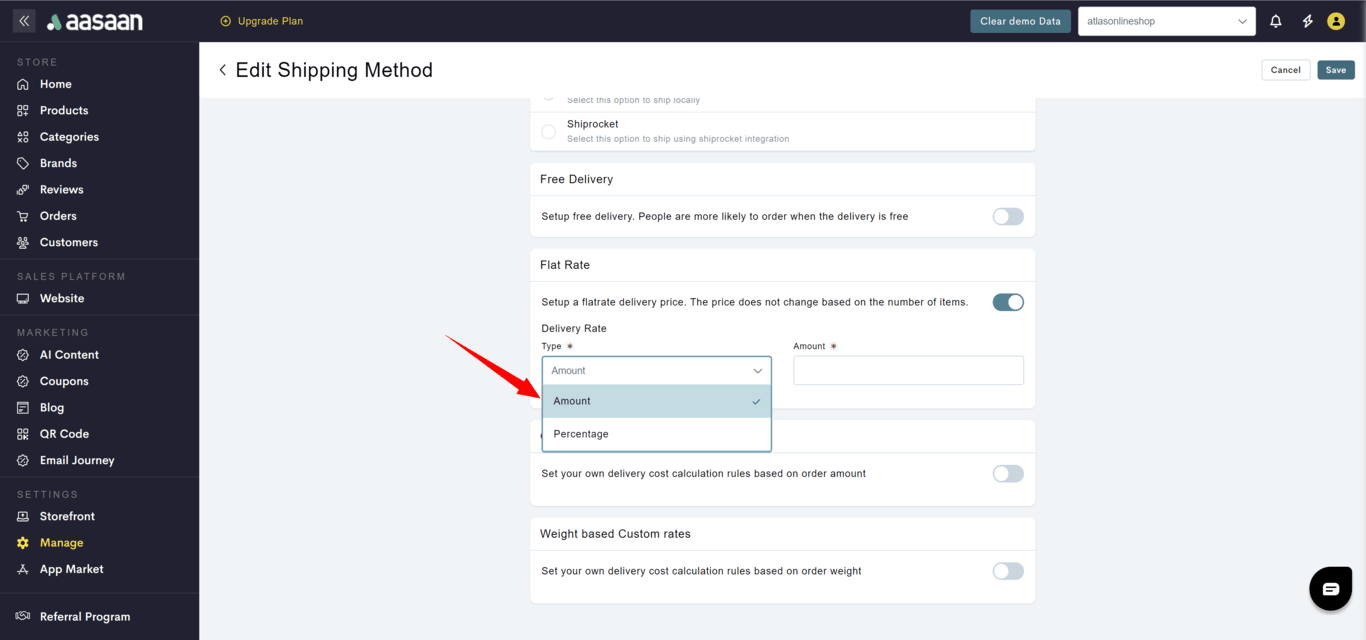
 **STEP 4:**
Then set the flat rate. You can choose to have either a fixed amount or a percentage value and provide the shipping rate. click on Save.
**STEP 4:**
Then set the flat rate. You can choose to have either a fixed amount or a percentage value and provide the shipping rate. click on Save.
 **STEP 5:**
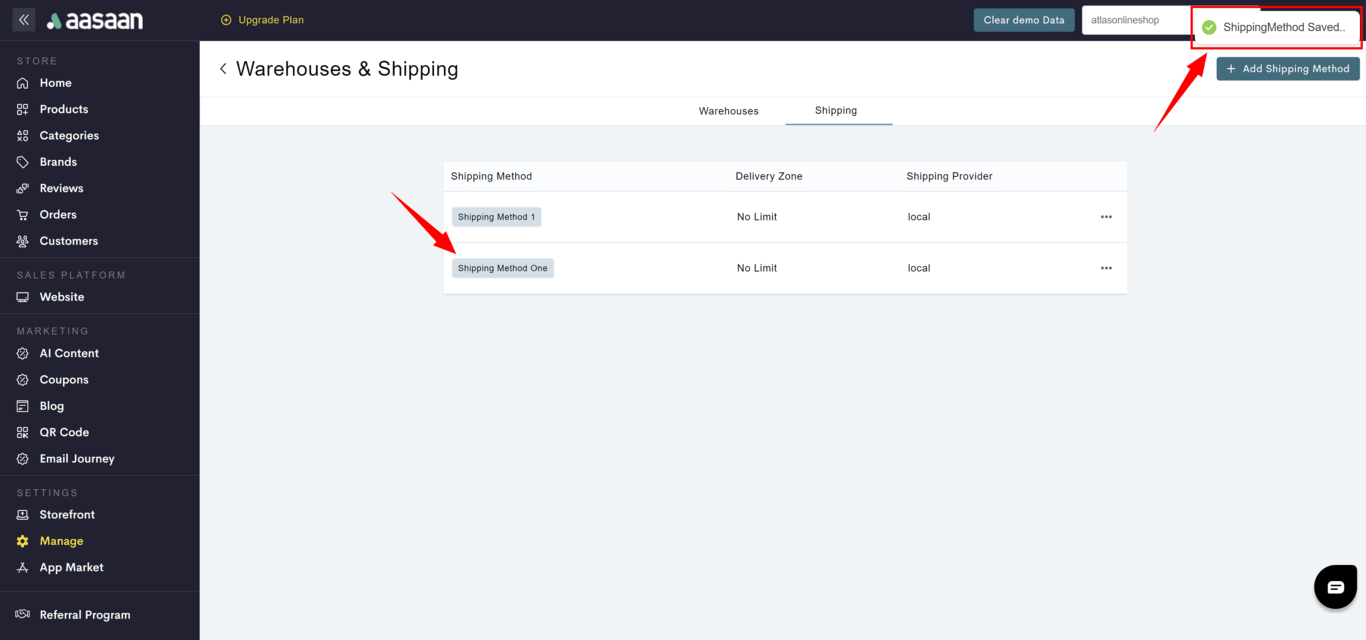
Your shipping method has been saved. You have successfully set flat shipping rates for your products.
**STEP 5:**
Your shipping method has been saved. You have successfully set flat shipping rates for your products.
 If you want to set custom shipping rates as per order value, here is how you do it.
**STEP 1:**
Create a new shipping method. You can learn how to do so in the parent article of this section: [How to create a shipping method](#delivery).
**STEP 2:**
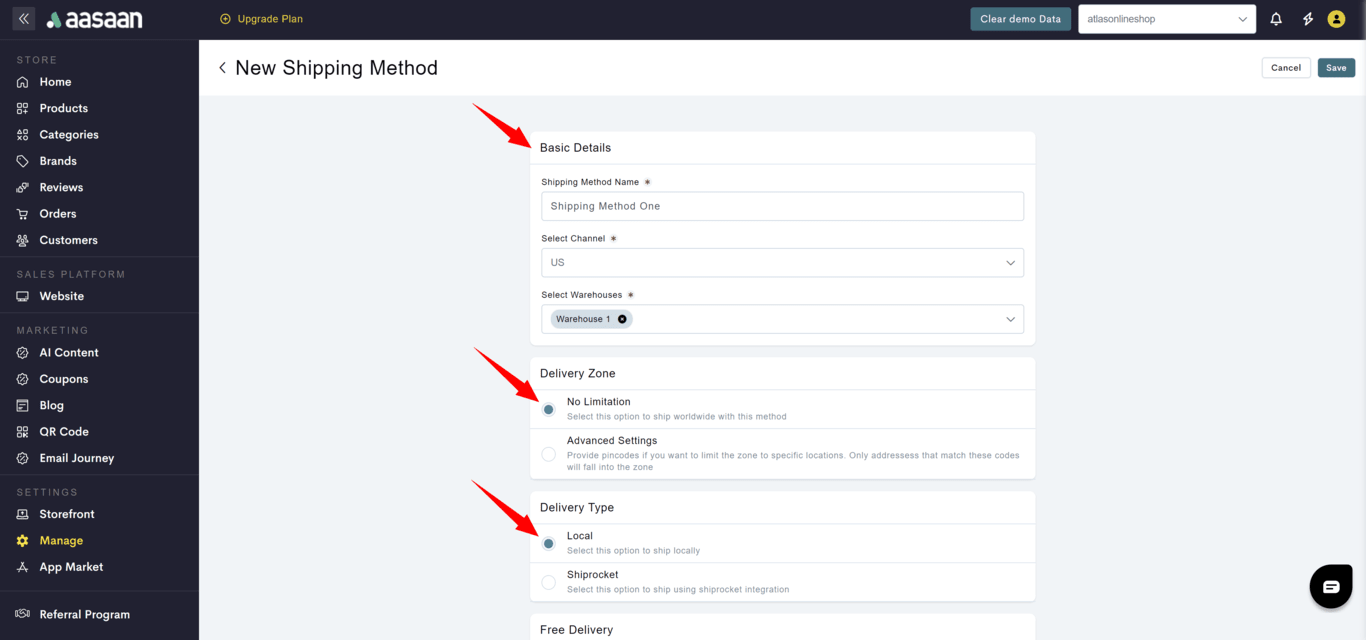
Enter the shipping method details (name and warehouse). Then specify the delivery zone. Since we are applying this shipping method worldwide, we will select No Limitation. Finally, we will select the delivery type. Here we will select Local. You can choose a shipping integration like Shiprocket if you prefer.
If you want to set custom shipping rates as per order value, here is how you do it.
**STEP 1:**
Create a new shipping method. You can learn how to do so in the parent article of this section: [How to create a shipping method](#delivery).
**STEP 2:**
Enter the shipping method details (name and warehouse). Then specify the delivery zone. Since we are applying this shipping method worldwide, we will select No Limitation. Finally, we will select the delivery type. Here we will select Local. You can choose a shipping integration like Shiprocket if you prefer.
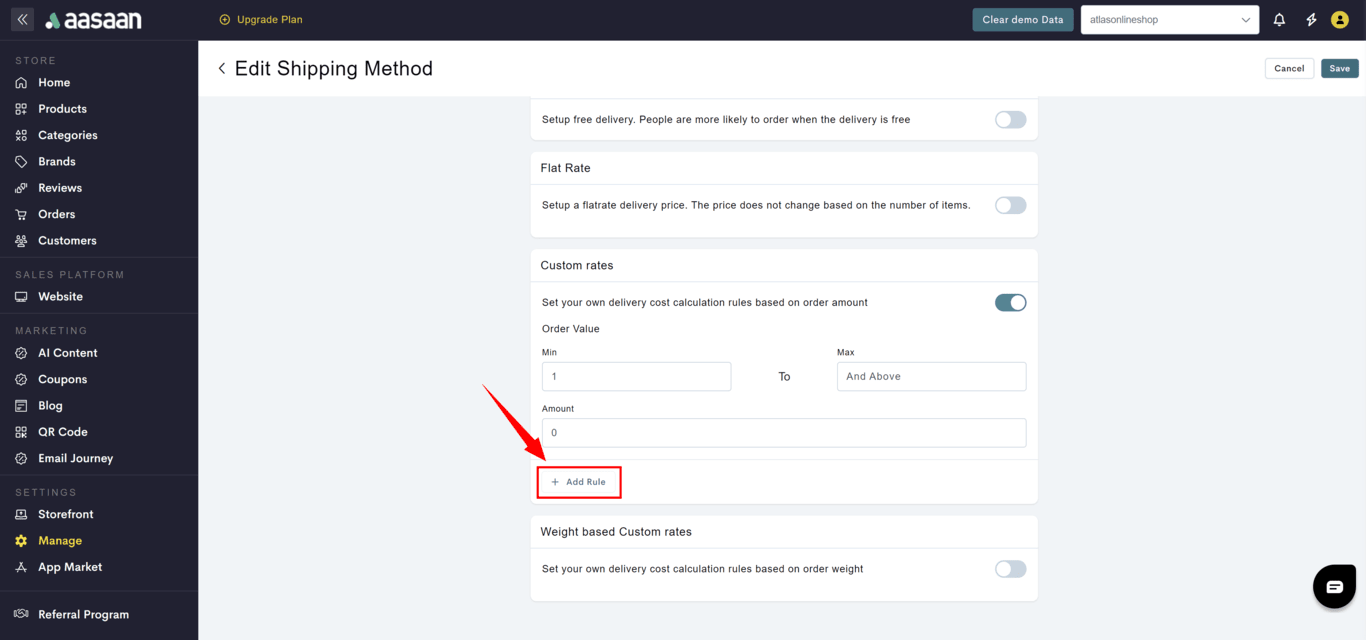
 **STEP 3:**
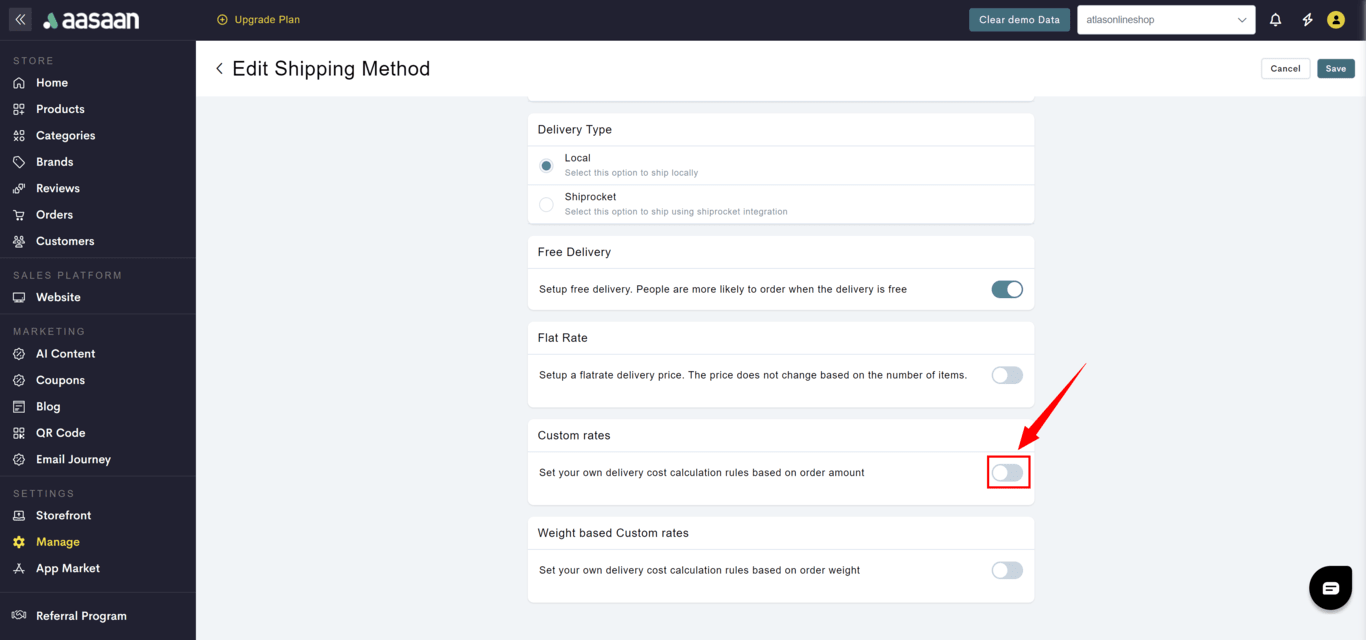
Scroll down and enable Custom rates.
**STEP 3:**
Scroll down and enable Custom rates.
 **STEP 4:**
Click on Add Rule to create ranges for your order values.
**STEP 4:**
Click on Add Rule to create ranges for your order values.
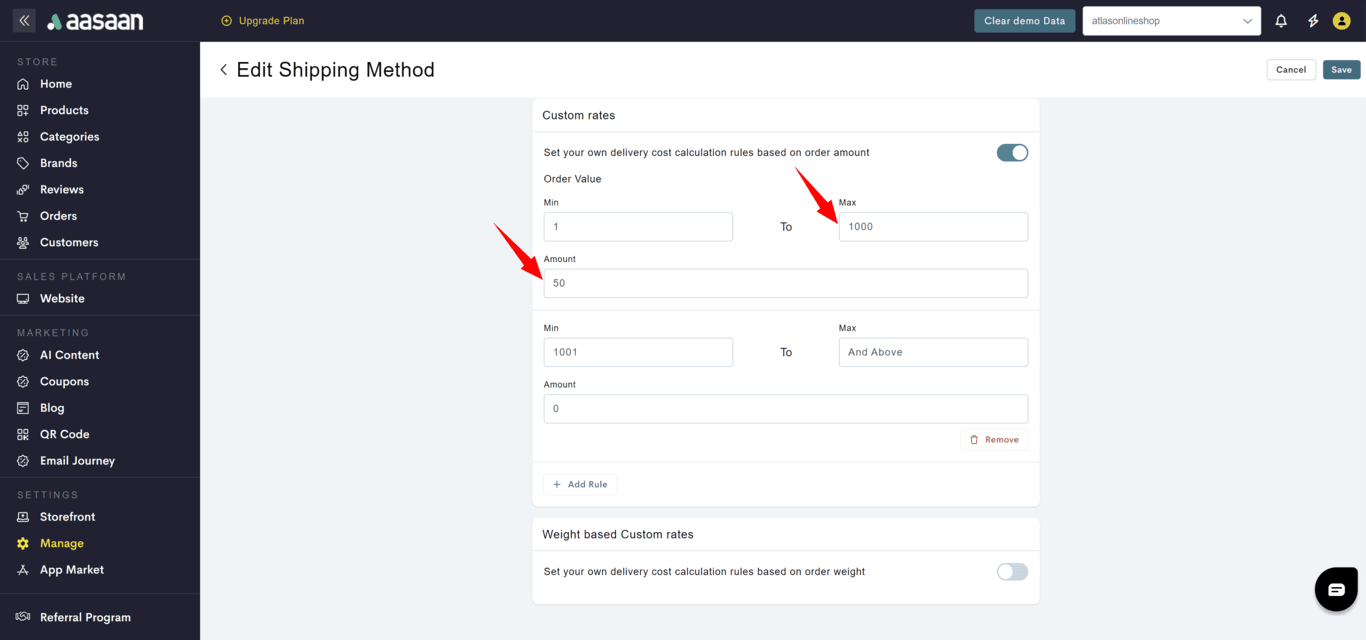
 You can set specific shipping rates for different ranges of order values. Here, we are setting a charge of Rs 50 for order values ranging from Rs 1 to Rs 1000, and free delivery for all orders above Rs 1000.
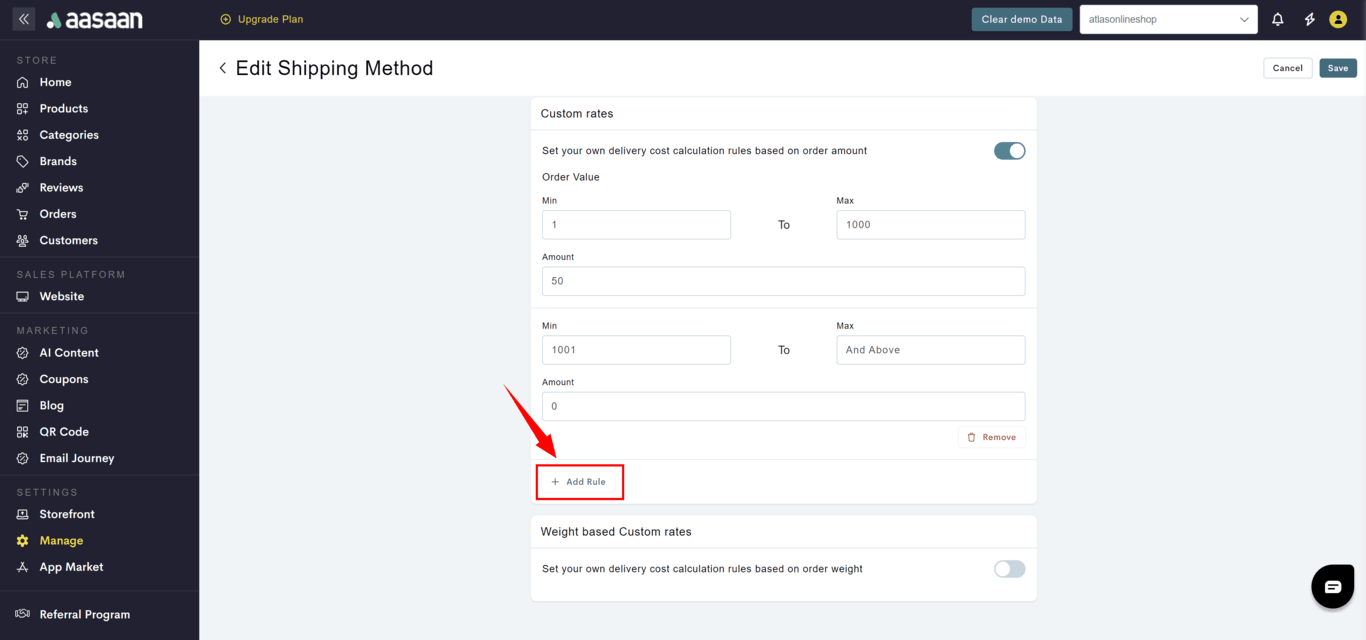
 You can click on Add Rule to add additional shipping rates for different order values.
 **STEP 5:**
Click on Save.
**STEP 5:**
Click on Save.
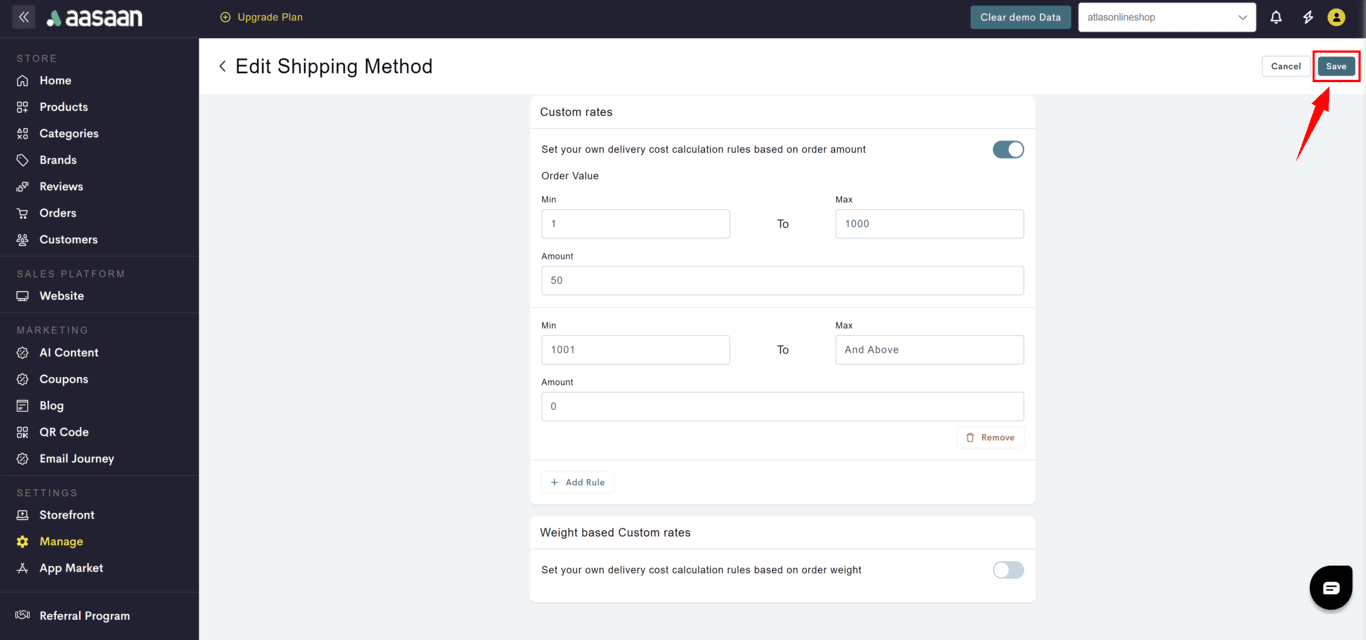 You have successfully saved your shipping method with custom rates.
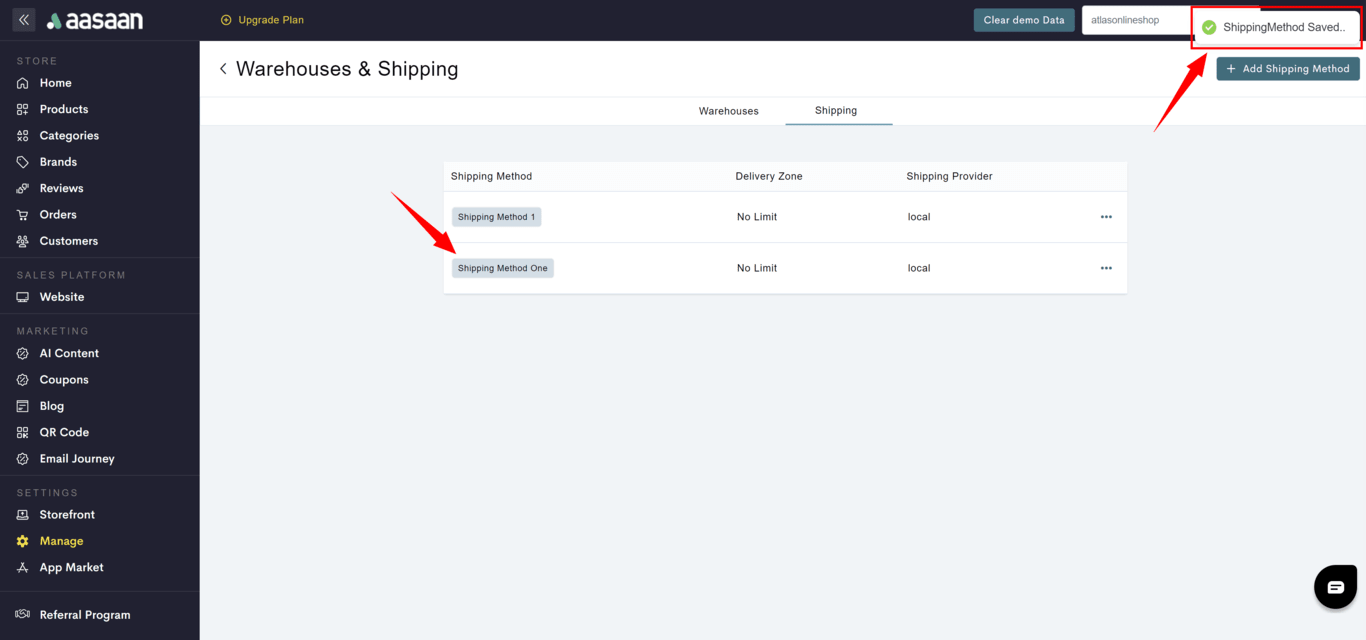 If you want to set custom shipping rates as per the total weight of products in the order, here is how you do it.
**STEP 1:**
Create a new shipping method. You can learn how to do so in the parent article of this section: [How to create a shipping method](#delivery).
**STEP 2:**
Enter the shipping method details(name and warehouse). Then specify the delivery zone. Since we are applying this shipping method worldwide, we will select No Limitation. Finally, we will select the delivery type. Here we will select Local. You can choose a shipping integration like Shiprocket if you prefer.
If you want to set custom shipping rates as per the total weight of products in the order, here is how you do it.
**STEP 1:**
Create a new shipping method. You can learn how to do so in the parent article of this section: [How to create a shipping method](#delivery).
**STEP 2:**
Enter the shipping method details(name and warehouse). Then specify the delivery zone. Since we are applying this shipping method worldwide, we will select No Limitation. Finally, we will select the delivery type. Here we will select Local. You can choose a shipping integration like Shiprocket if you prefer.
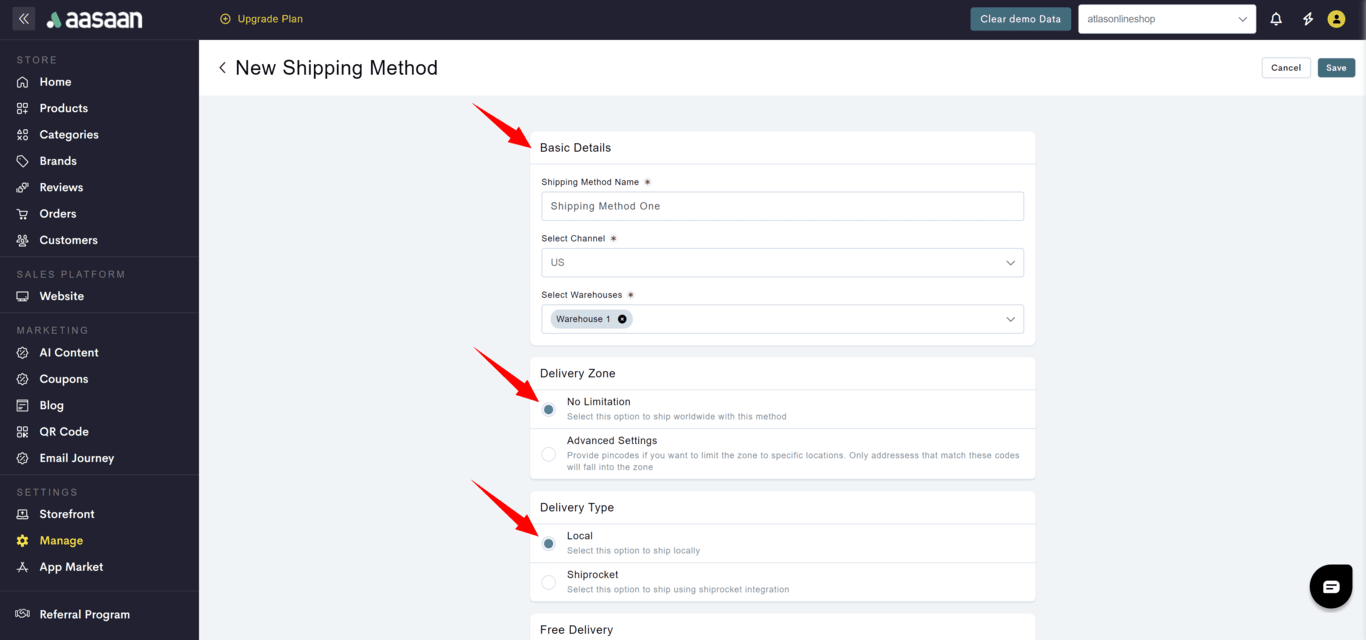 **STEP 3:**
Scroll down and click on the toggle to enable Custom Weight Rates.
**STEP 3:**
Scroll down and click on the toggle to enable Custom Weight Rates.
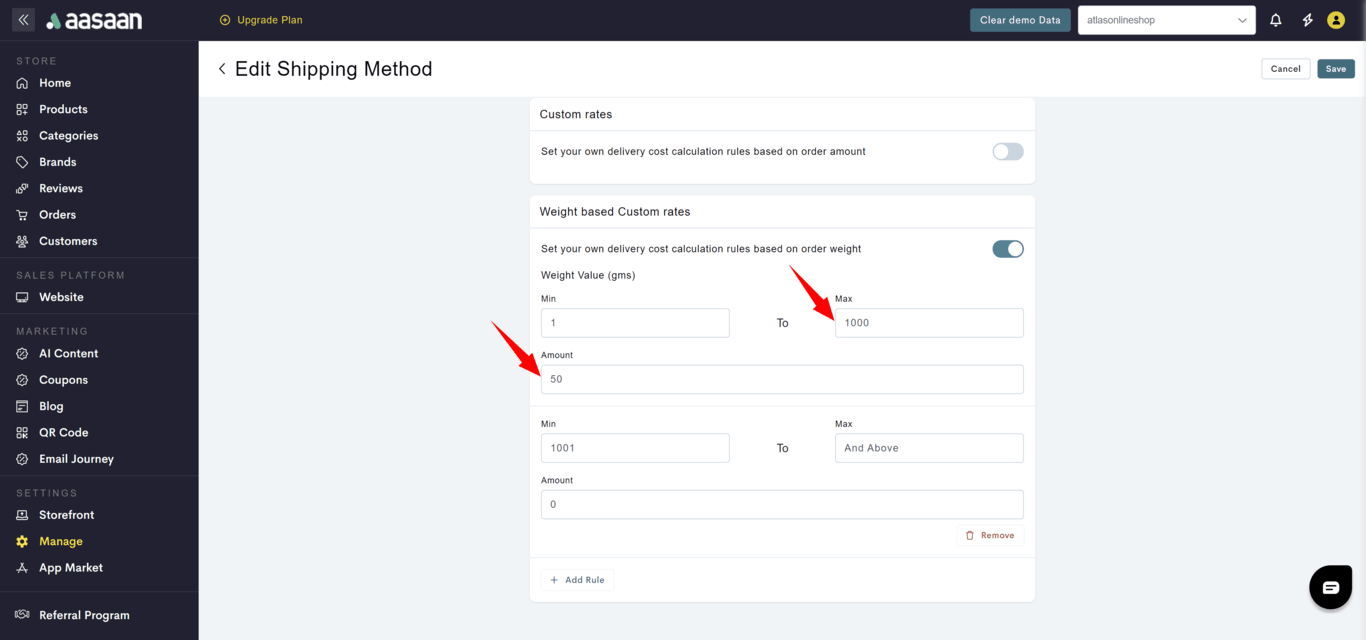
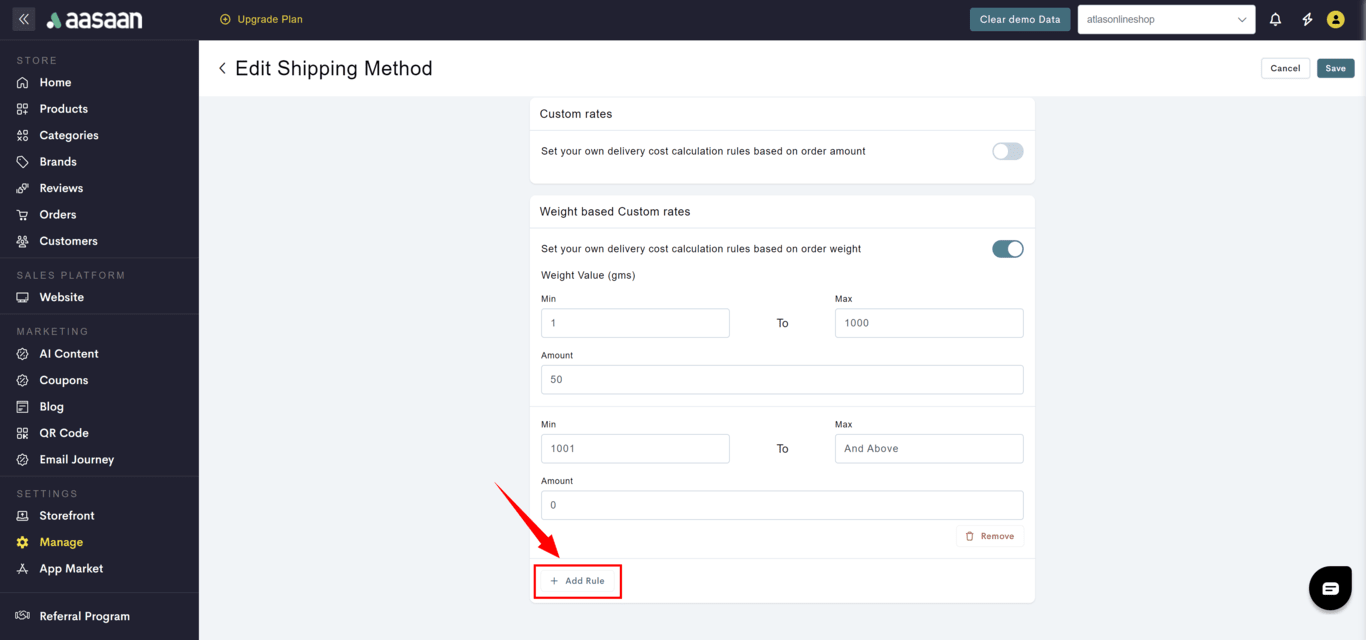
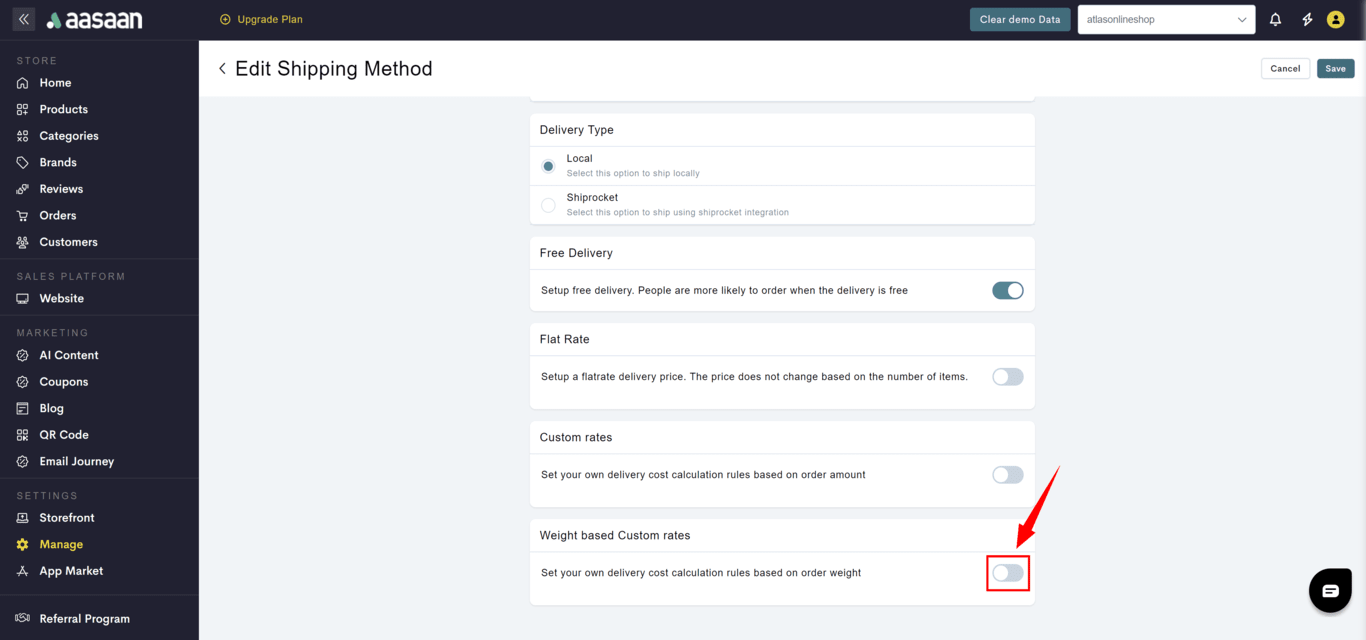 Click on Add Rule to enter your first order weight range and corresponding shipping rate.
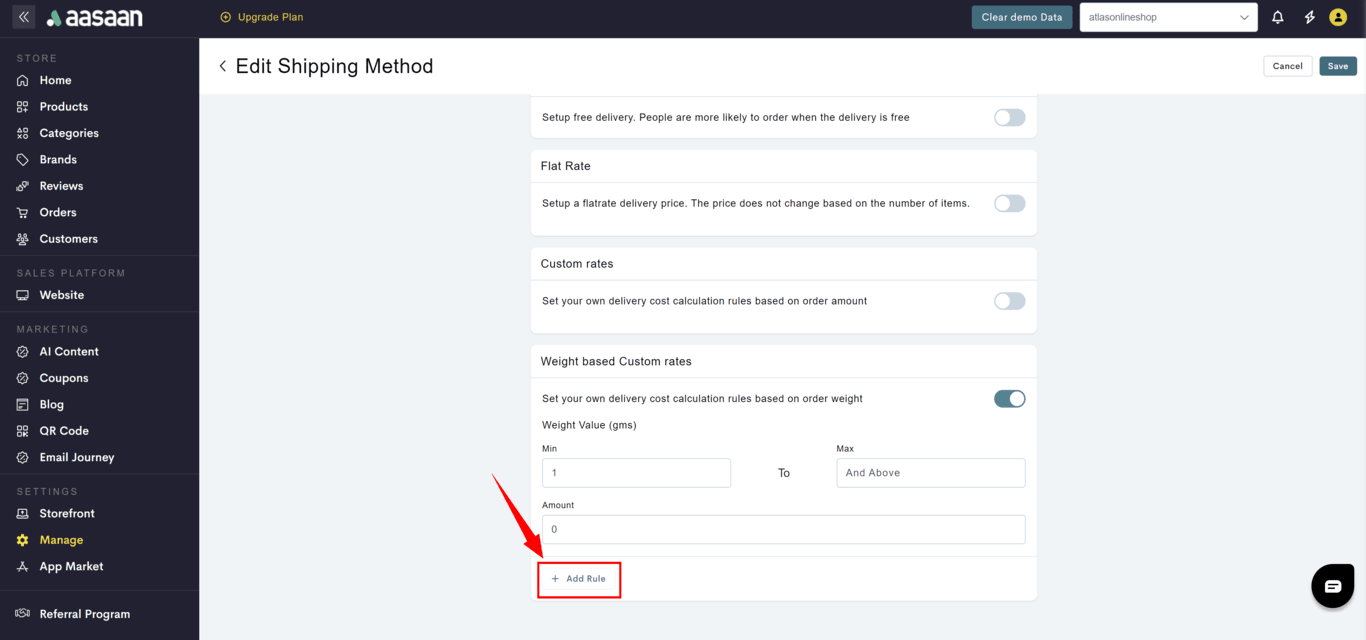 Enter the order weight range in grams and the corresponding shipping rate.
 You can click on Add rule to add shipping rates for additional weight ranges.
 **STEP 4:**
After you have added all your weight ranges and corresponding delivery rates, click on Save.
**STEP 4:**
After you have added all your weight ranges and corresponding delivery rates, click on Save.
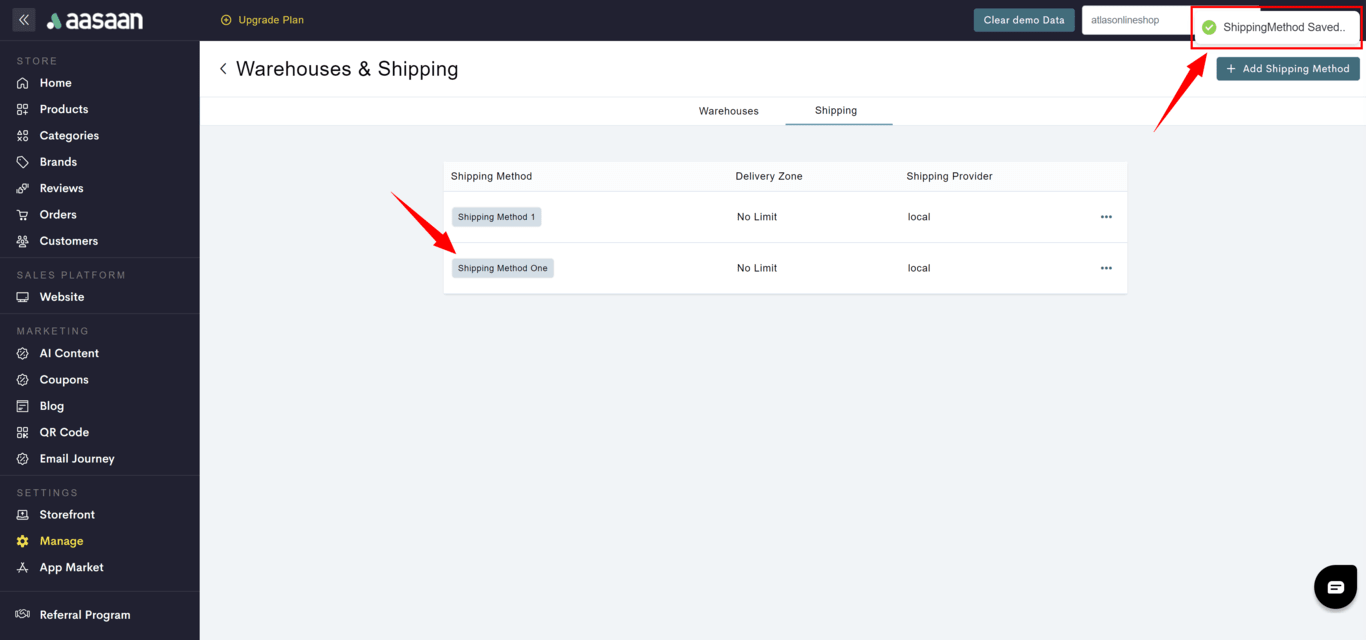 Your shipping method has been saved.
 If you want to set custom shipping rates as per the total weight of products in the order, here is how you do it.
**STEP 1:**
Create a new shipping method. You can learn how to do so in the parent article of this section: [How to create a shipping method](#delivery).
**STEP 2:**
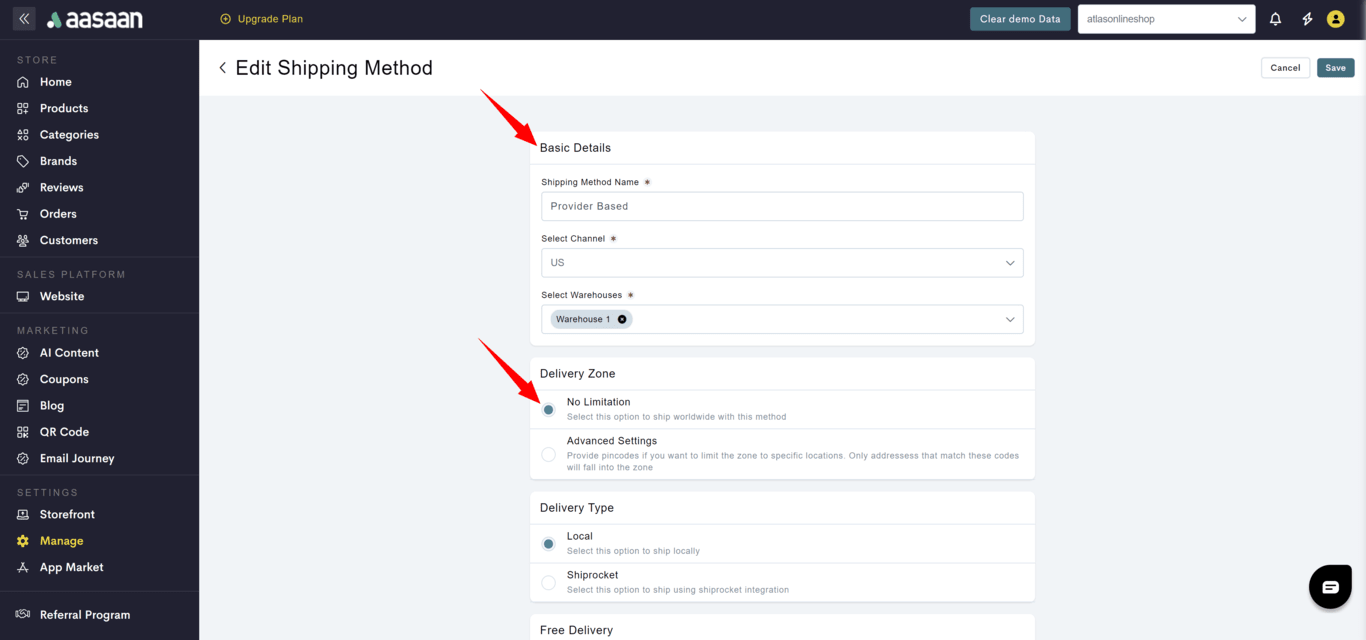
Enter the name of your shipping method and set the delivery zone. Here we will set the zone as No Limitation.
Enter the shipping method details(name and warehouse). Then specify the delivery zone. Since we are applying this shipping method worldwide, we will select No Limitation.
If you want to set custom shipping rates as per the total weight of products in the order, here is how you do it.
**STEP 1:**
Create a new shipping method. You can learn how to do so in the parent article of this section: [How to create a shipping method](#delivery).
**STEP 2:**
Enter the name of your shipping method and set the delivery zone. Here we will set the zone as No Limitation.
Enter the shipping method details(name and warehouse). Then specify the delivery zone. Since we are applying this shipping method worldwide, we will select No Limitation.
 **STEP 3:**
Since we want to enable provider-based rates, we need to enable our shipping provider. Here we will choose Shiprocket.
**STEP 3:**
Since we want to enable provider-based rates, we need to enable our shipping provider. Here we will choose Shiprocket.
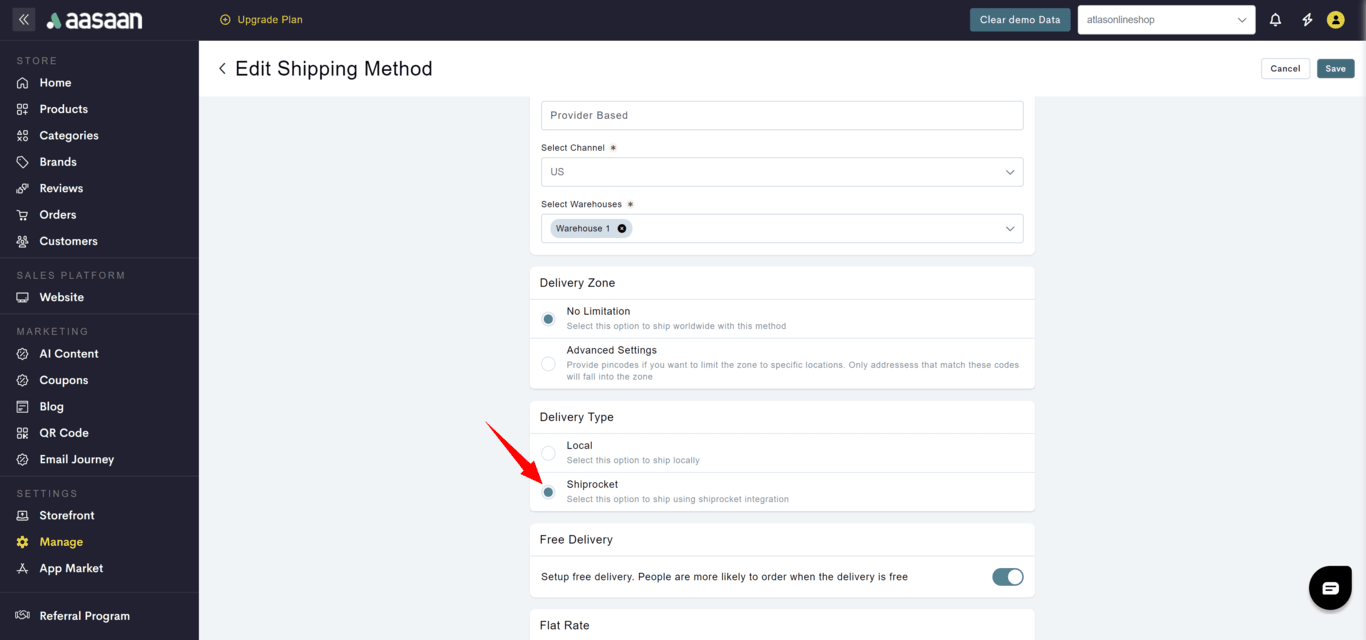 **STEP 4:**
Click on the toggle to enable Provider Rates and click on Save.
**STEP 4:**
Click on the toggle to enable Provider Rates and click on Save.
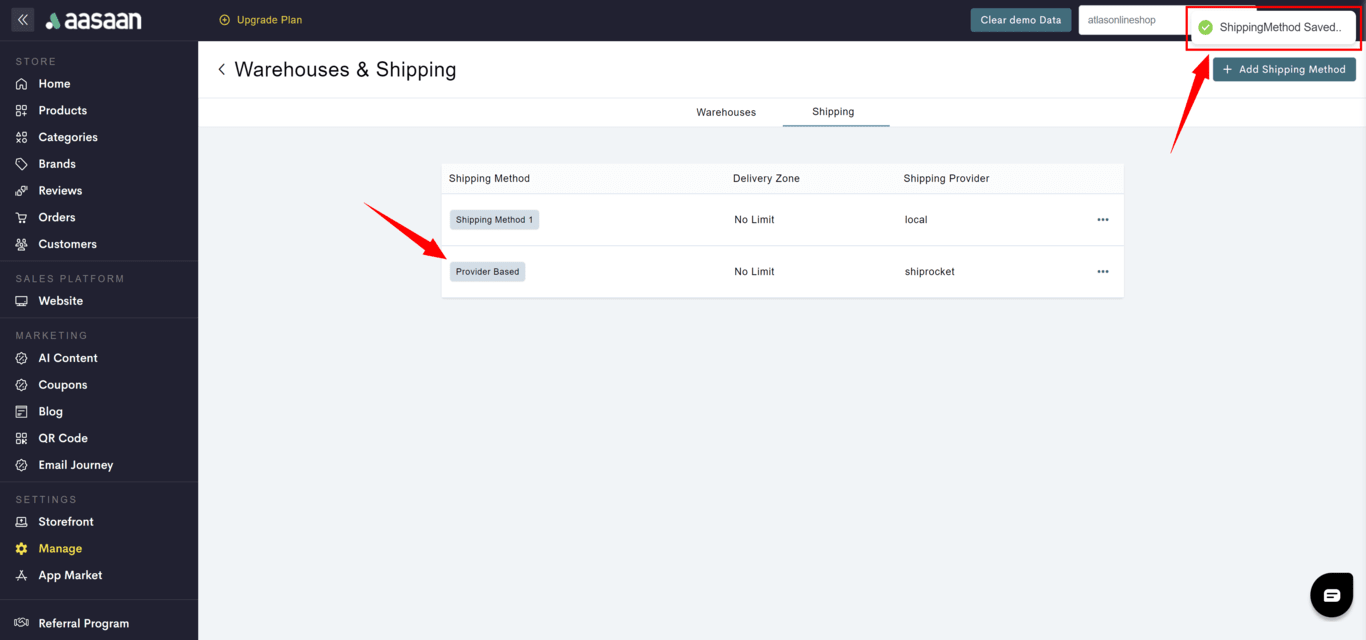
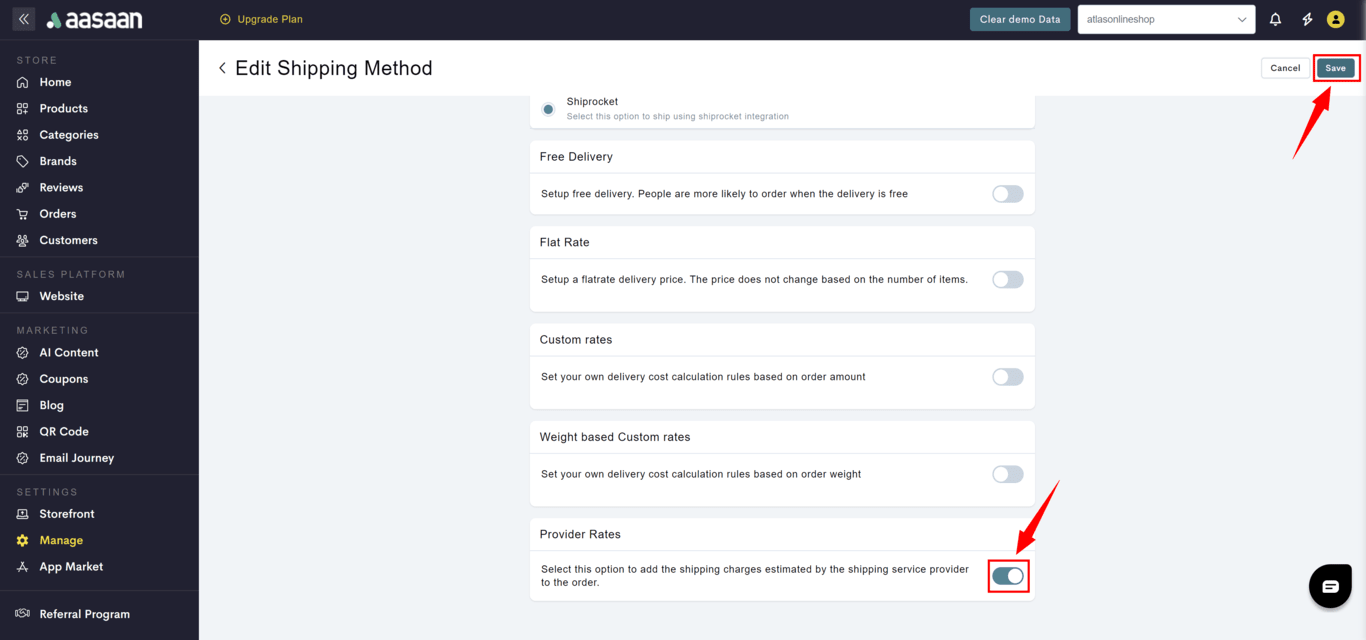 Your shipping method has been saved.
 If you want to ensure your shipping rates are applicable to a specific area only, you need to create delivery zones. Here's how you do it:
**STEP 1:**
Create a new shipping method. You can learn how to do so in the parent article of this section: [How to create a shipping method](#delivery).
**STEP 2:**
Enter the name of your shipping method, select the warehouse and click on Advanced Settings.
If you want to ensure your shipping rates are applicable to a specific area only, you need to create delivery zones. Here's how you do it:
**STEP 1:**
Create a new shipping method. You can learn how to do so in the parent article of this section: [How to create a shipping method](#delivery).
**STEP 2:**
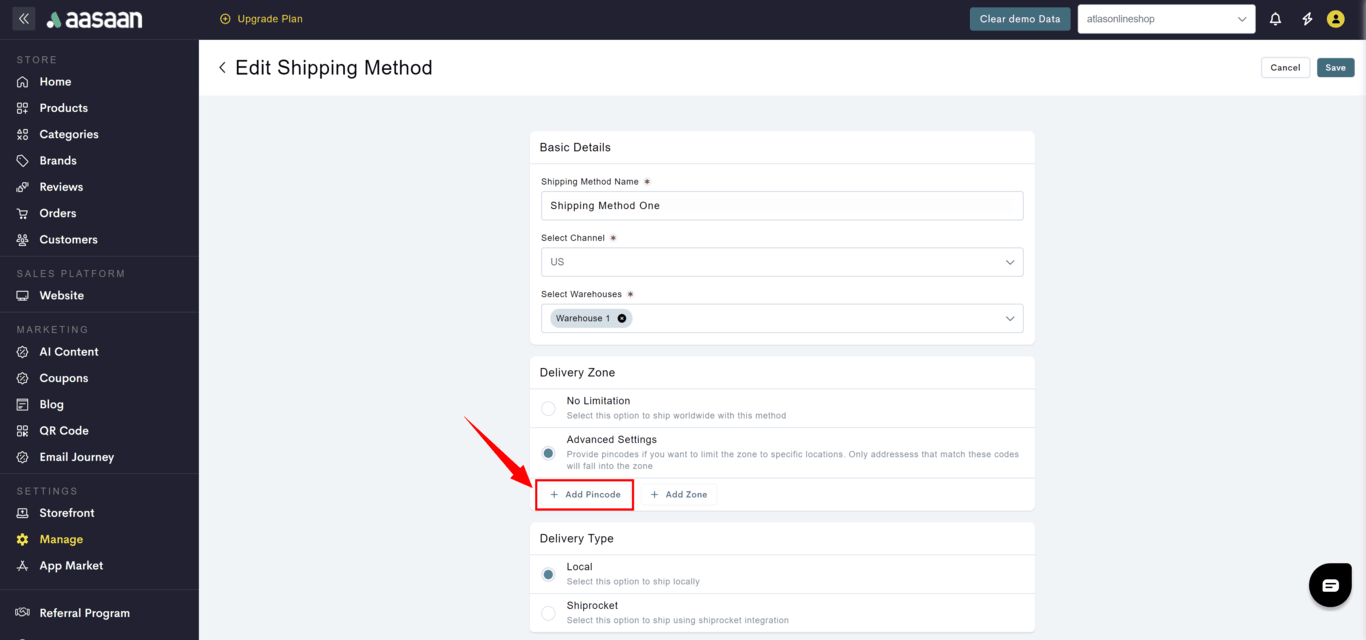
Enter the name of your shipping method, select the warehouse and click on Advanced Settings.
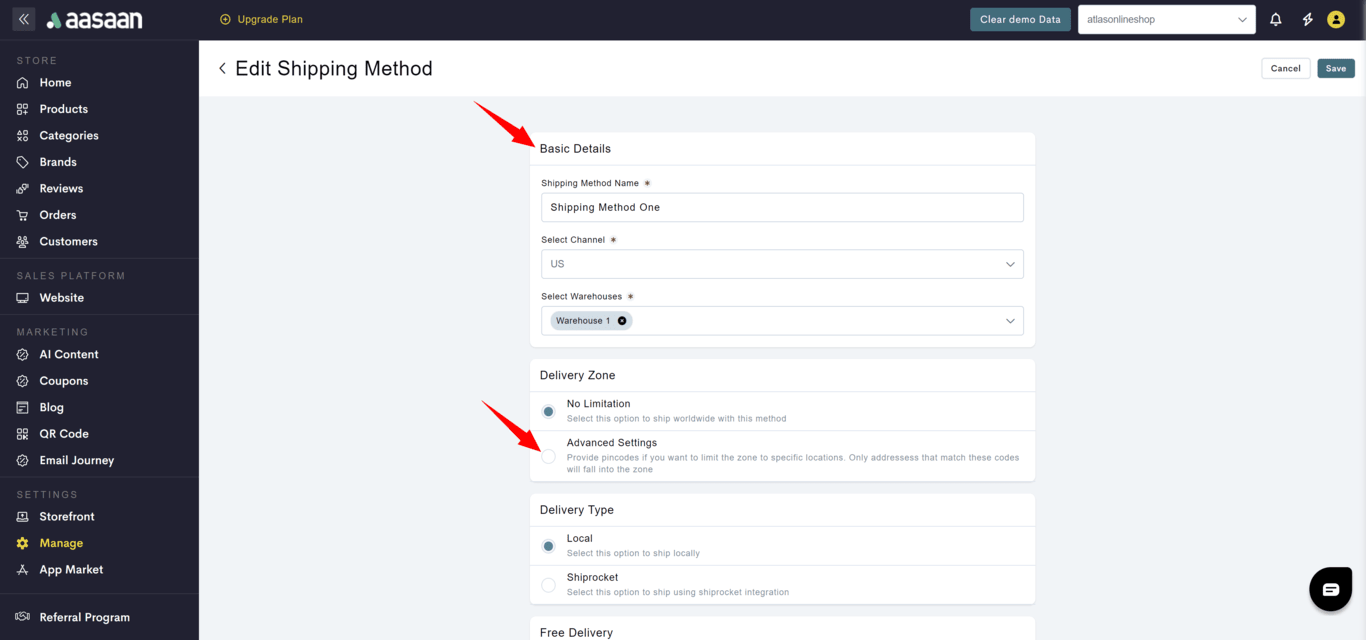 Then click on Add Pincode.
 **STEP 3:**
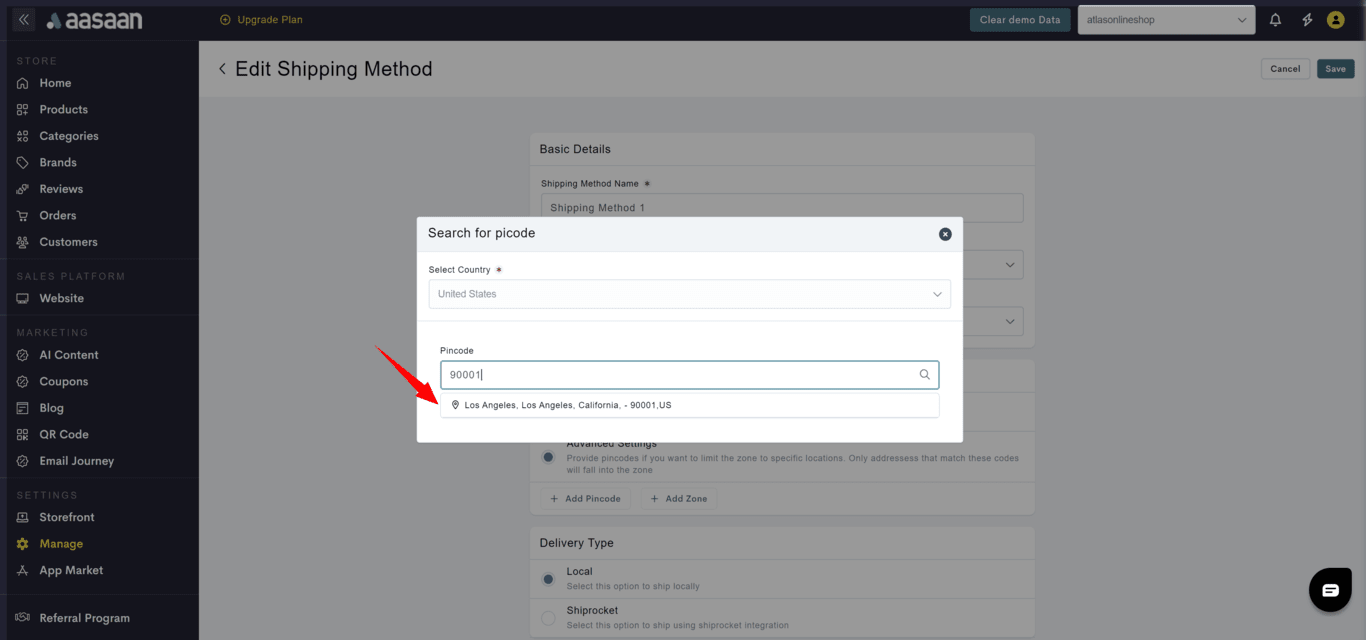
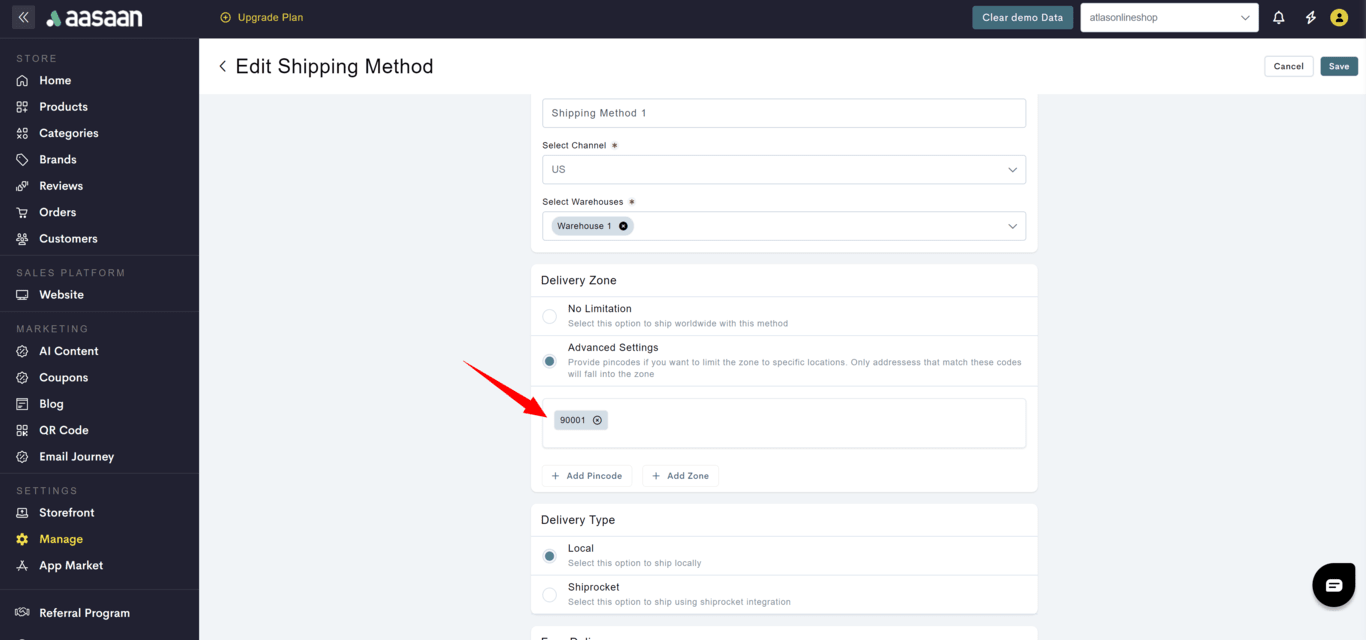
Enter the pincodes you wish to set your shipping method for and choose the appropriate area associated with said pincodes.
**STEP 3:**
Enter the pincodes you wish to set your shipping method for and choose the appropriate area associated with said pincodes.
 **STEP 4:**
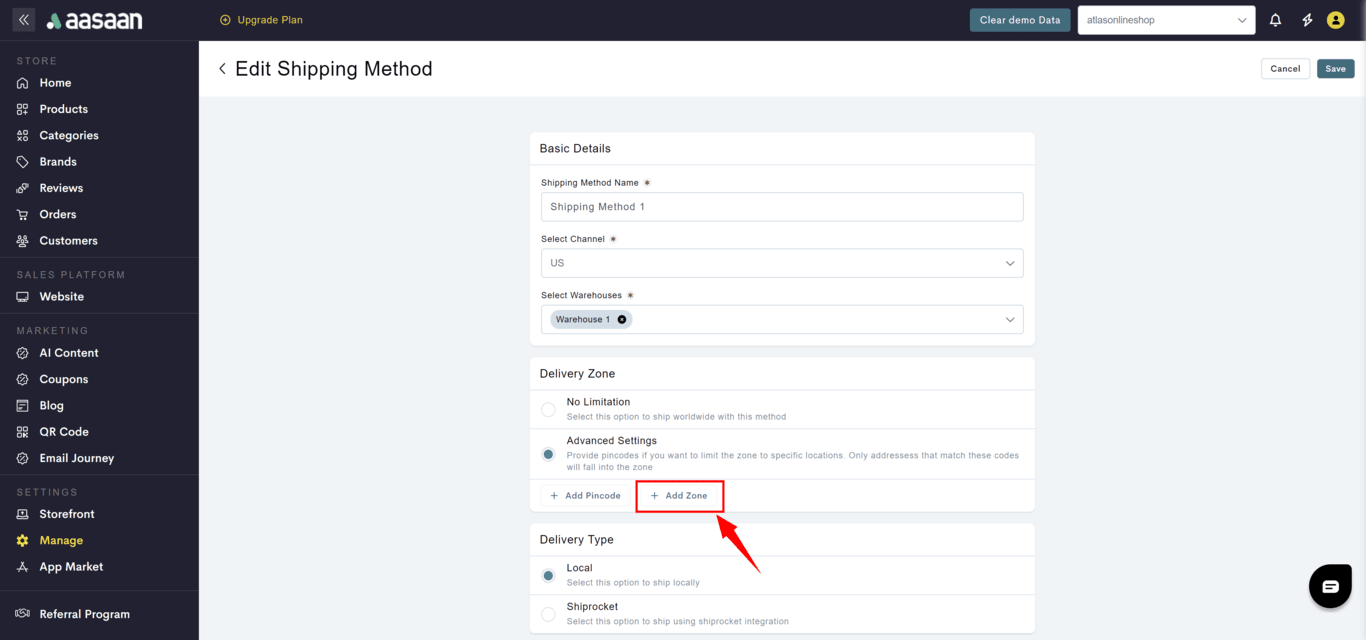
Alternatively, you can click on Add Zone to add all the pincodes of your town or city at once.
**STEP 4:**
Alternatively, you can click on Add Zone to add all the pincodes of your town or city at once.
 **STEP 5:**
Enter the name of your town or city.
**STEP 5:**
Enter the name of your town or city.
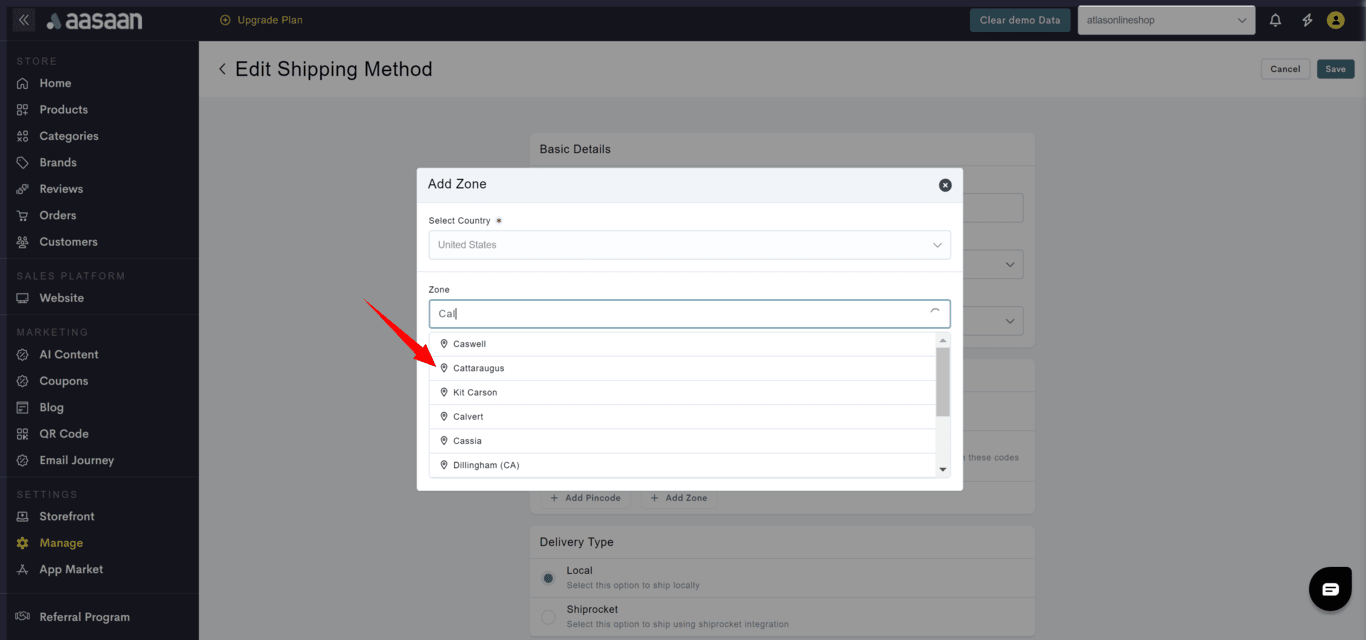 All the pincodes within that zone have been added simultaneously.
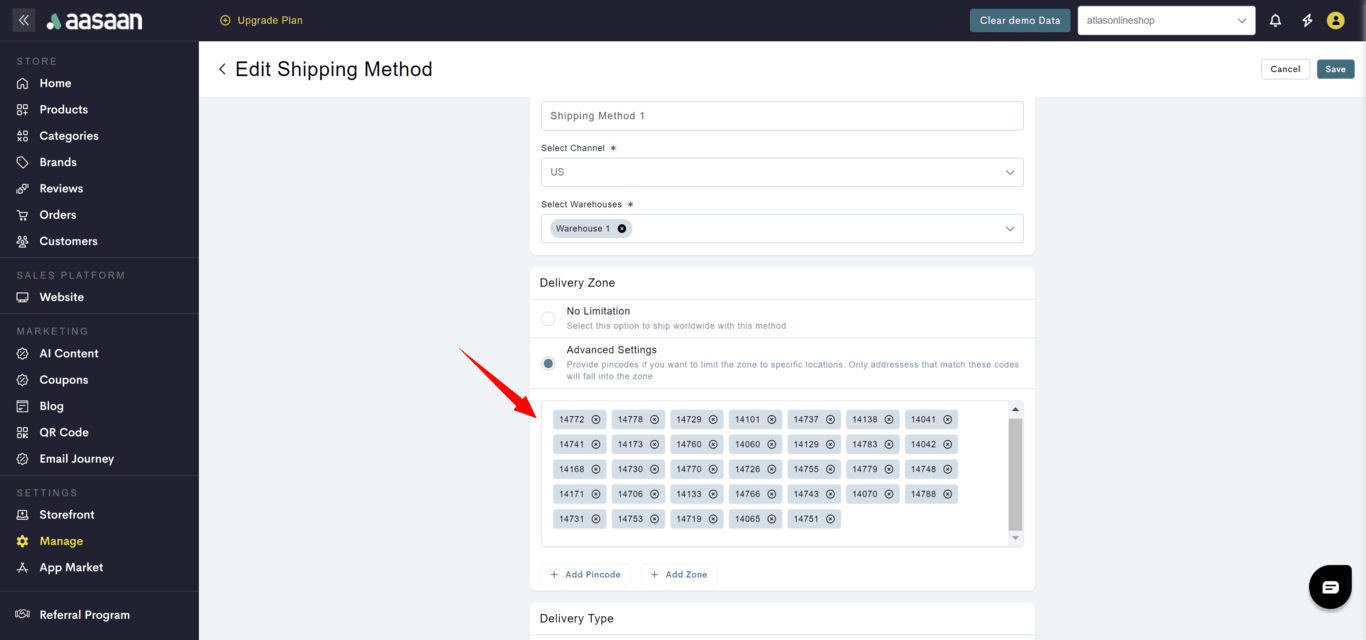 **STEP 6:**
Select the delivery type - here, we will select Local - and choose your shipping rate - we will choose Free Delivery.
**STEP 6:**
Select the delivery type - here, we will select Local - and choose your shipping rate - we will choose Free Delivery.
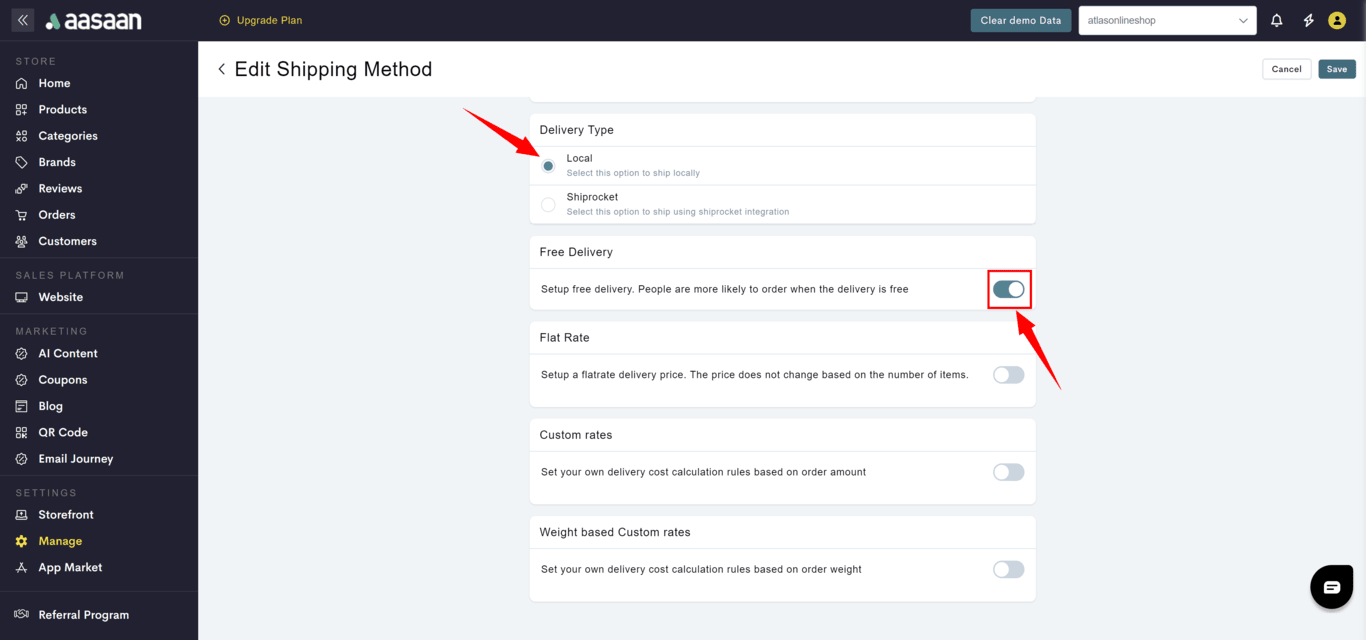 **STEP 7:**
Click on Save.
**STEP 7:**
Click on Save.
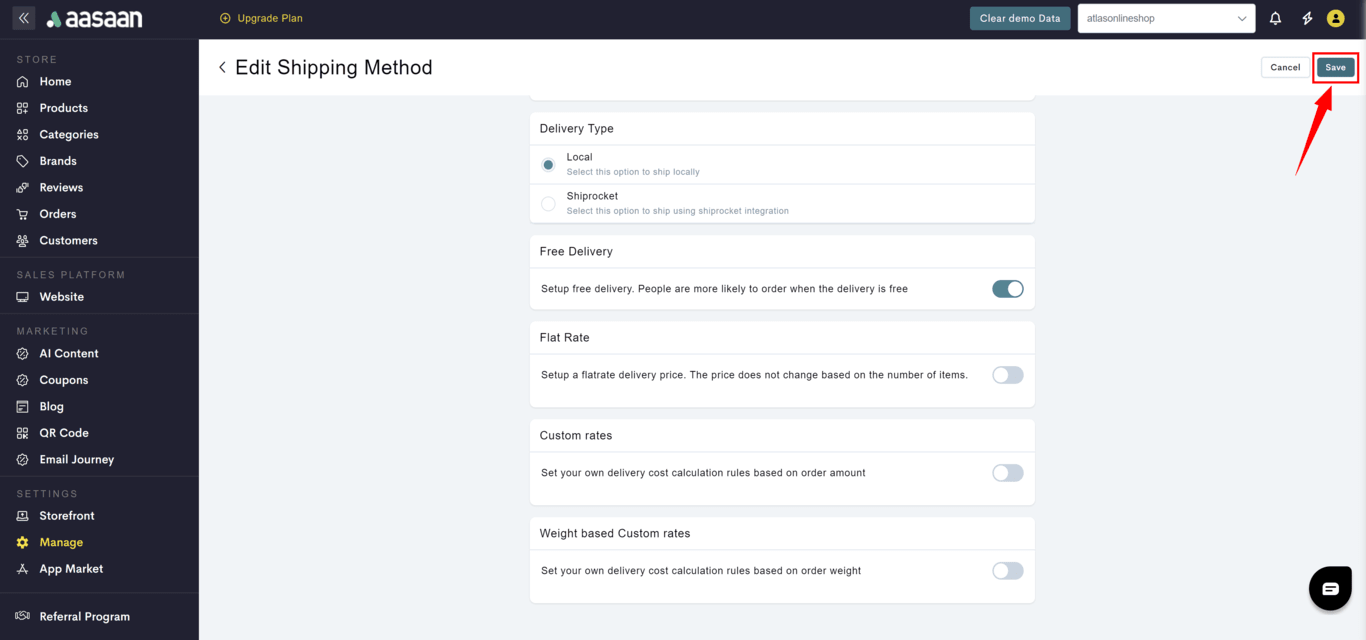 **STEP 8:**
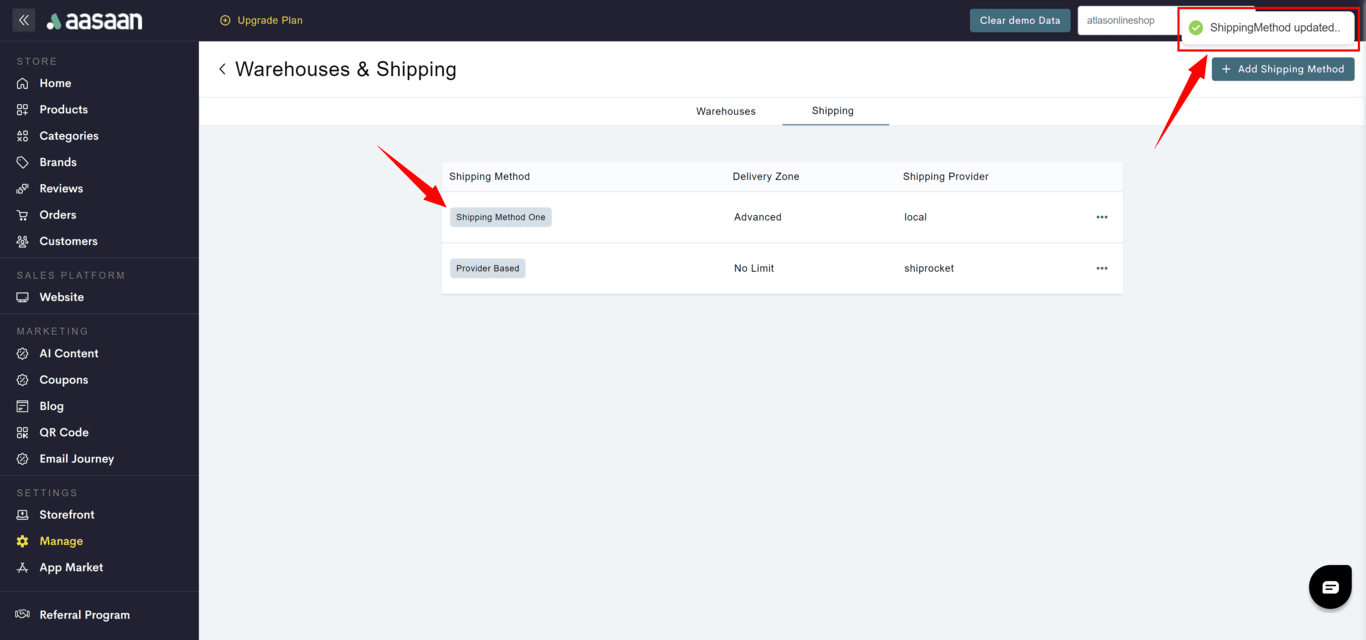
You have successfully set up your advanced settings for shipping.
**STEP 8:**
You have successfully set up your advanced settings for shipping.
 ## Channel Settings
In this section, you will learn how to manage channels.
### Channels
You can use aasaan to sell your products on different online sales channels. Sales channels represent the different geographical regions where you sell your products. You can customize your product pricing, currency, taxes, warehouses, and shipping methods for each channel in your store. This feature is especially useful if you wish to launch your brand globally. For example, if you wish to sell in India and the United States, you can create the respective channels for both countries in your store, and customize the currency, tax rates, and other details for each channel.
The channels feature is only offered on the business plan.
The steps for creating channels in your store are as follows:
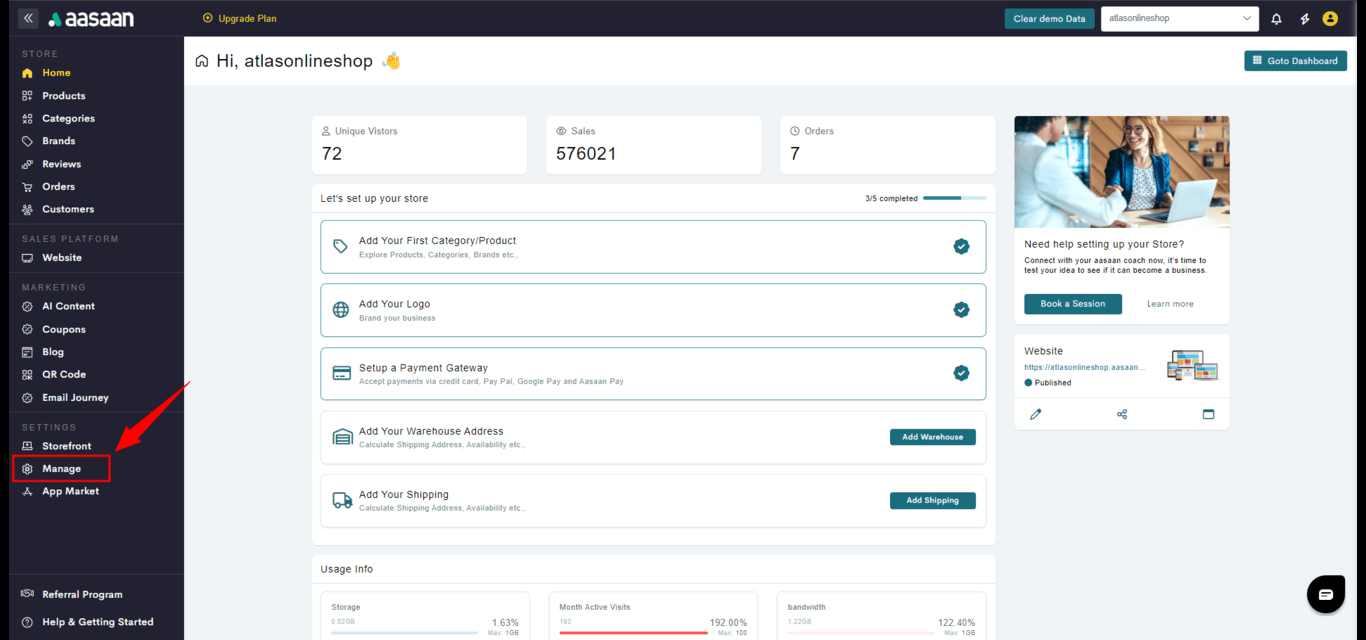
**STEP 1:**
Login to your aasaan desktop admin panel and click on Manage.
## Channel Settings
In this section, you will learn how to manage channels.
### Channels
You can use aasaan to sell your products on different online sales channels. Sales channels represent the different geographical regions where you sell your products. You can customize your product pricing, currency, taxes, warehouses, and shipping methods for each channel in your store. This feature is especially useful if you wish to launch your brand globally. For example, if you wish to sell in India and the United States, you can create the respective channels for both countries in your store, and customize the currency, tax rates, and other details for each channel.
The channels feature is only offered on the business plan.
The steps for creating channels in your store are as follows:
**STEP 1:**
Login to your aasaan desktop admin panel and click on Manage.
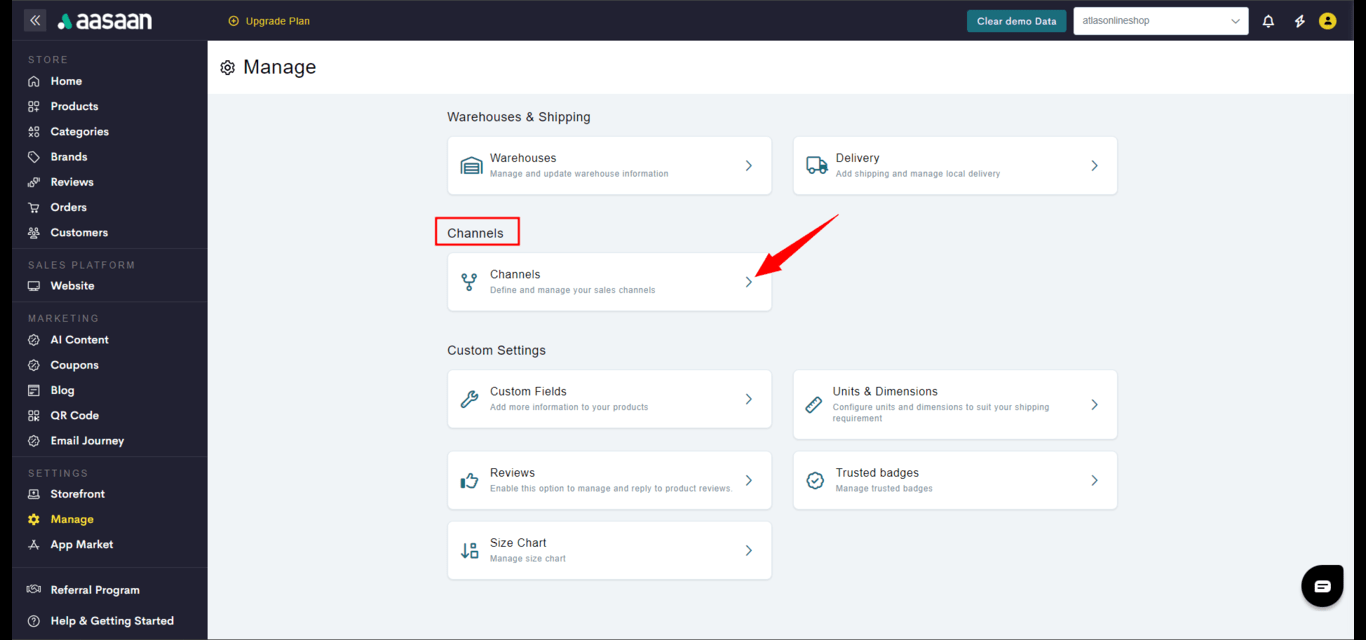
 **STEP 2:**
Click on Channels.
**STEP 2:**
Click on Channels.
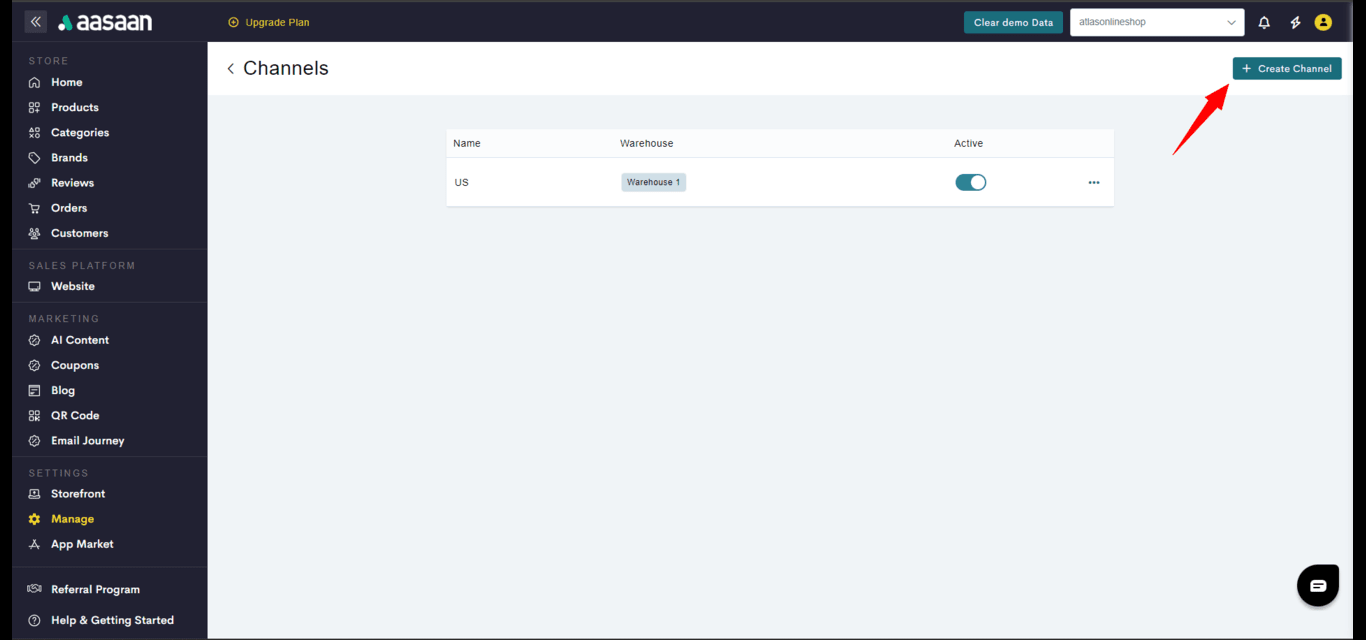
 **STEP 3:**
You will see a default channel created based on the country selected while creating your store. To create a new channel, click on **+ Create Channel**.
**STEP 3:**
You will see a default channel created based on the country selected while creating your store. To create a new channel, click on **+ Create Channel**.
 **STEP 4:**
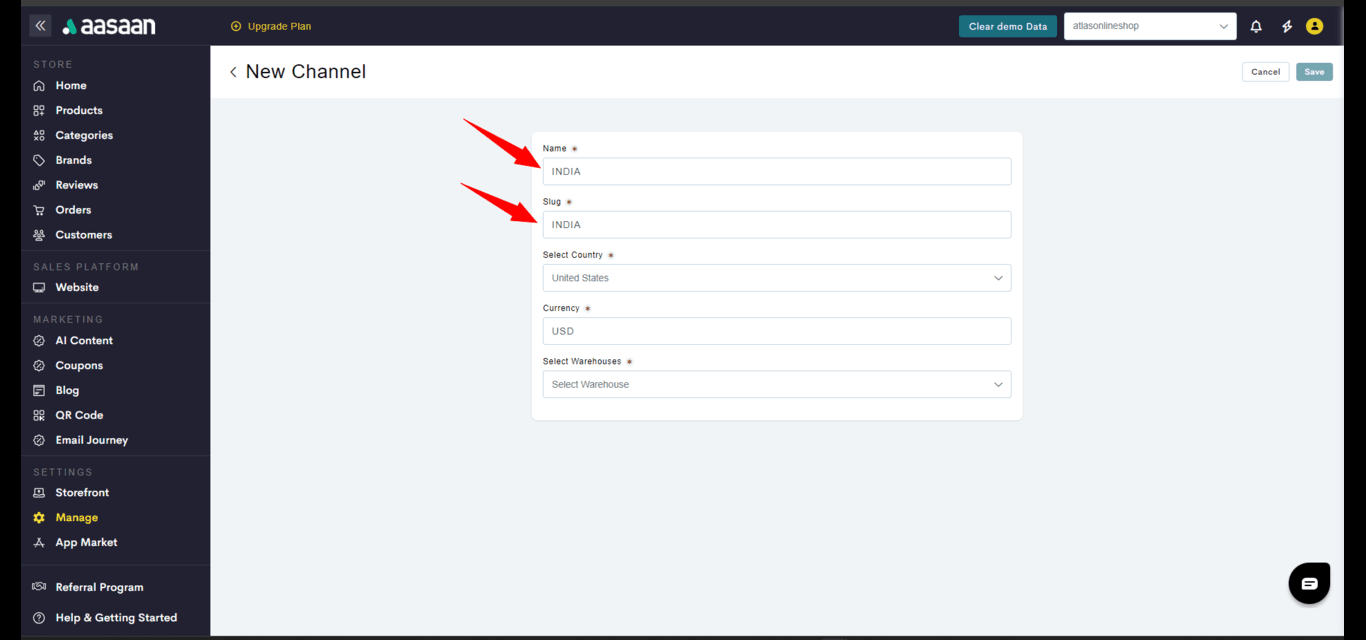
Enter the channel name and slug.
Keep the slug same as channel name but in lower case without spaces
**STEP 4:**
Enter the channel name and slug.
Keep the slug same as channel name but in lower case without spaces
 **STEP 5:**
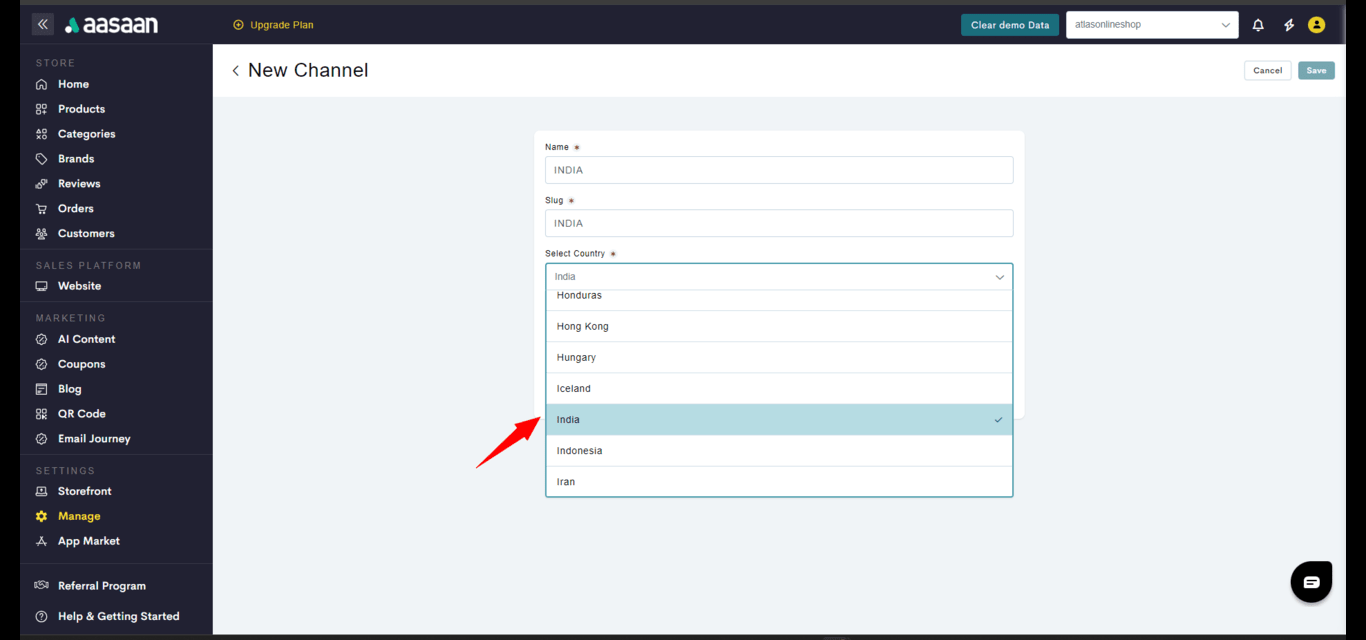
Choose the country you wish to assign to the channel. The channel currency will be automatically selected according to the country you choose.
**STEP 5:**
Choose the country you wish to assign to the channel. The channel currency will be automatically selected according to the country you choose.
 **STEP 6:**
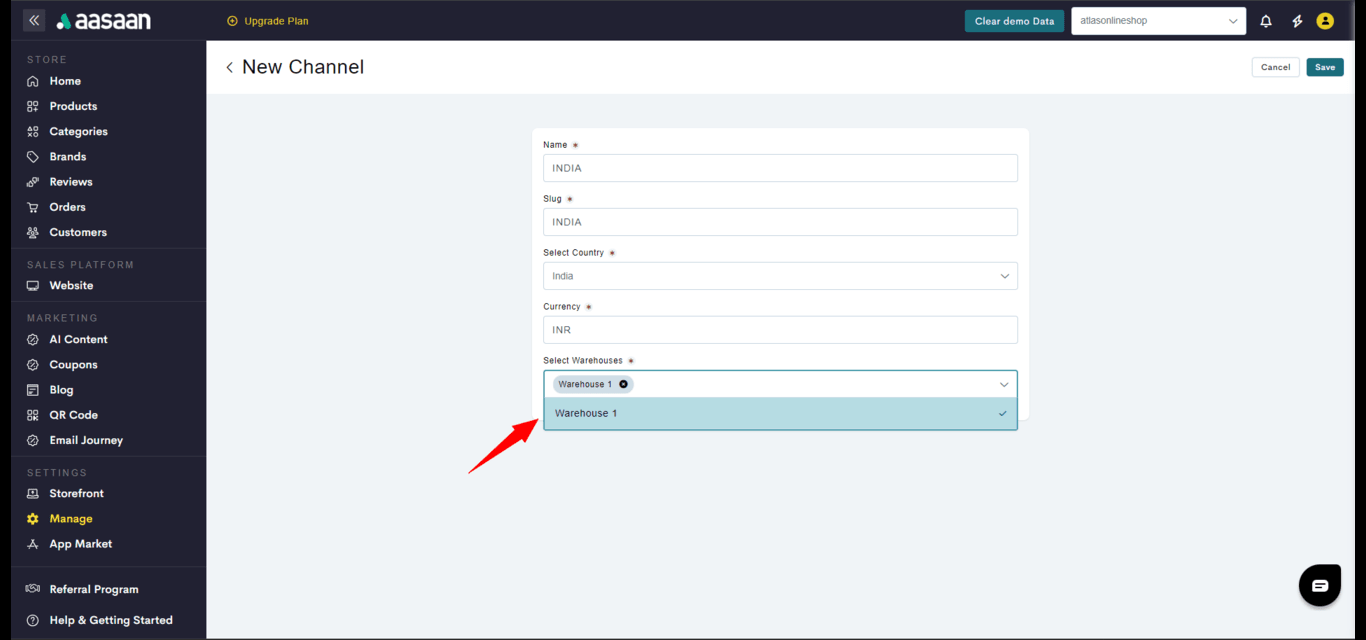
Select the warehouse you wish to assign to the sales channel.
**STEP 6:**
Select the warehouse you wish to assign to the sales channel.
 **STEP 7:**
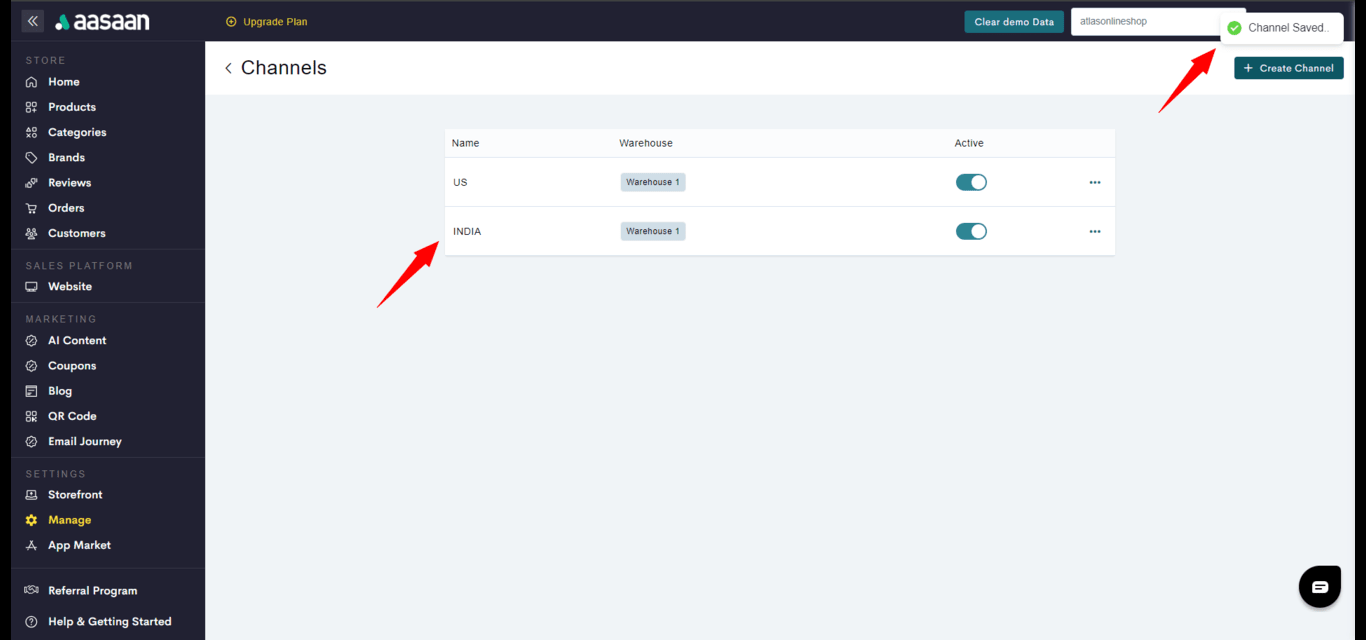
After adding all your channel details, click on Save.
**STEP 7:**
After adding all your channel details, click on Save.
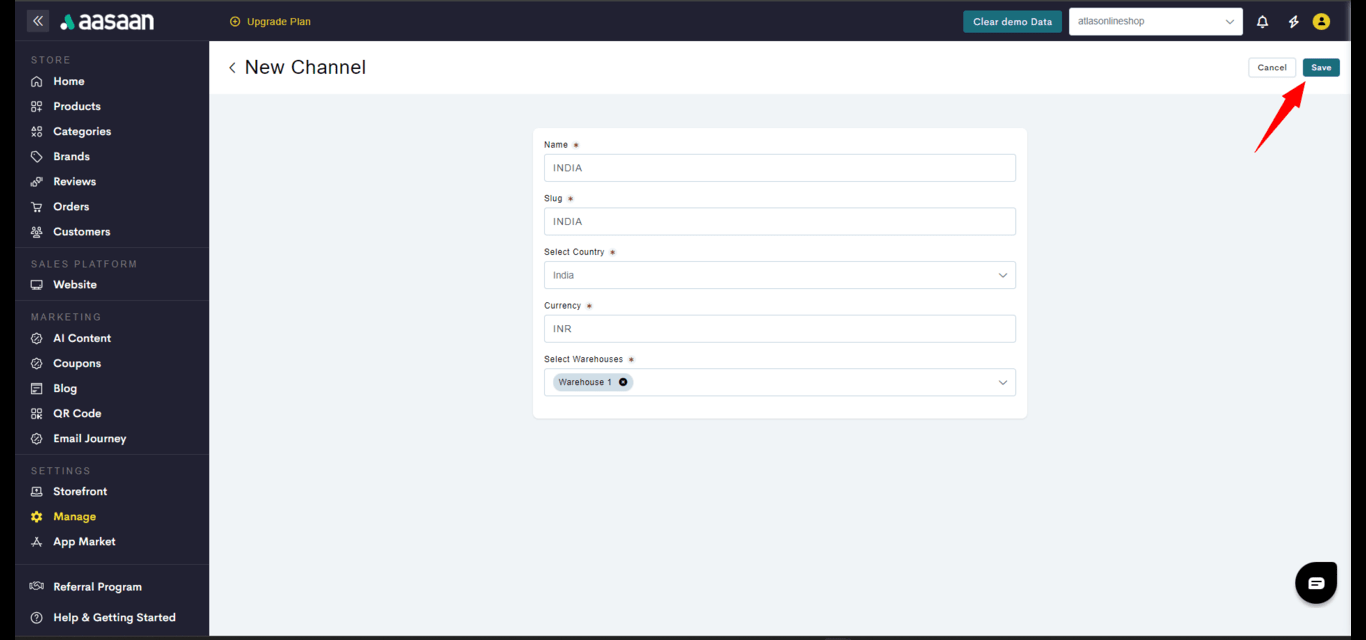 You have successfully added a new channel to your store.
 ## Custom Settings
In this section, you will learn how to manage custom fields, units & dimensions, reviews, trusted badges and size chart settings.
### Custom Fields
Here's how you can create custom fields in aasaan.
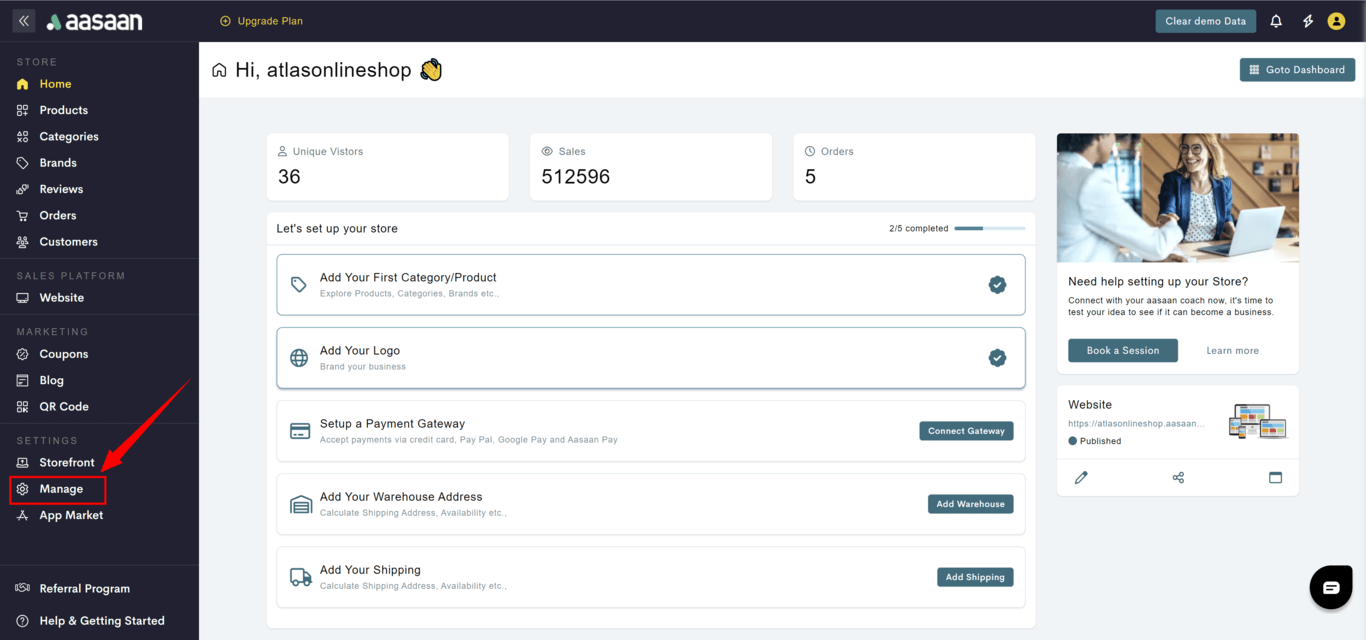
**STEP 1:**
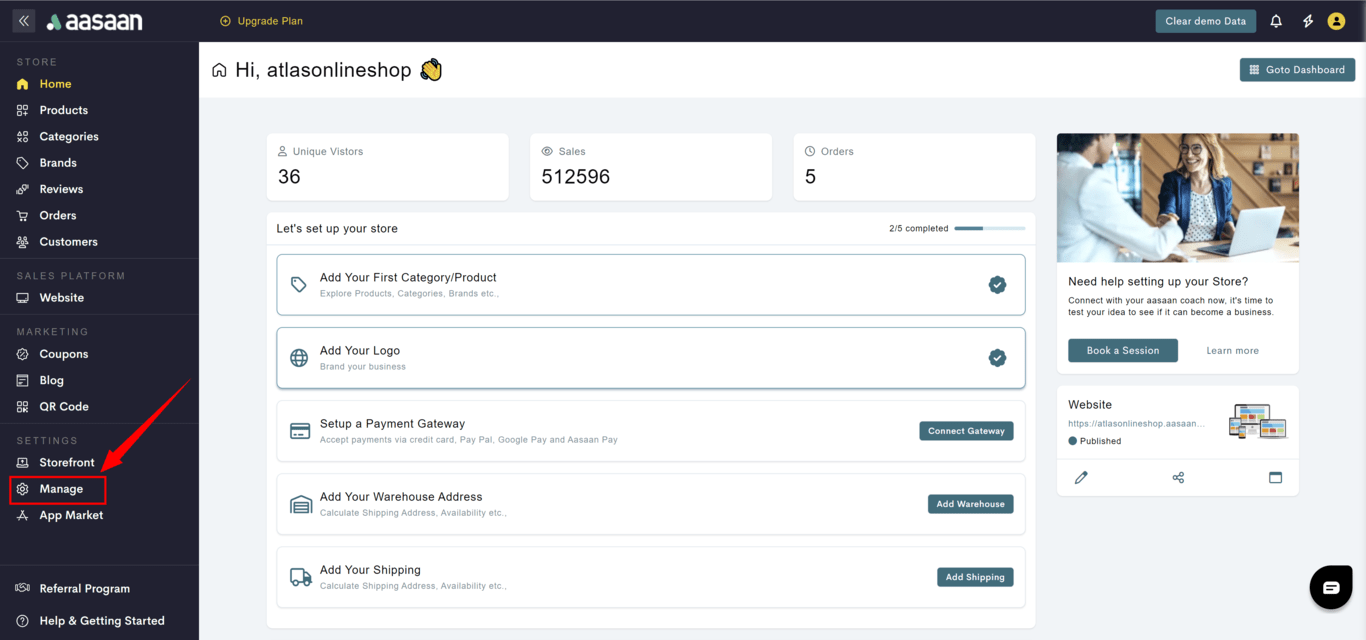
Login to your aasaan desktop admin panel and click on Manage.
## Custom Settings
In this section, you will learn how to manage custom fields, units & dimensions, reviews, trusted badges and size chart settings.
### Custom Fields
Here's how you can create custom fields in aasaan.
**STEP 1:**
Login to your aasaan desktop admin panel and click on Manage.
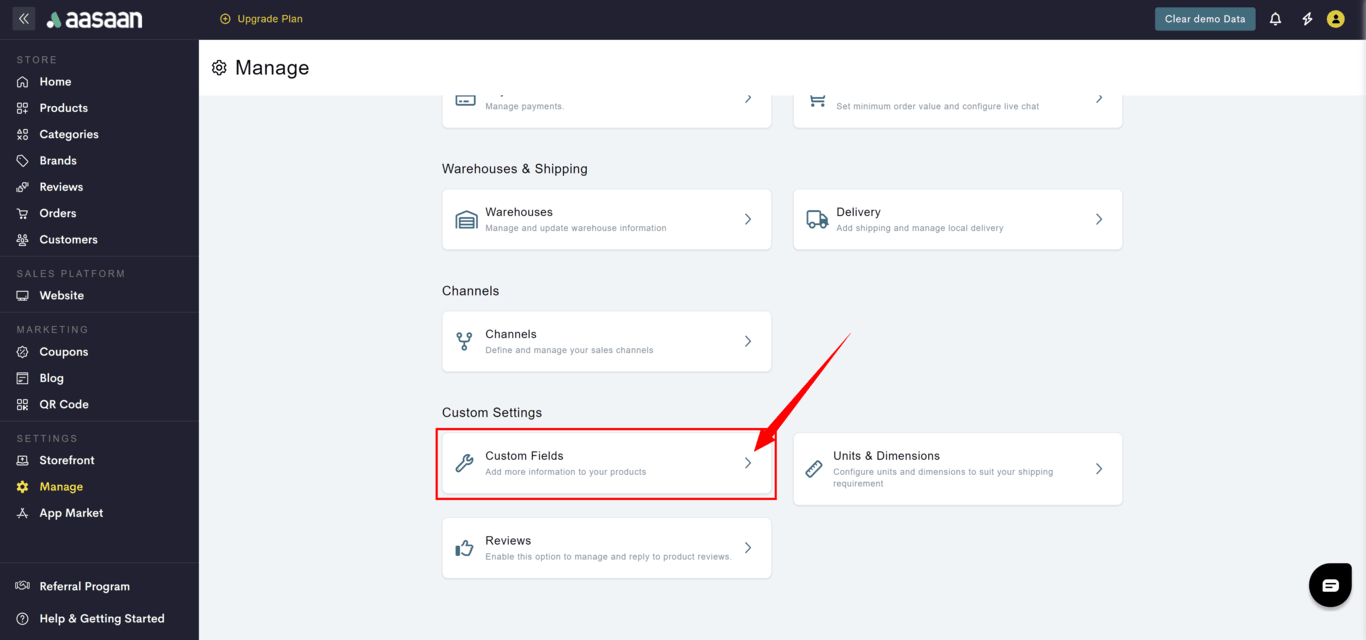
 **STEP 2:**
Click on Custom Fields.
**STEP 2:**
Click on Custom Fields.
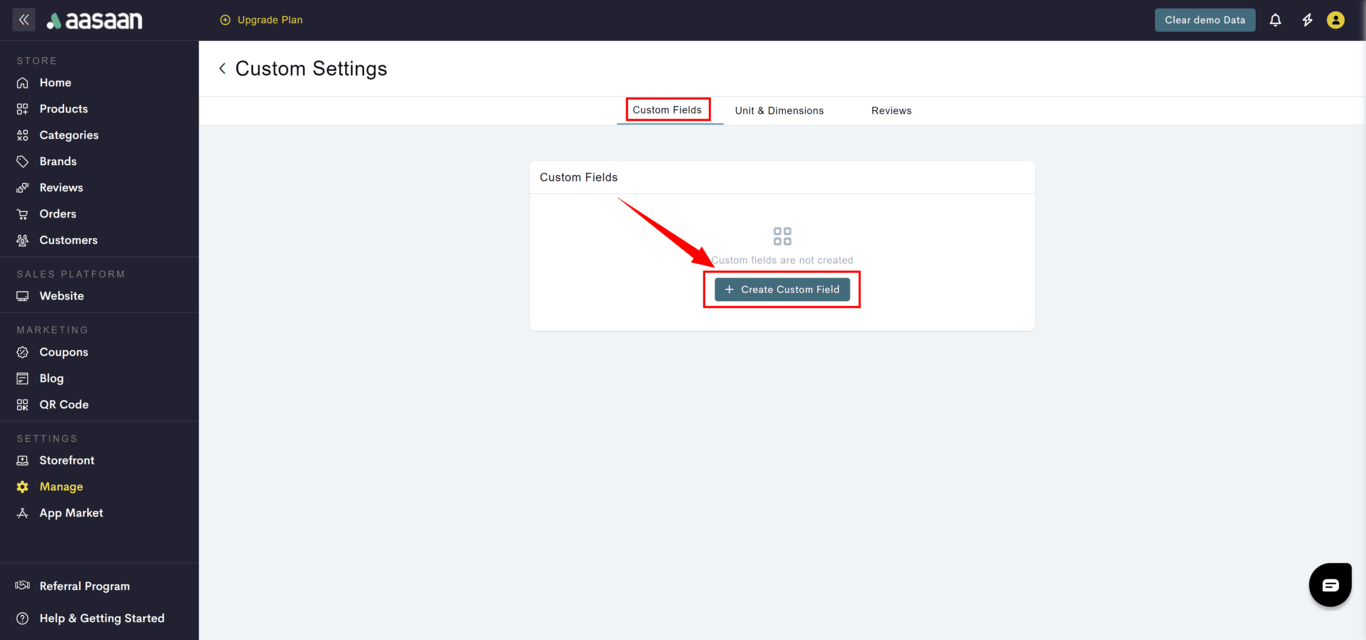
 **STEP 3:**
Click on **+ New Field**
**STEP 3:**
Click on **+ New Field**
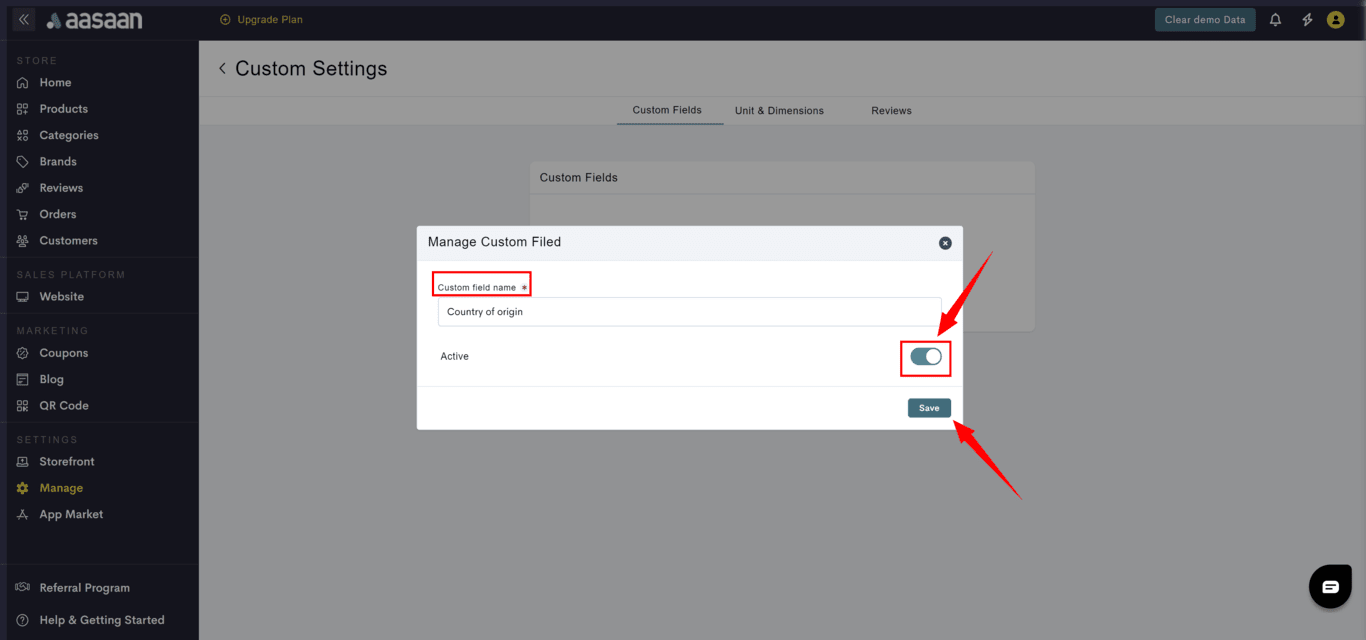
 **STEP 4:**
Provide custom field name and toggle switch to enable/disable the field. Click Save.
**STEP 4:**
Provide custom field name and toggle switch to enable/disable the field. Click Save.
 ### Units & Dimensions
Here's how you can set your desired units and dimensions in aasaan.
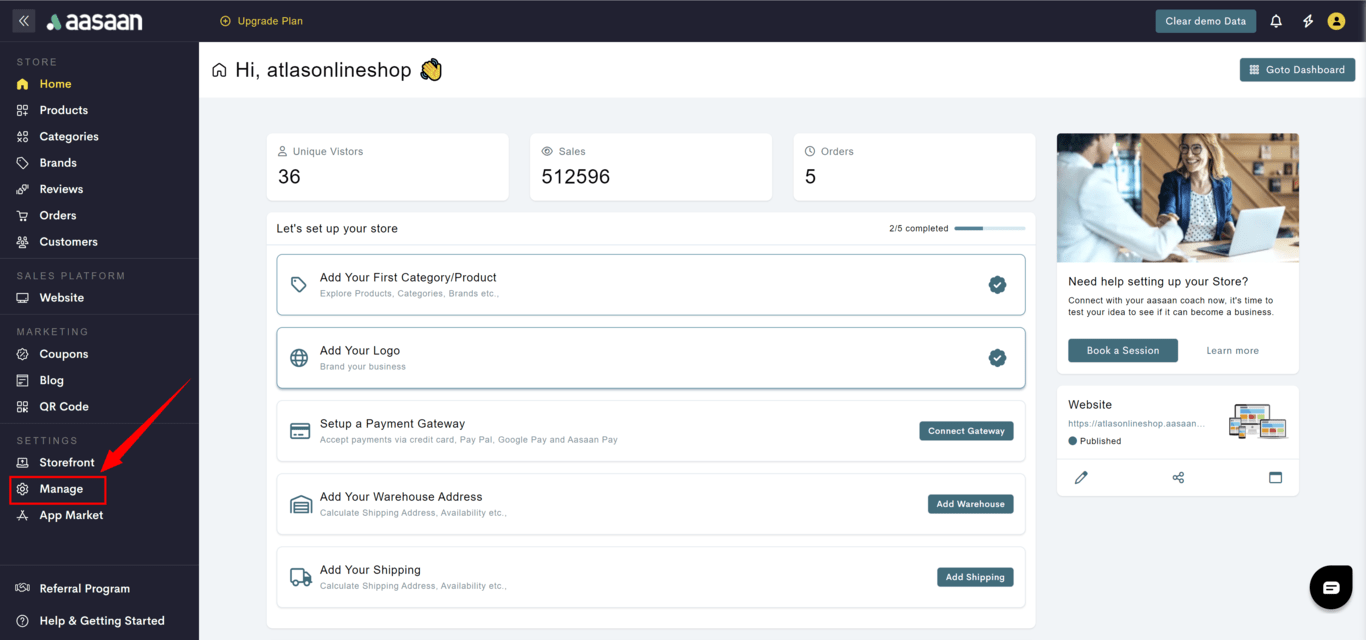
**STEP 1:**
Login to your aasaan desktop admin panel and click on Manage.
### Units & Dimensions
Here's how you can set your desired units and dimensions in aasaan.
**STEP 1:**
Login to your aasaan desktop admin panel and click on Manage.
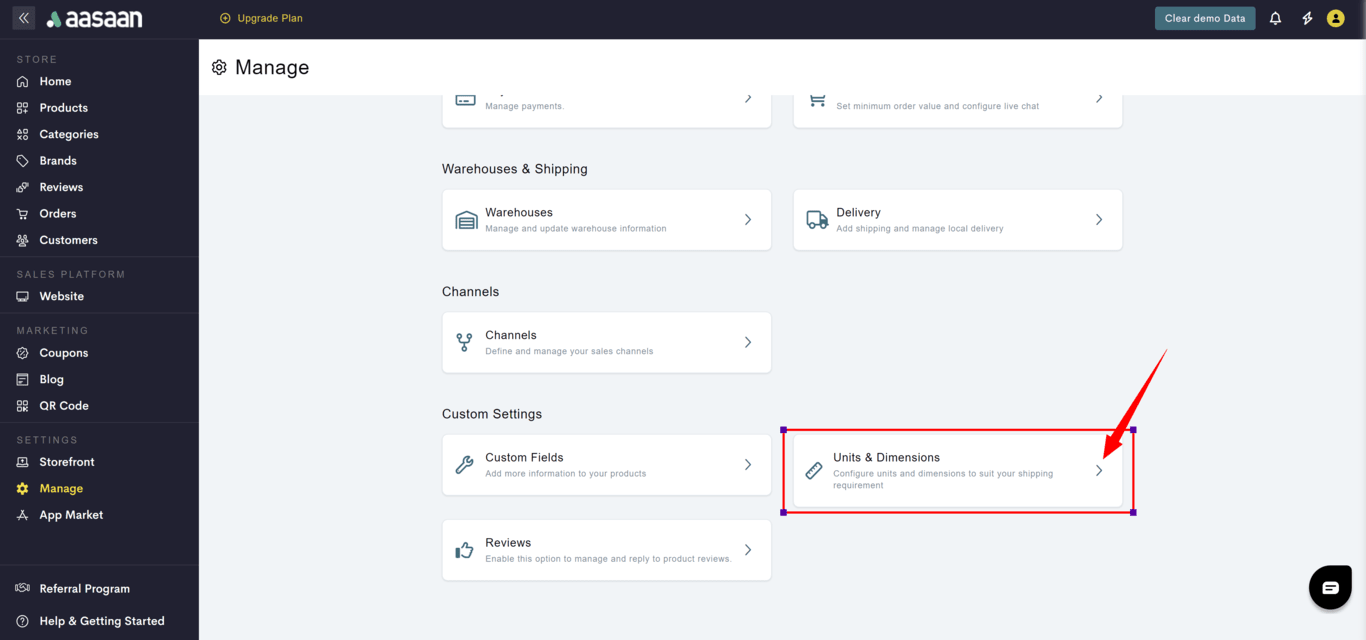
 **STEP 2:**
Click on Units and Dimensions.
**STEP 2:**
Click on Units and Dimensions.
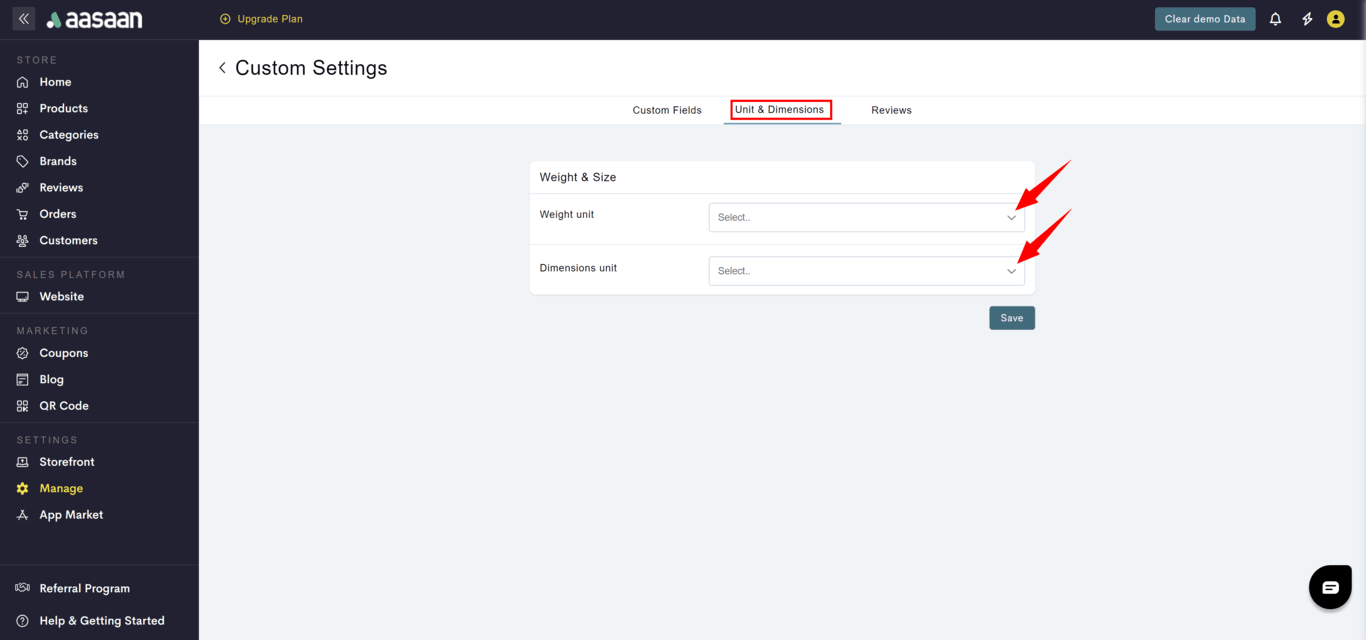
 **STEP 3:**
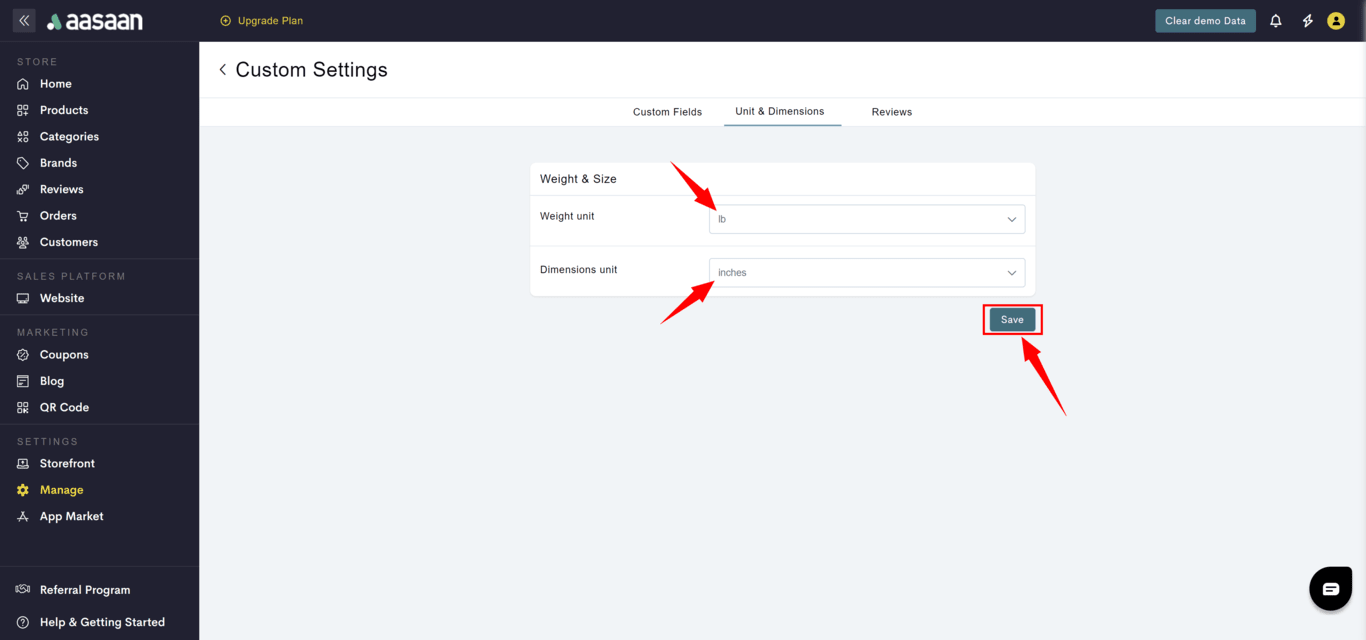
Click on the weight unit drop down to set the desired unit for your product weights. Also click on the dimensions unit drop down to set the desired unit for your product dimensions.
**STEP 3:**
Click on the weight unit drop down to set the desired unit for your product weights. Also click on the dimensions unit drop down to set the desired unit for your product dimensions.
 **STEP 4:**
Click on Save to save your settings.
**STEP 4:**
Click on Save to save your settings.
 **STEP 5:**
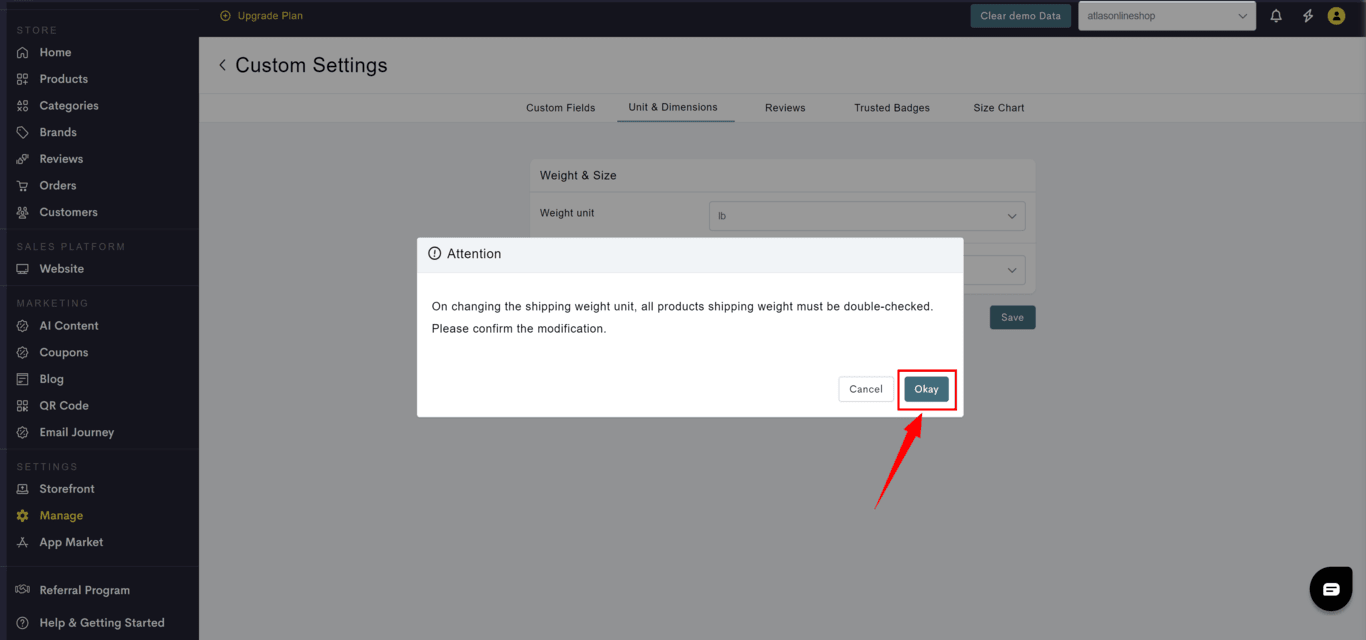
Click on Okay to confirm your changes.
**STEP 5:**
Click on Okay to confirm your changes.
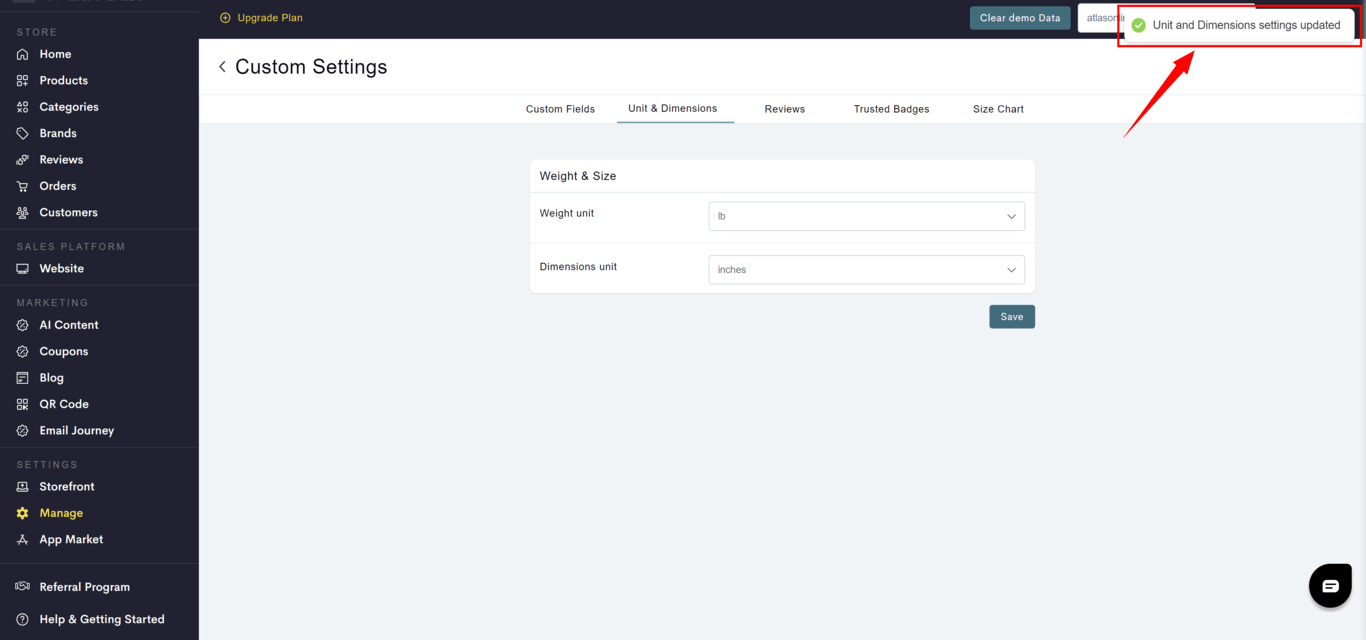
 Your settings have been successfully saved.
 To verify this, you can go to any product to view the units you've set.
### Reviews
To manage product reviews on your store:
**STEP 1:**
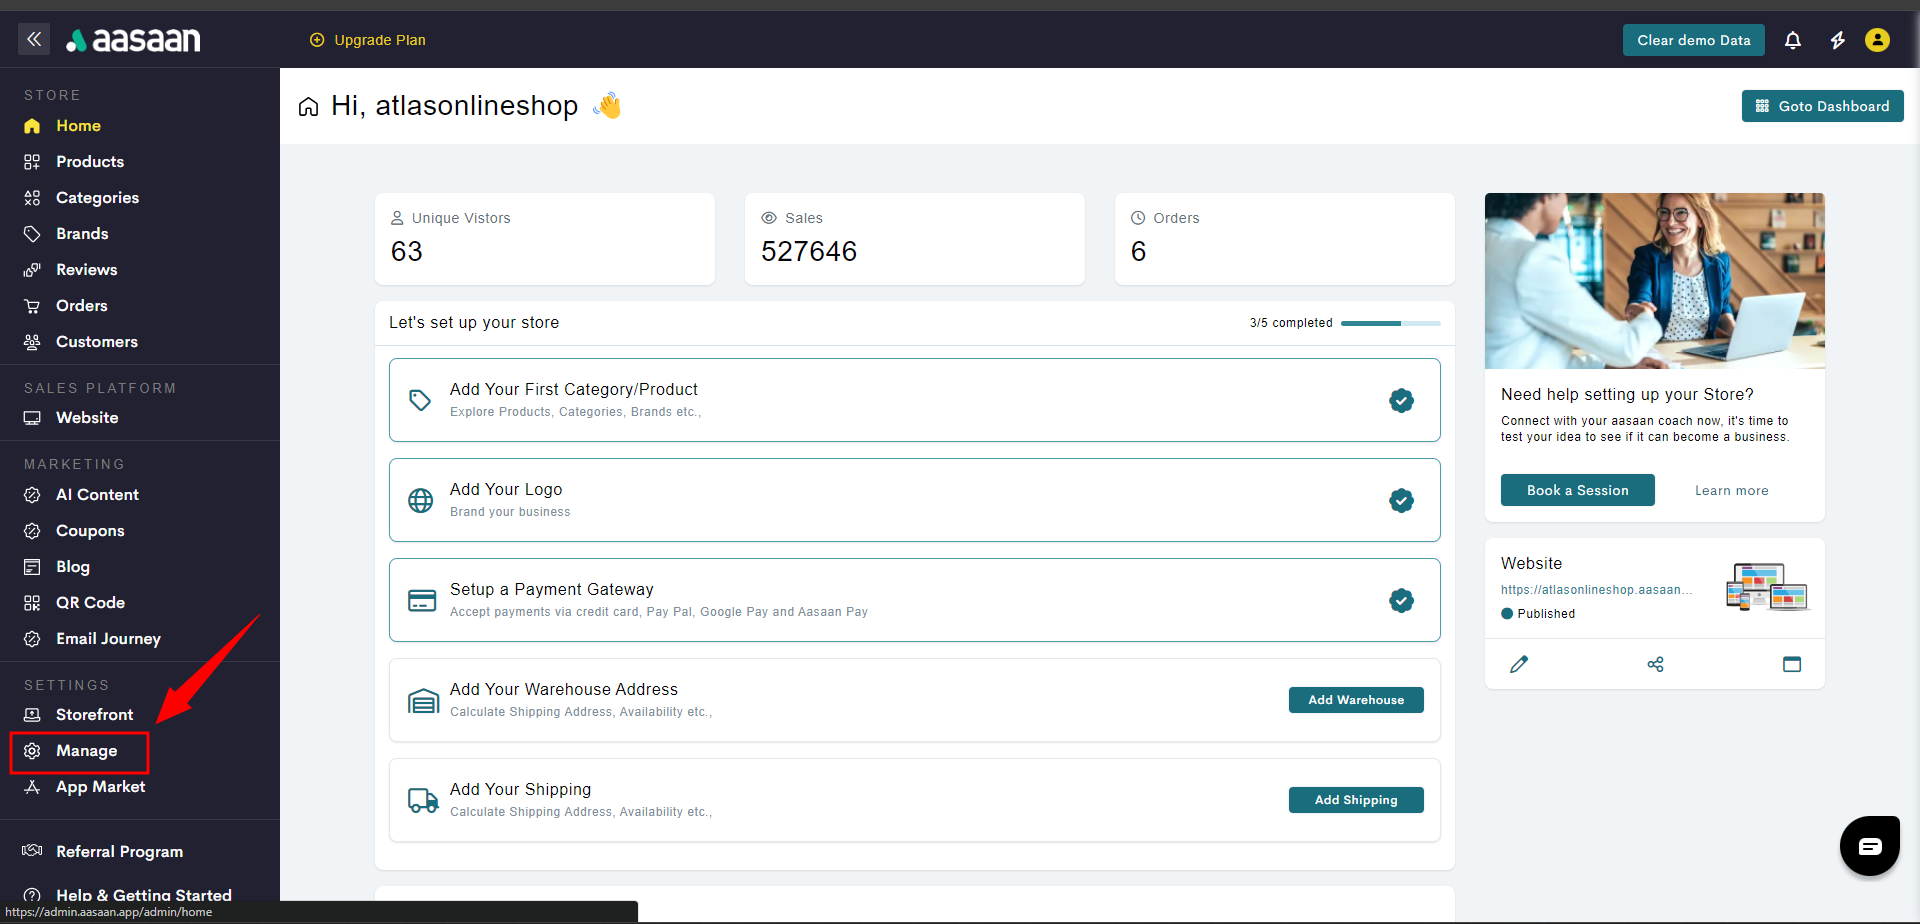
Login to your aasaan desktop admin panel and click on Manage.
To verify this, you can go to any product to view the units you've set.
### Reviews
To manage product reviews on your store:
**STEP 1:**
Login to your aasaan desktop admin panel and click on Manage.
 **STEP 2:**
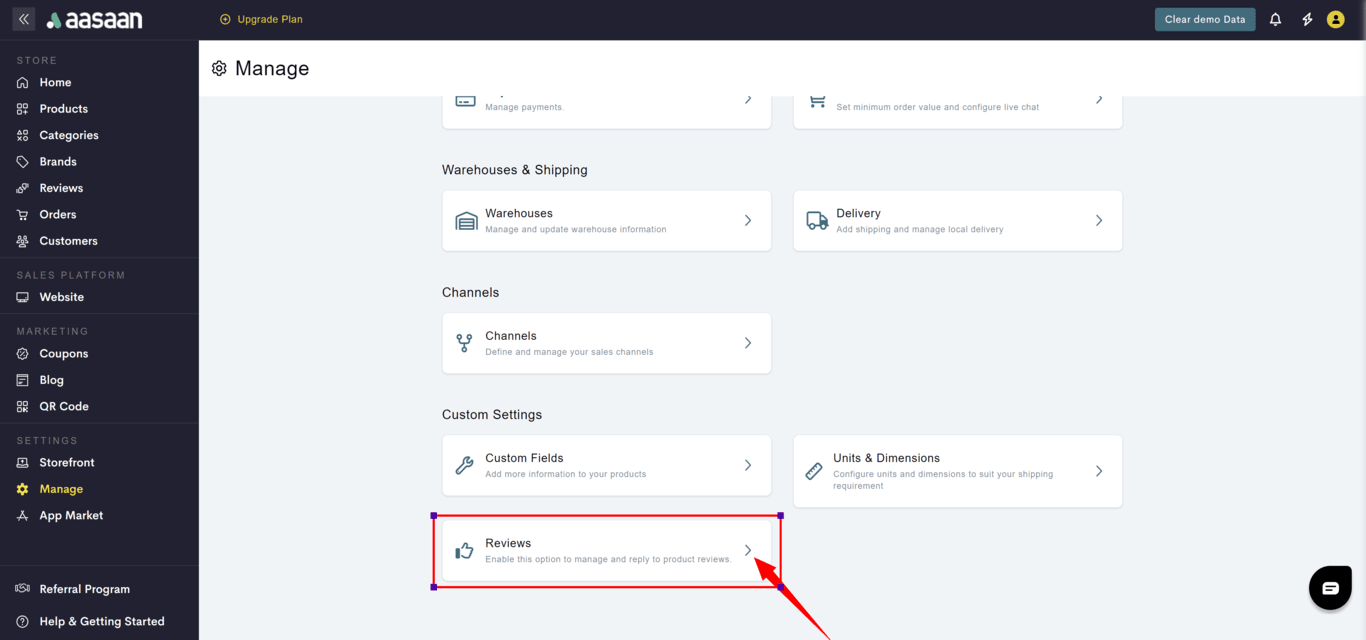
Click on Reviews.
**STEP 2:**
Click on Reviews.
 **STEP 3:**
Click the toggle to enable your reviews setting. Enabling it will automatically approve any review you get.
**STEP 3:**
Click the toggle to enable your reviews setting. Enabling it will automatically approve any review you get.
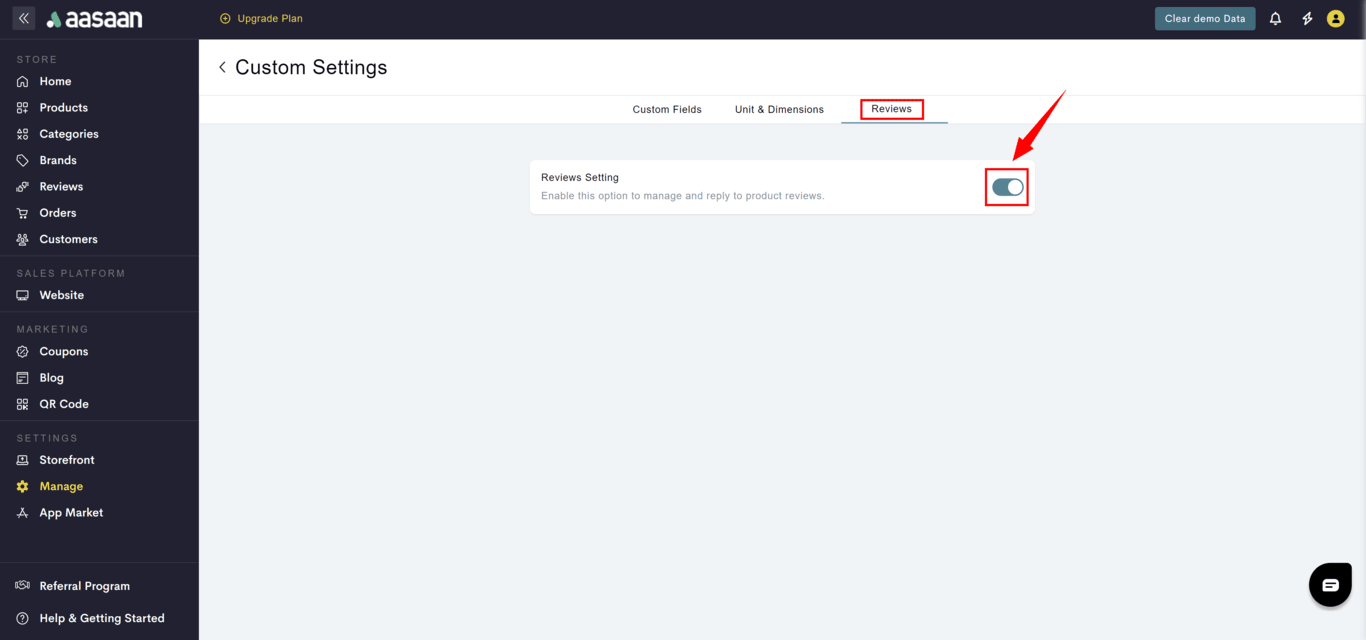 Keep it disabled. This will mark all new reviews as pending until you approve them.
### Trusted Badges
To manage trust badges on your store:
**STEP 1:**
Login to your aasaan desktop admin panel and click on Manage.
Keep it disabled. This will mark all new reviews as pending until you approve them.
### Trusted Badges
To manage trust badges on your store:
**STEP 1:**
Login to your aasaan desktop admin panel and click on Manage.
 **STEP 2:**
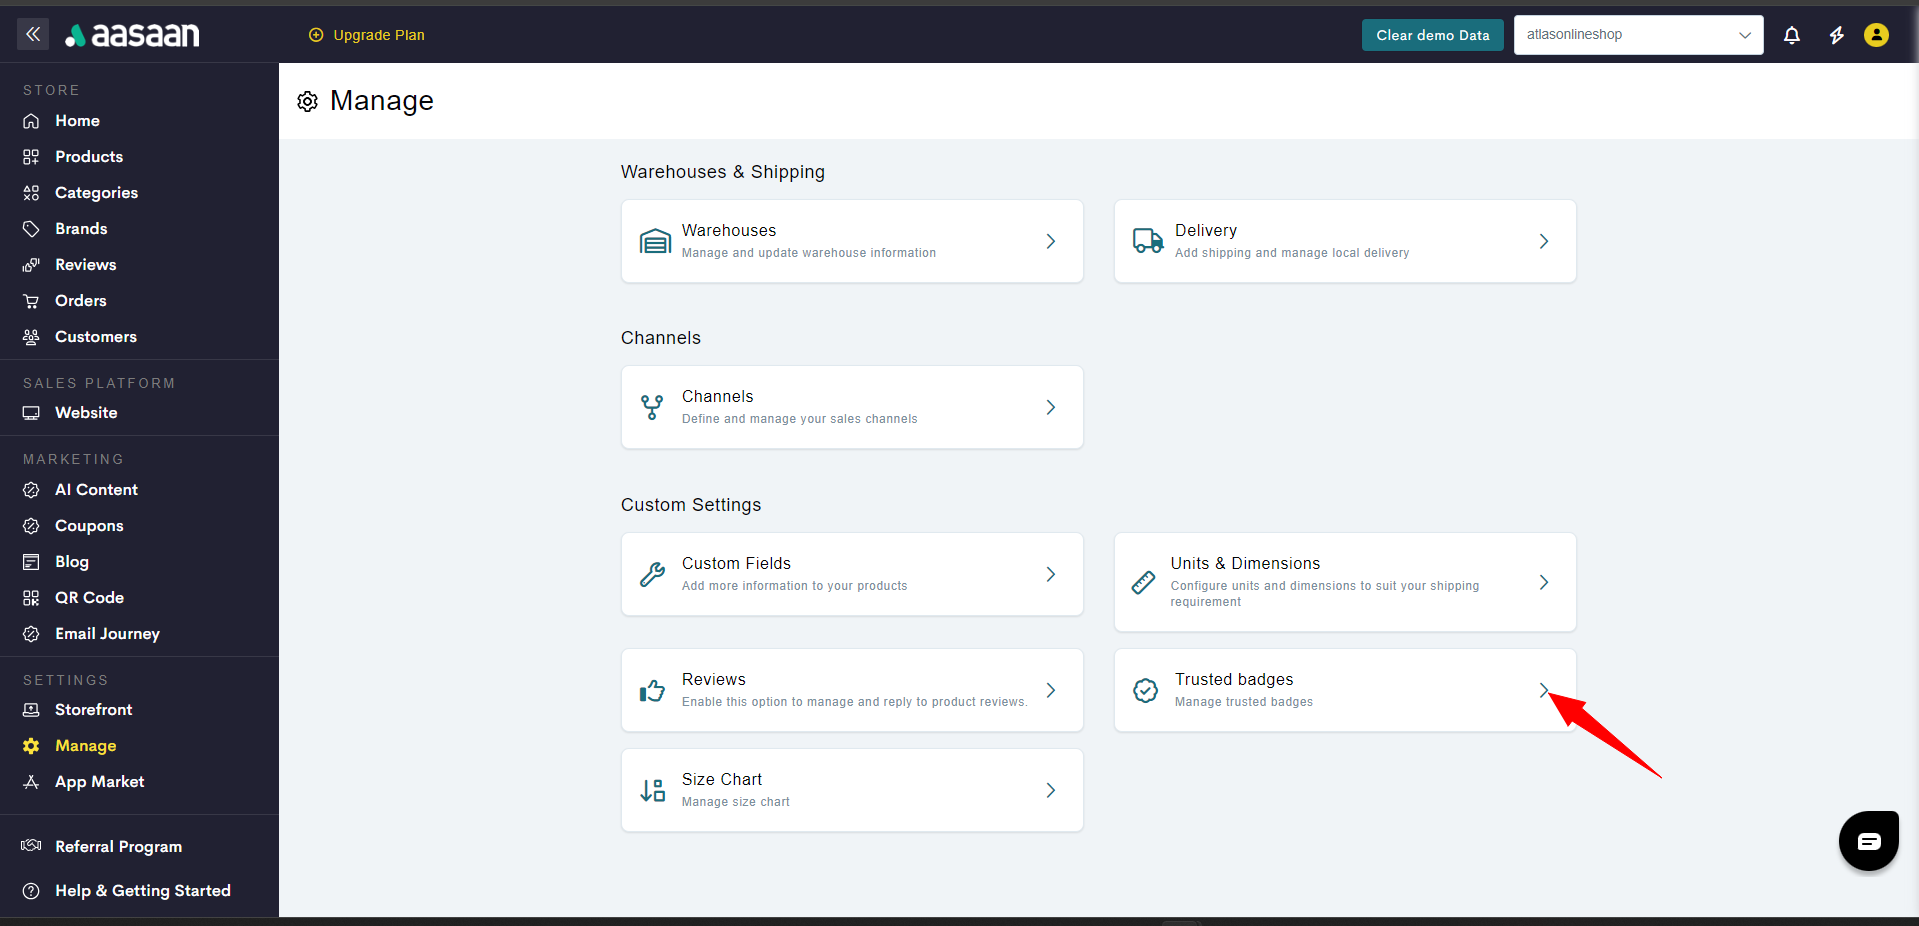
Click on Trusted Badges.
**STEP 2:**
Click on Trusted Badges.
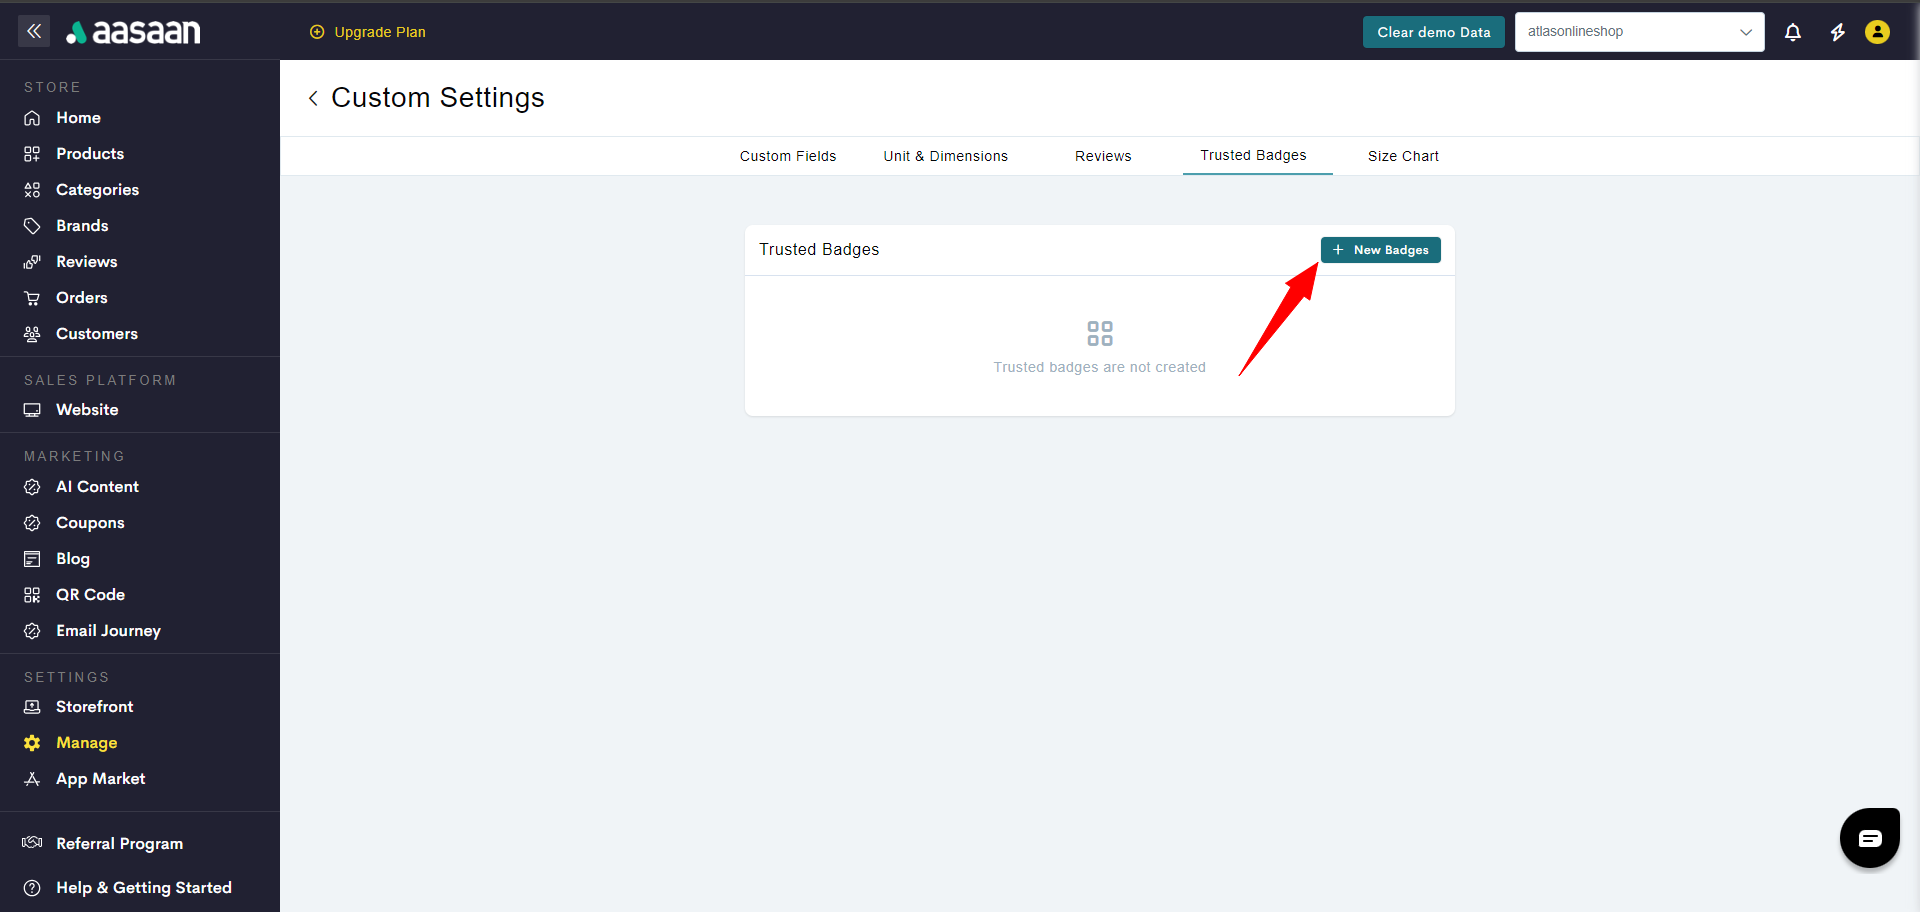
 **STEP 3:**
Click on **+ New Badges**.
**STEP 3:**
Click on **+ New Badges**.
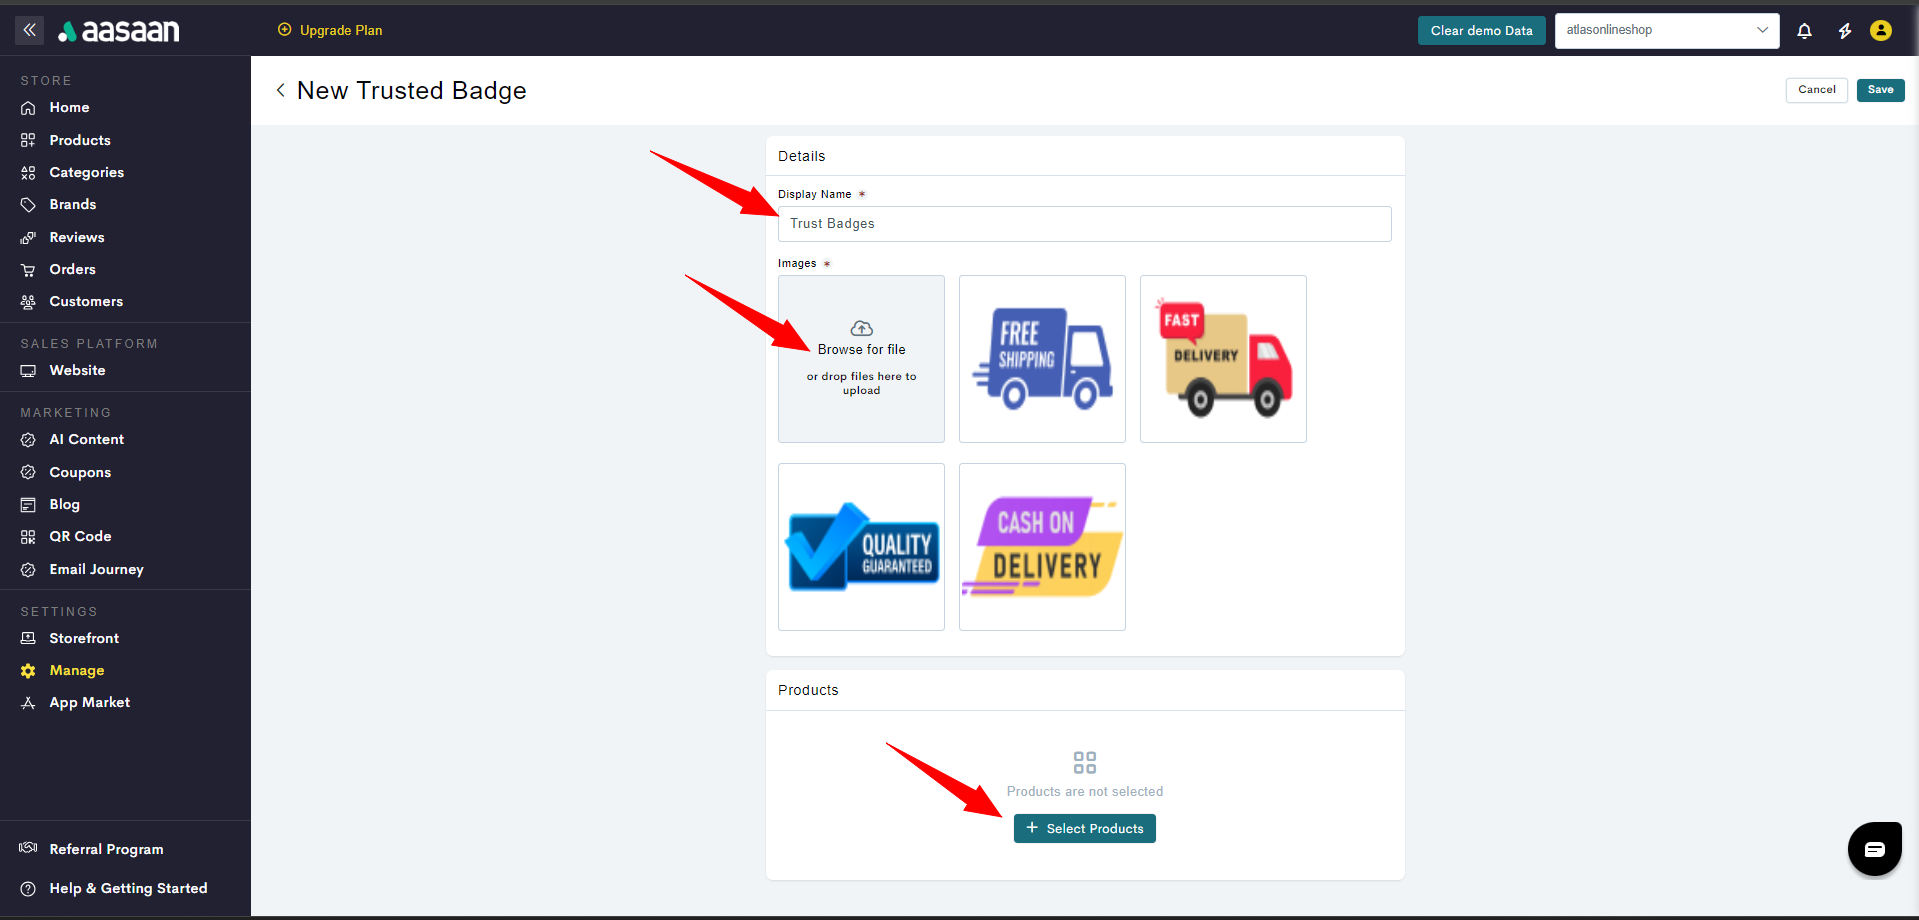
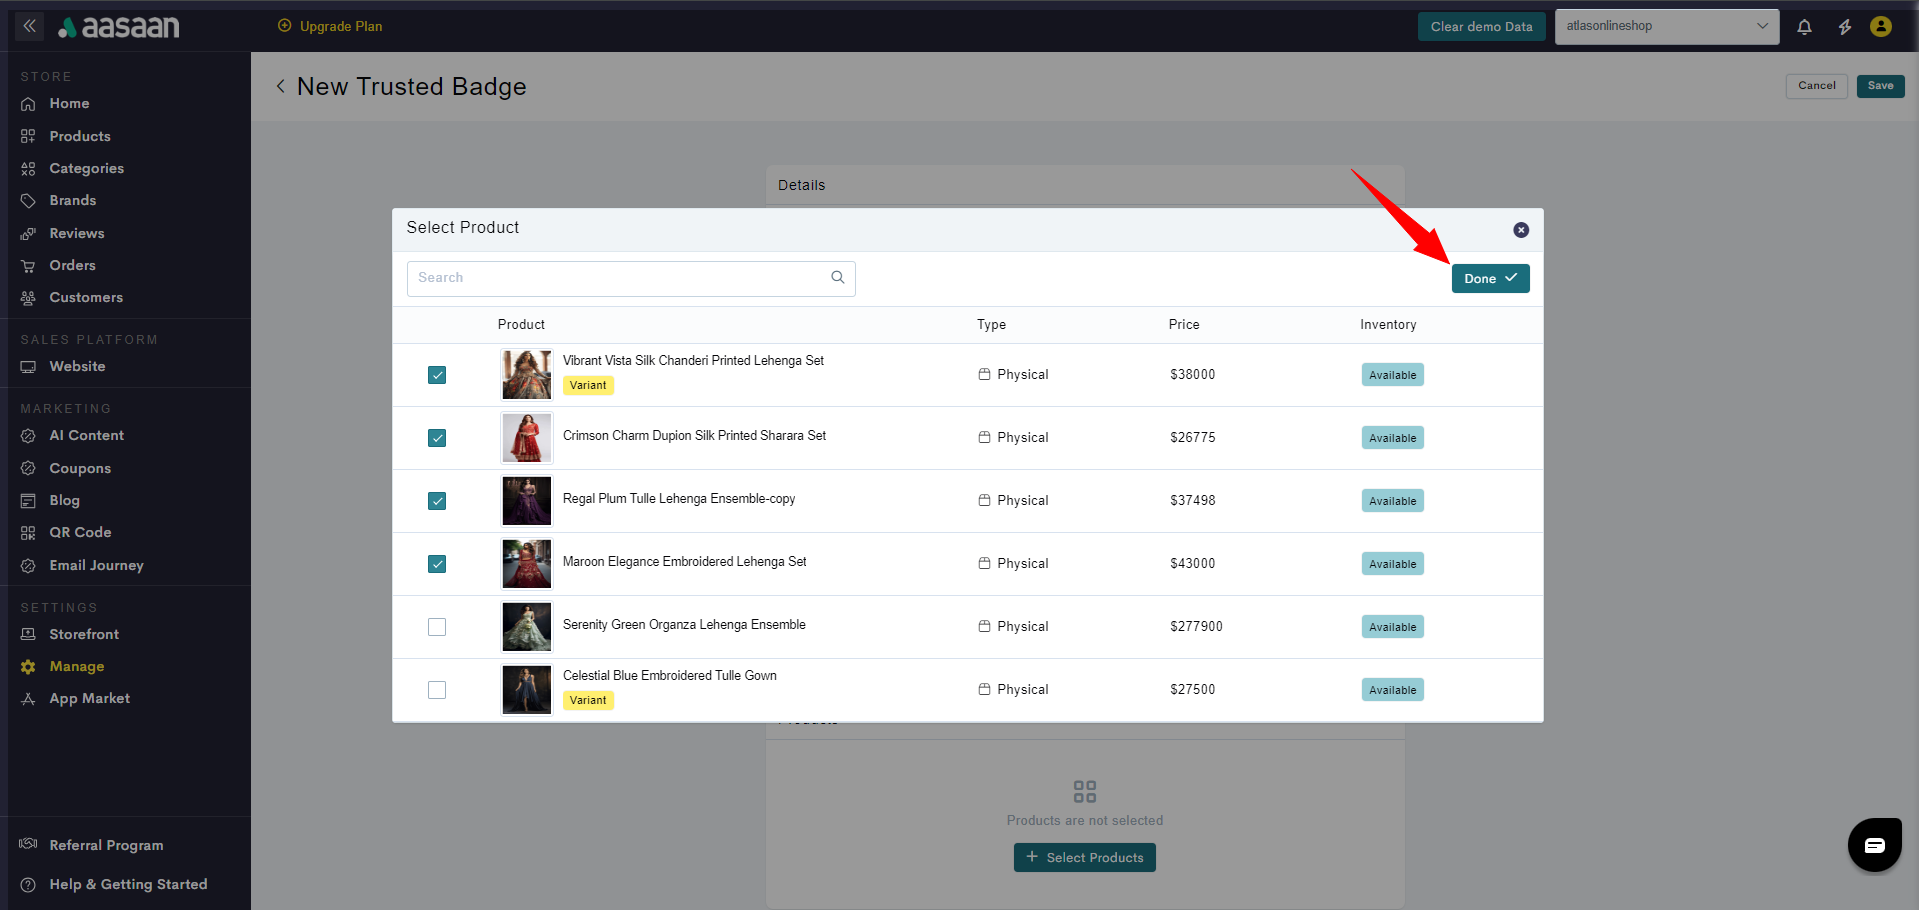
 **STEP 4:**
Provide a name, add the trusted badges and also select the products which are to be associated.
**STEP 4:**
Provide a name, add the trusted badges and also select the products which are to be associated.
 **STEP 5:**
Click on Save.
**STEP 5:**
Click on Save.
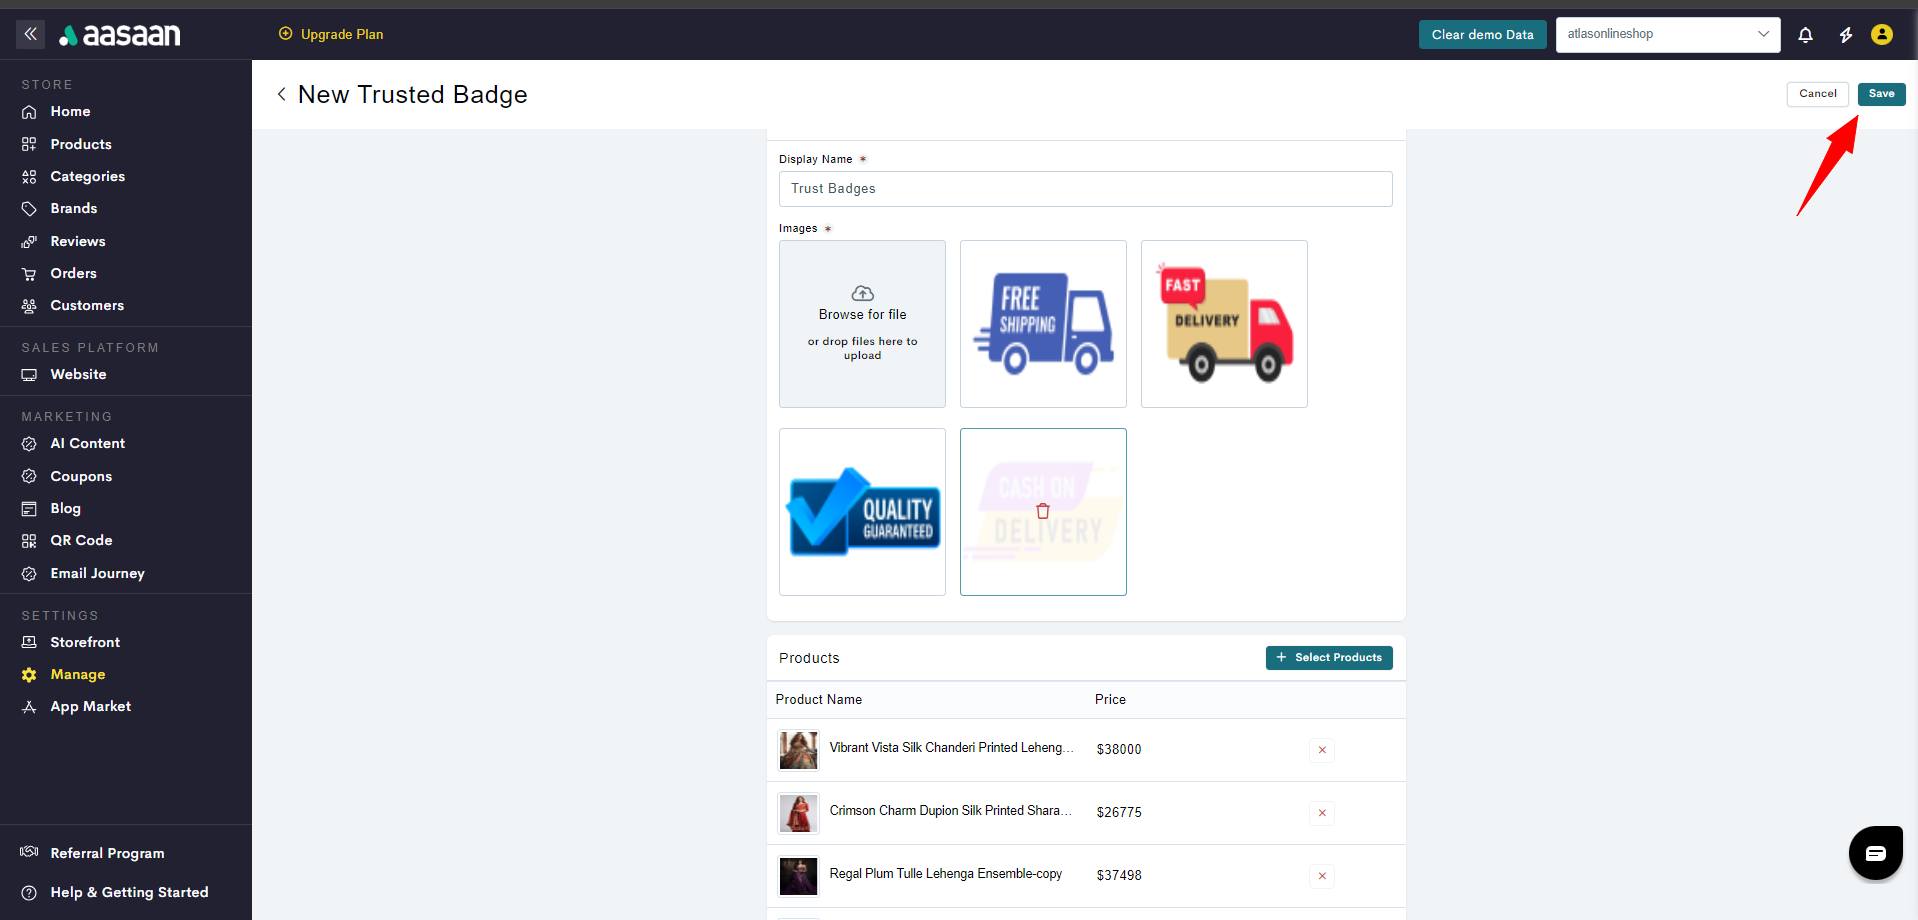
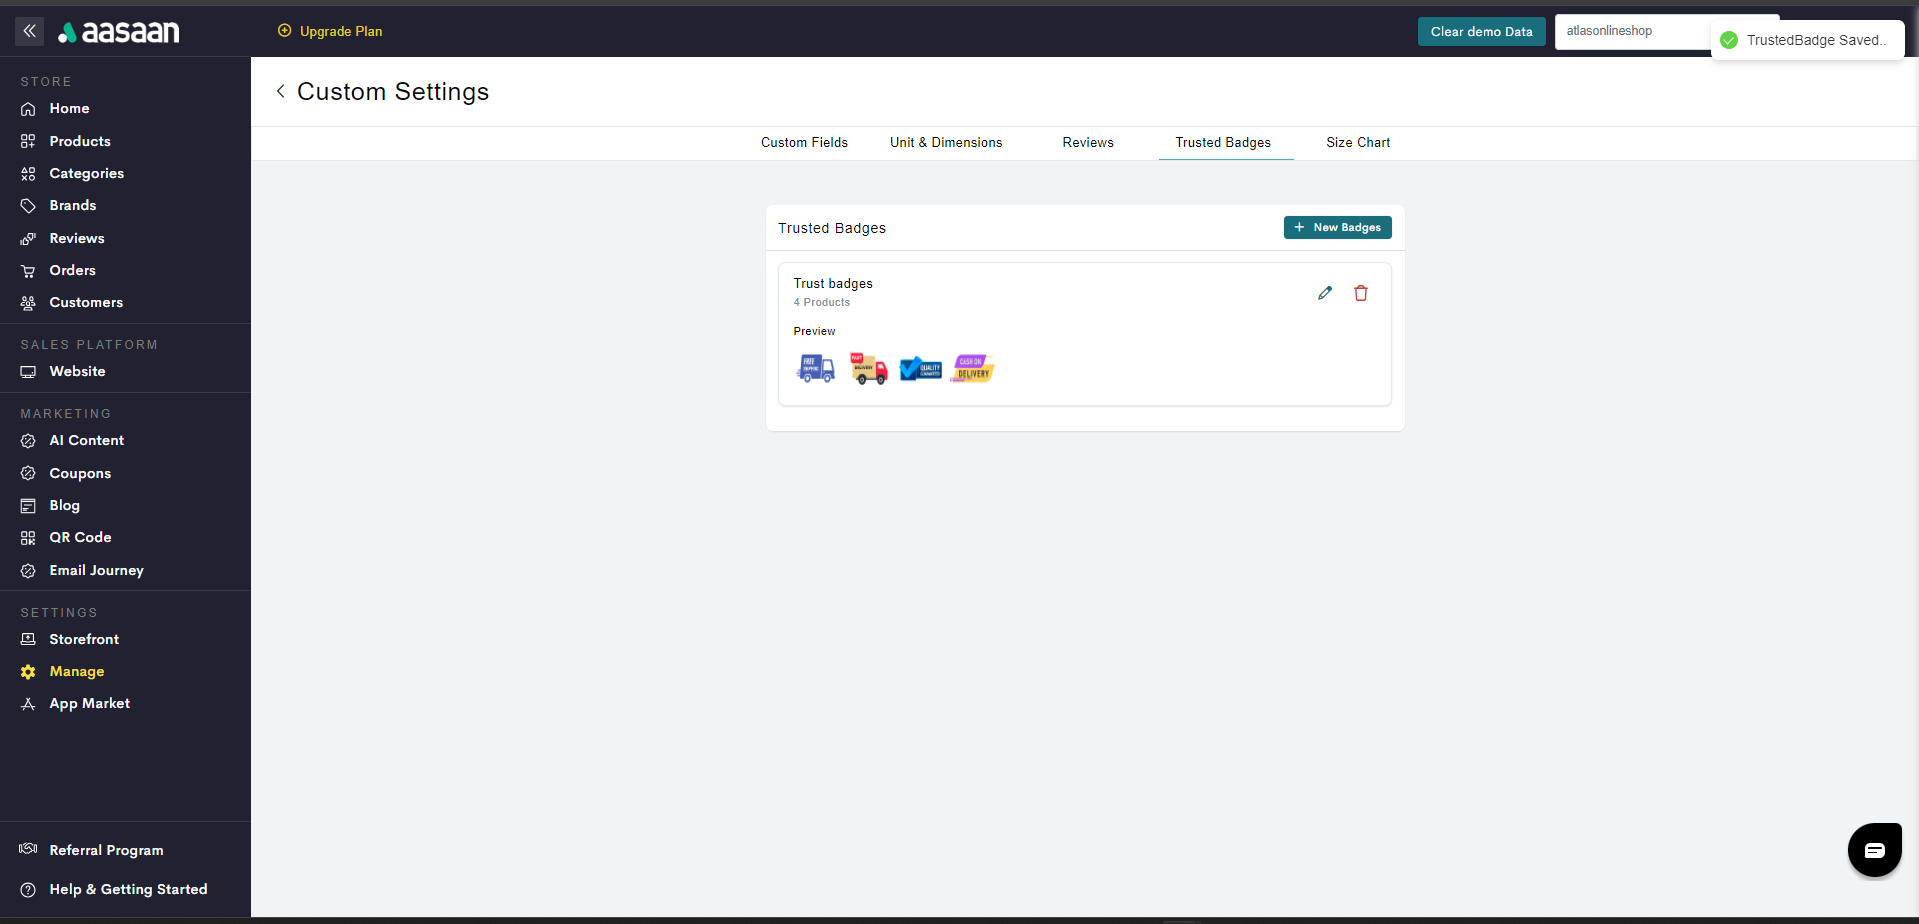 Maximum of 6 images can be associated as a group.
### Size Chart
To manage size chart on your store:
**STEP 1:**
Login to your aasaan desktop admin panel and click on Manage.
Maximum of 6 images can be associated as a group.
### Size Chart
To manage size chart on your store:
**STEP 1:**
Login to your aasaan desktop admin panel and click on Manage.
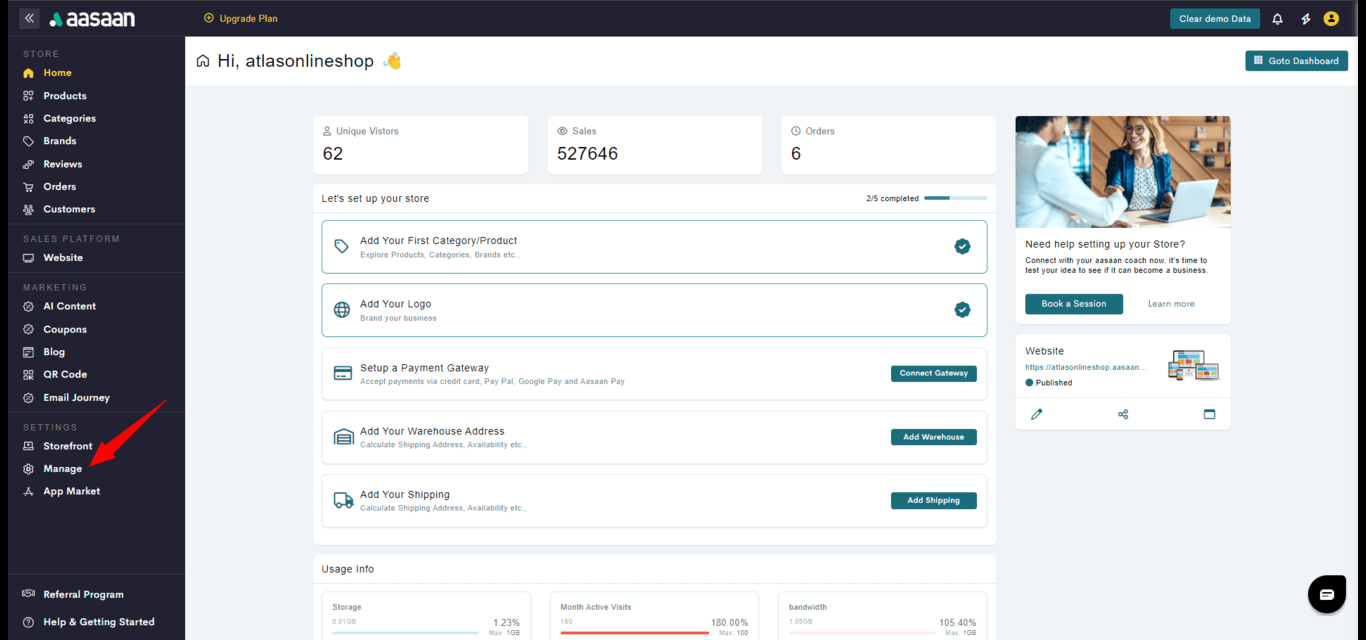 **STEP 2:**
Click on Size Chart.
**STEP 2:**
Click on Size Chart.
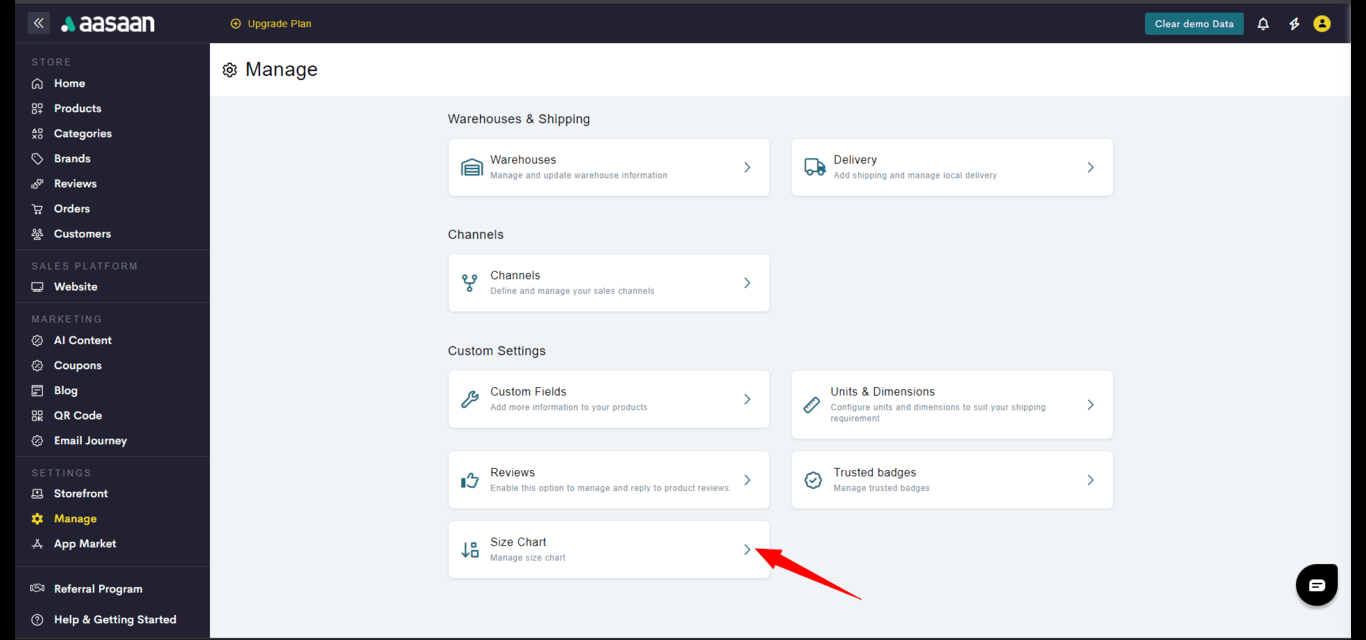 **STEP 3:**
Click on **+ Create Size Chart**.
**STEP 3:**
Click on **+ Create Size Chart**.
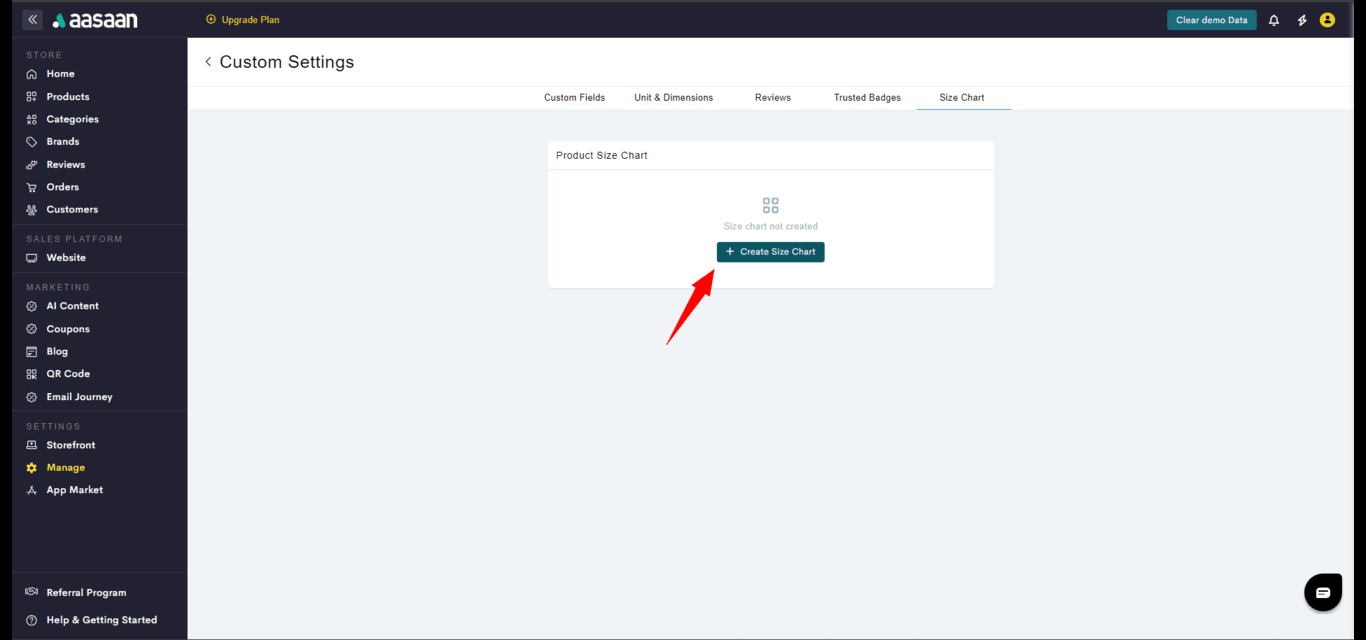 **STEP 4:**
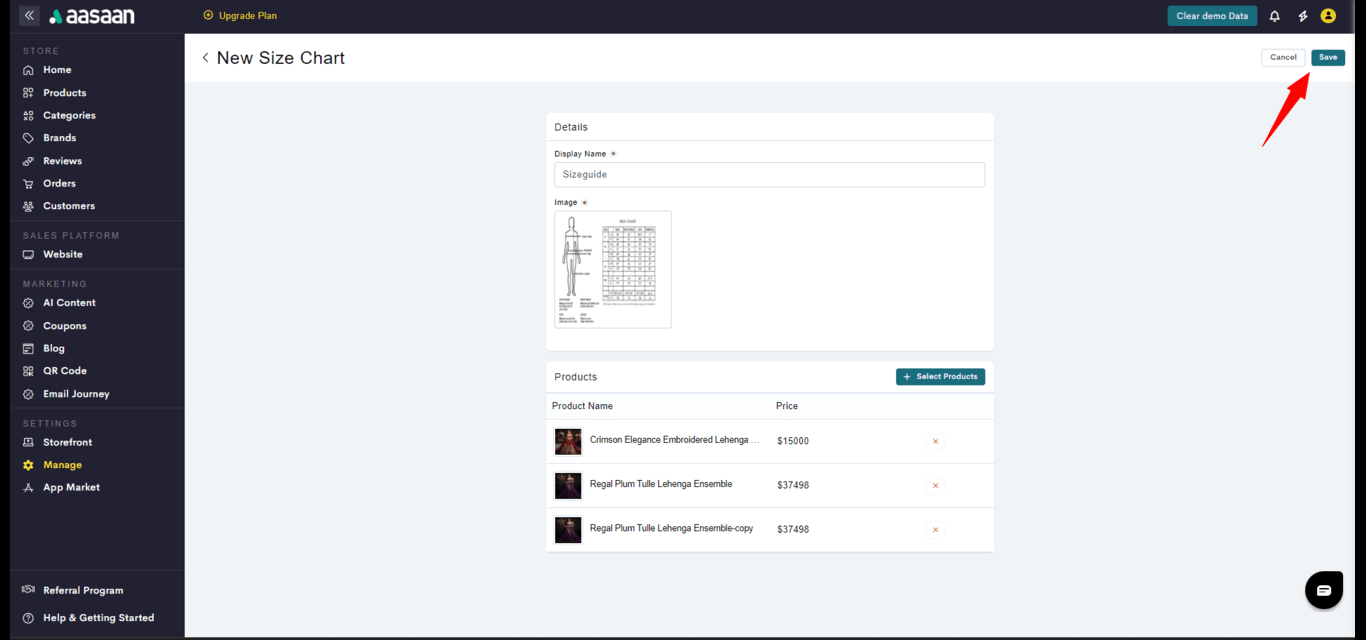
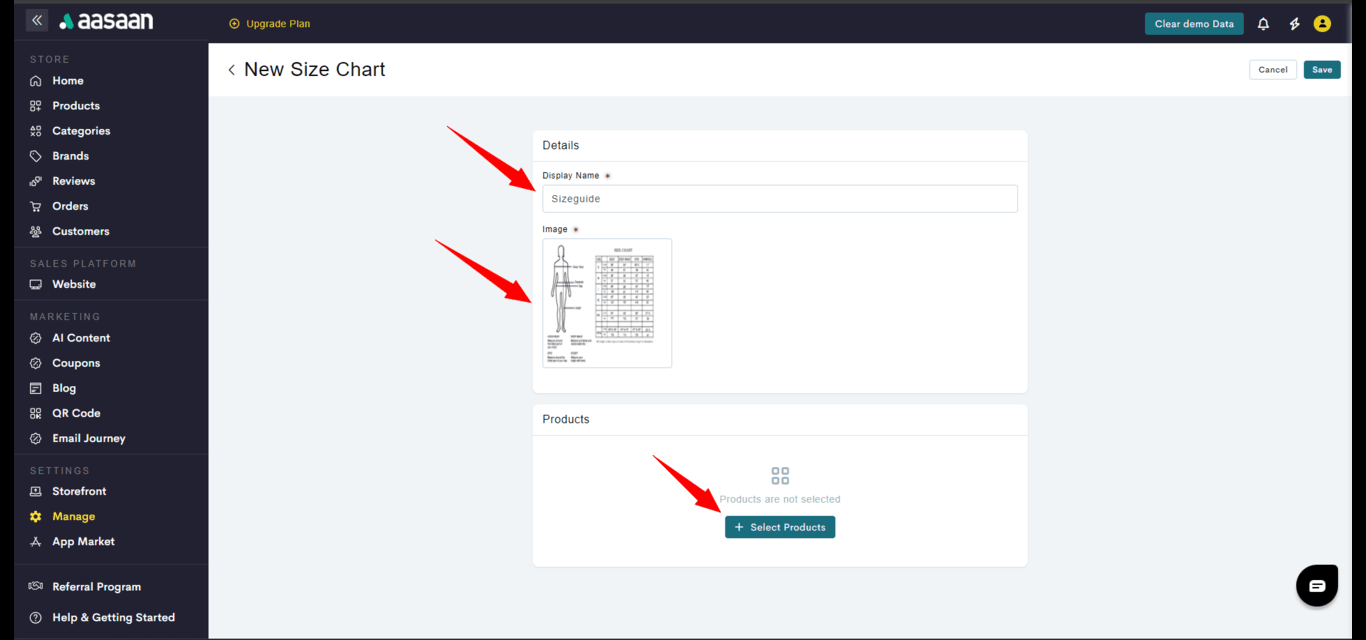
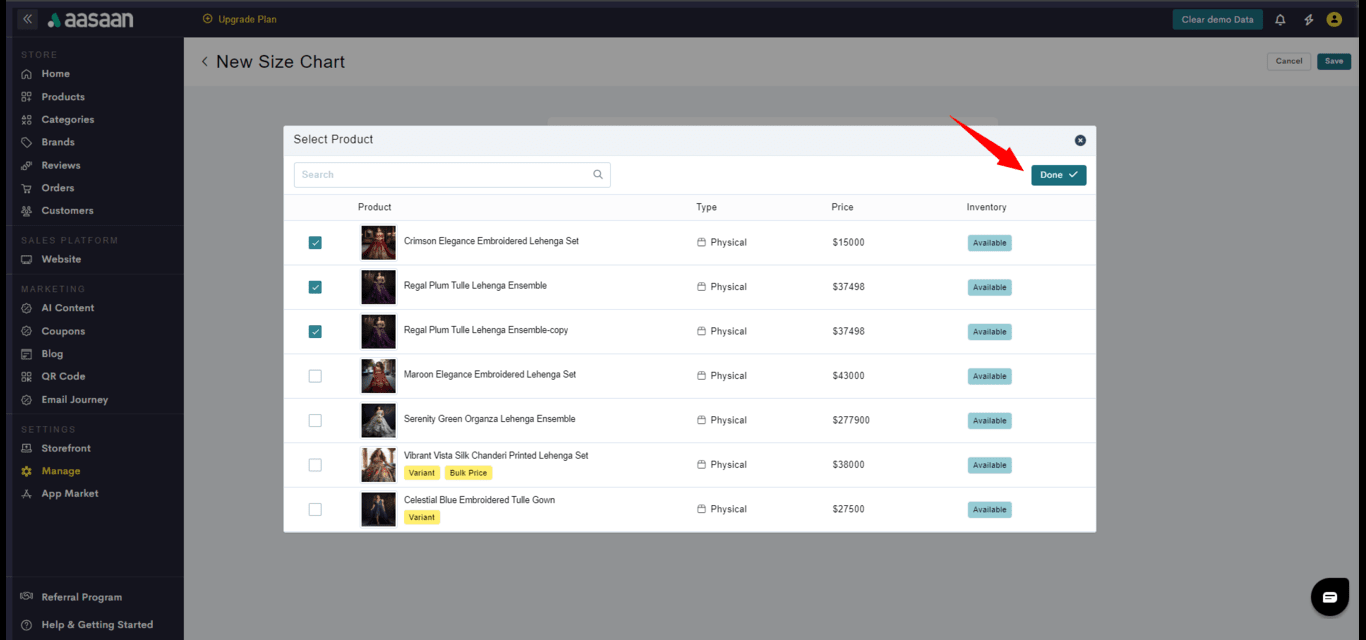
Provide a name, add the size chart image and also select the products which are to be associated.
**STEP 4:**
Provide a name, add the size chart image and also select the products which are to be associated.
 **STEP 5:**
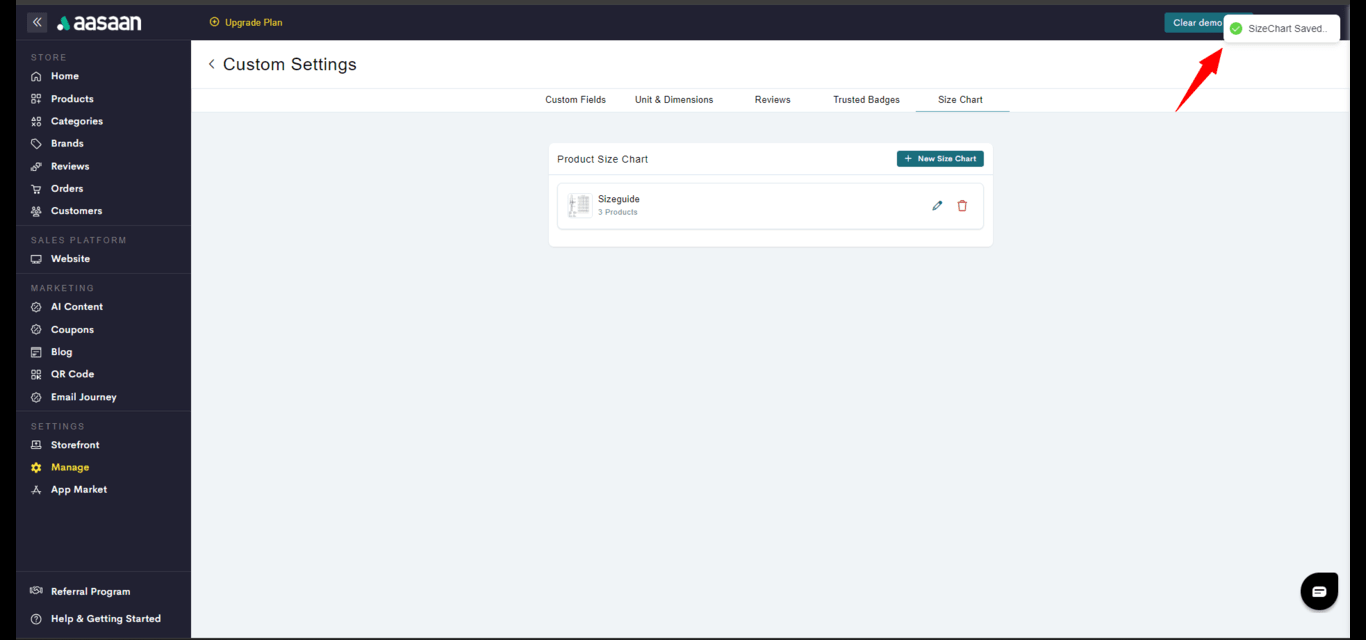
Click on Save.
**STEP 5:**
Click on Save.