> ## Documentation Index
> Fetch the complete documentation index at: https://help.aasaan.app/llms.txt
> Use this file to discover all available pages before exploring further.
# Analytics
> Learn how to set up Analytics with aasaan
## Google Analytics Integration Guide
Welcome to the Google Analytics Integration Guide, where you can learn how to set up Google Analytics for your website.
***
## Google Analytics
*Add Universal Google Analytics to Your aasaan Website*\
*Set up Universal Google Analytics on your Store*
*Note: Click [here](mobile-admin-link) to navigate to the mobile admin app version of this article*
You can watch the video version of this article [here](video-link).
Google Analytics is a free tool by Google that enables you to track your website statistics, including how many people have visited, for how long is the average user on your website, and how many people are on your website right now.
Here is how you link your Aasaan website to Google Analytics so that you can track your website statistics easily.\
*Note: Log in to your Aasaan desktop admin panel and install Google Analytics from your app market. Click [here](app-market-link) to learn how to install apps from the app market.*
### STEP 1:
Login to your Google Analytics dashboard.
### STEP 2:
On your dashboard, click on the Admin button at the bottom left.
### STEP 3:
Click on Property Settings.
### STEP 4:
Copy the tracking ID shown.
### STEP 5:
Go to your Google Analytics app in aasaan, enter the tracking ID from step 4 and click on Verify.\
You have successfully linked your Universal Analytics property to your Aasaan website.
## Screenshots for Google Analytics

***
## Create Google Analytics 4 Property
*How to Create your Google Analytics 4 Property*
**STEP 1:**
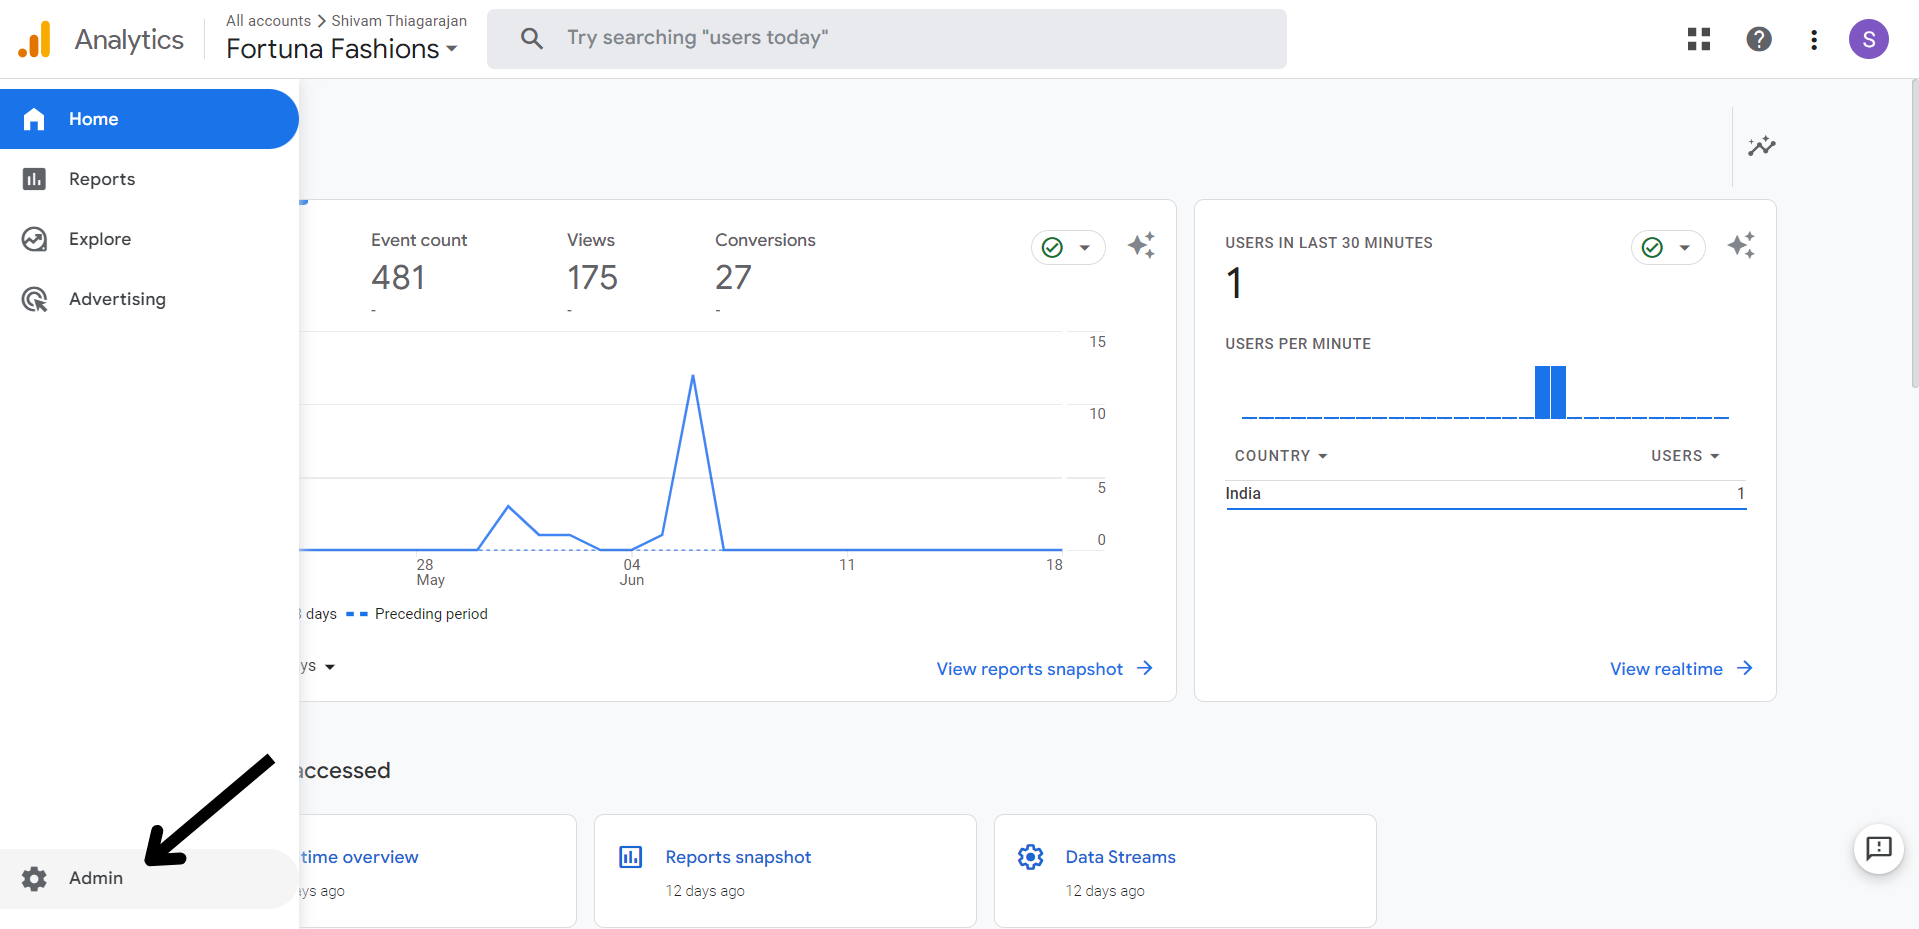
Login to Google Analytics and click on Admin.
**STEP 2:**
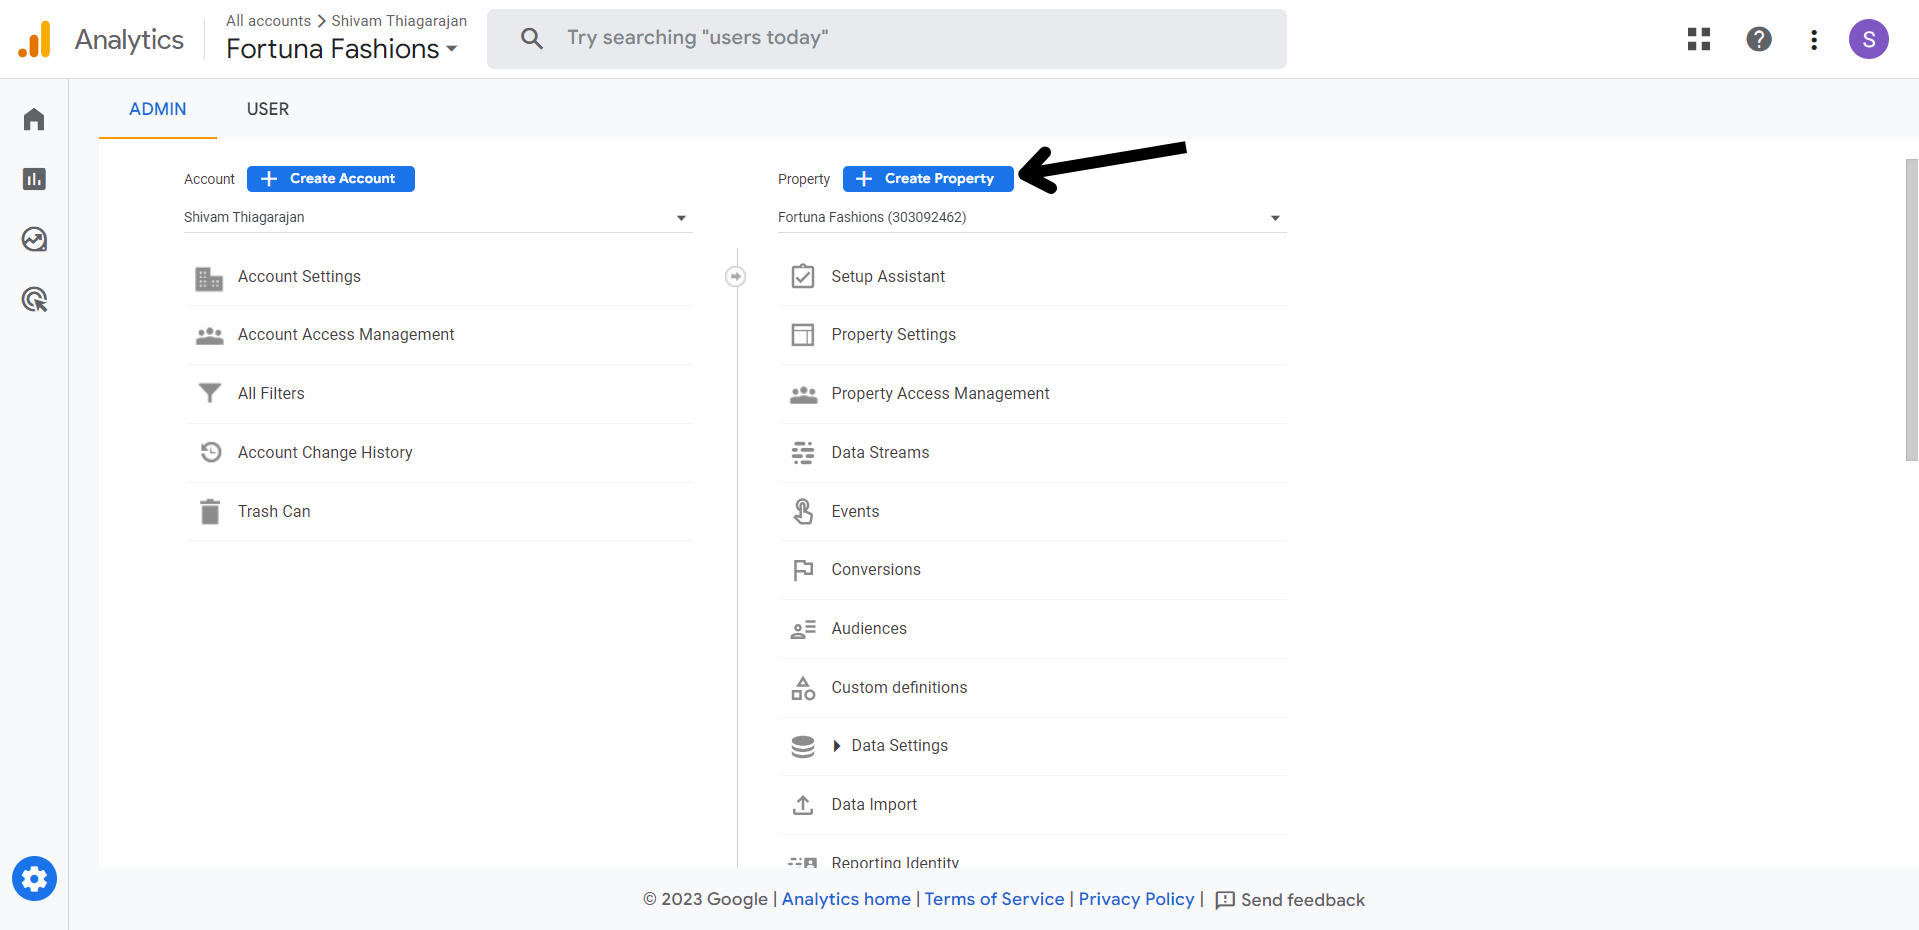
Click on Create Property.
**STEP 3:**
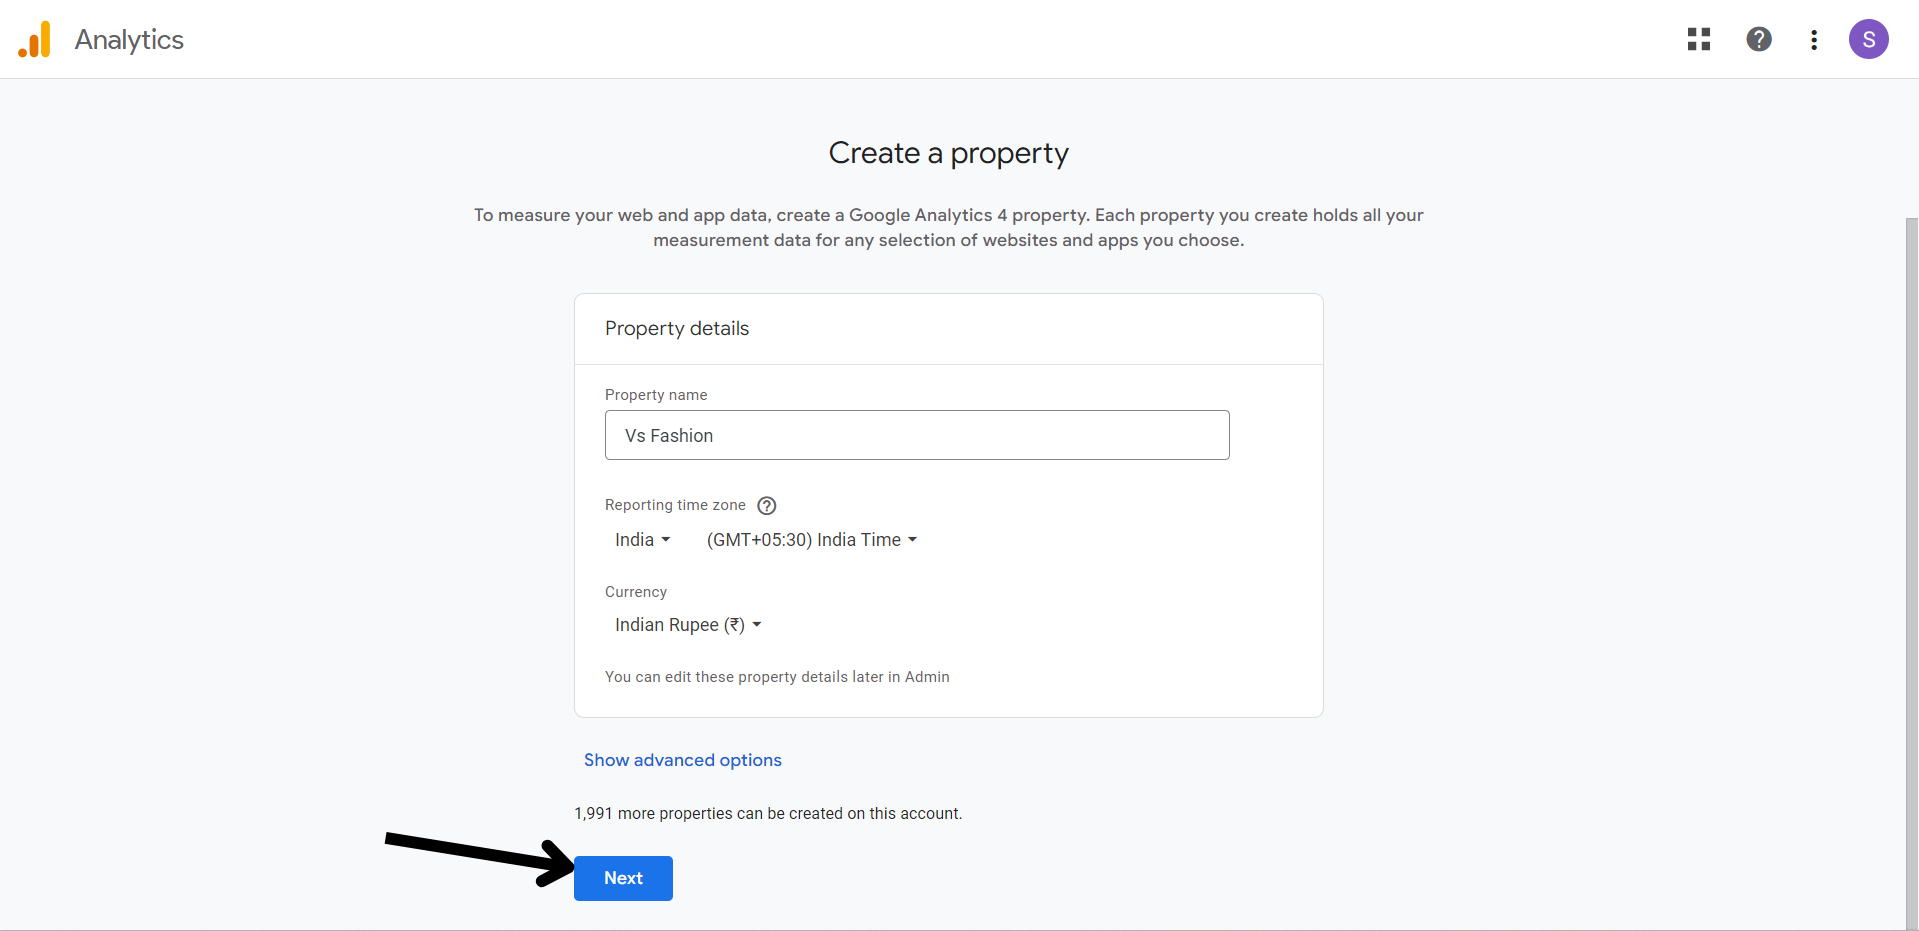
Enter the Property name, country, currency, and click on Next.
**STEP 4:**
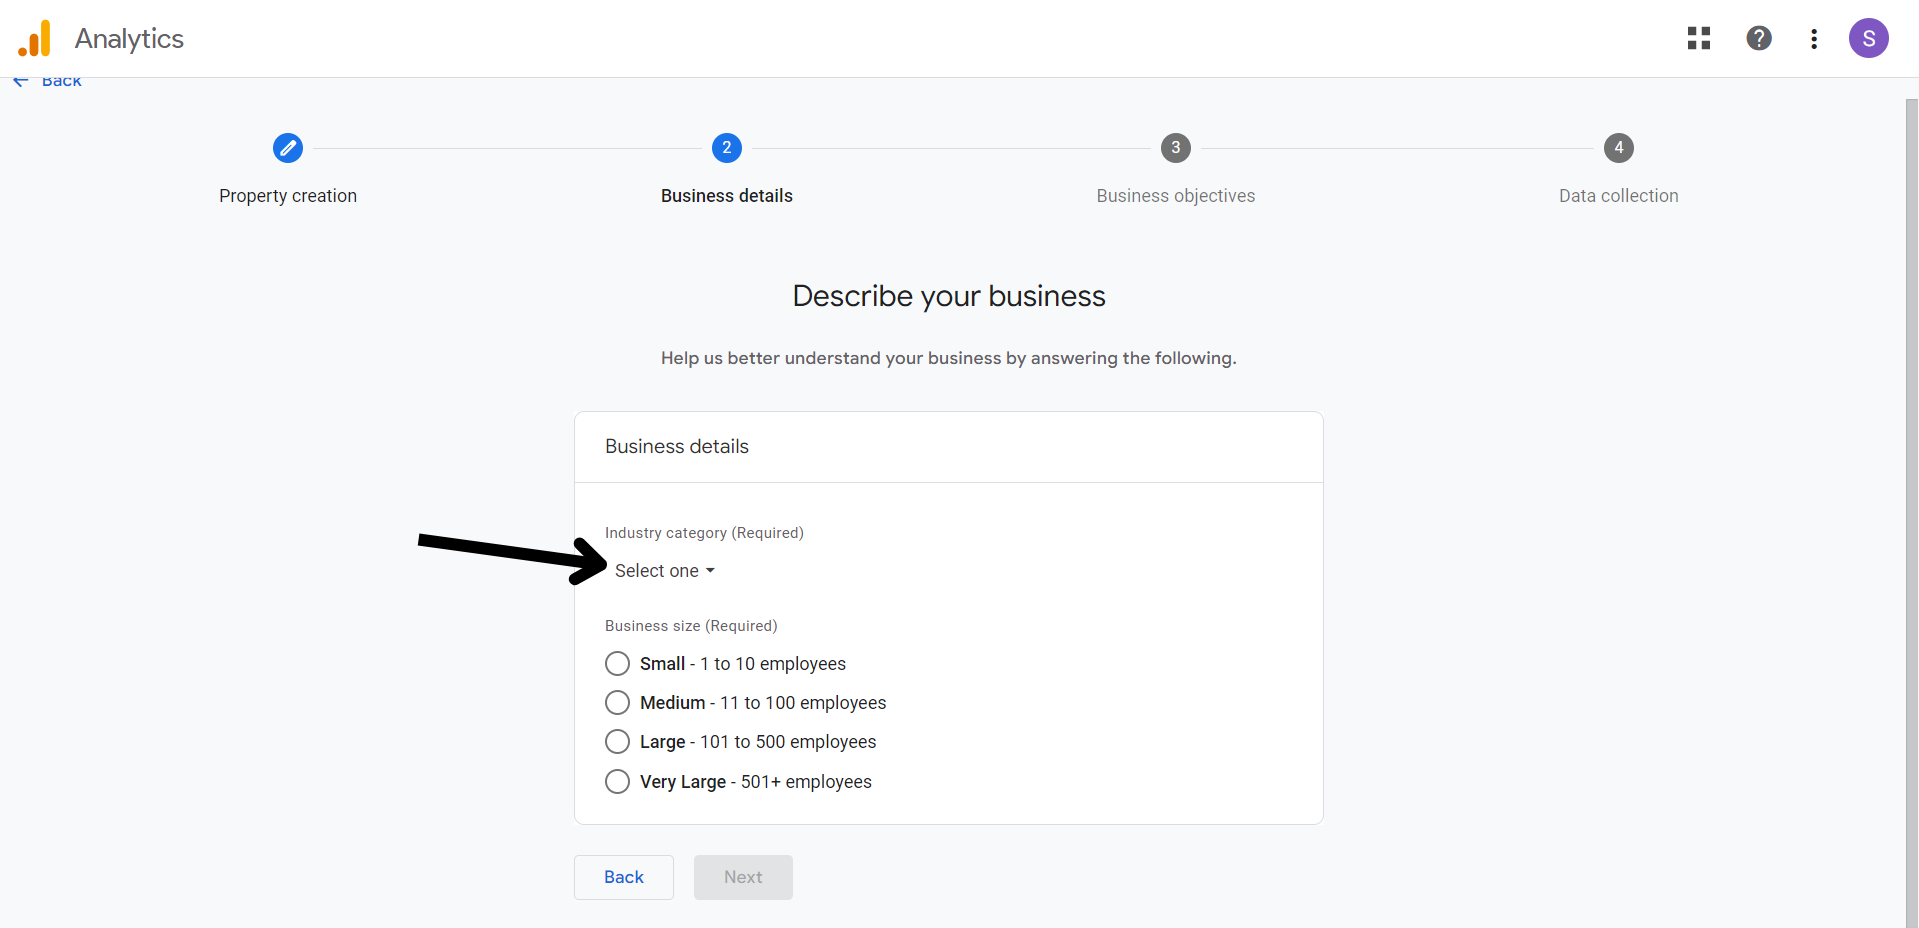
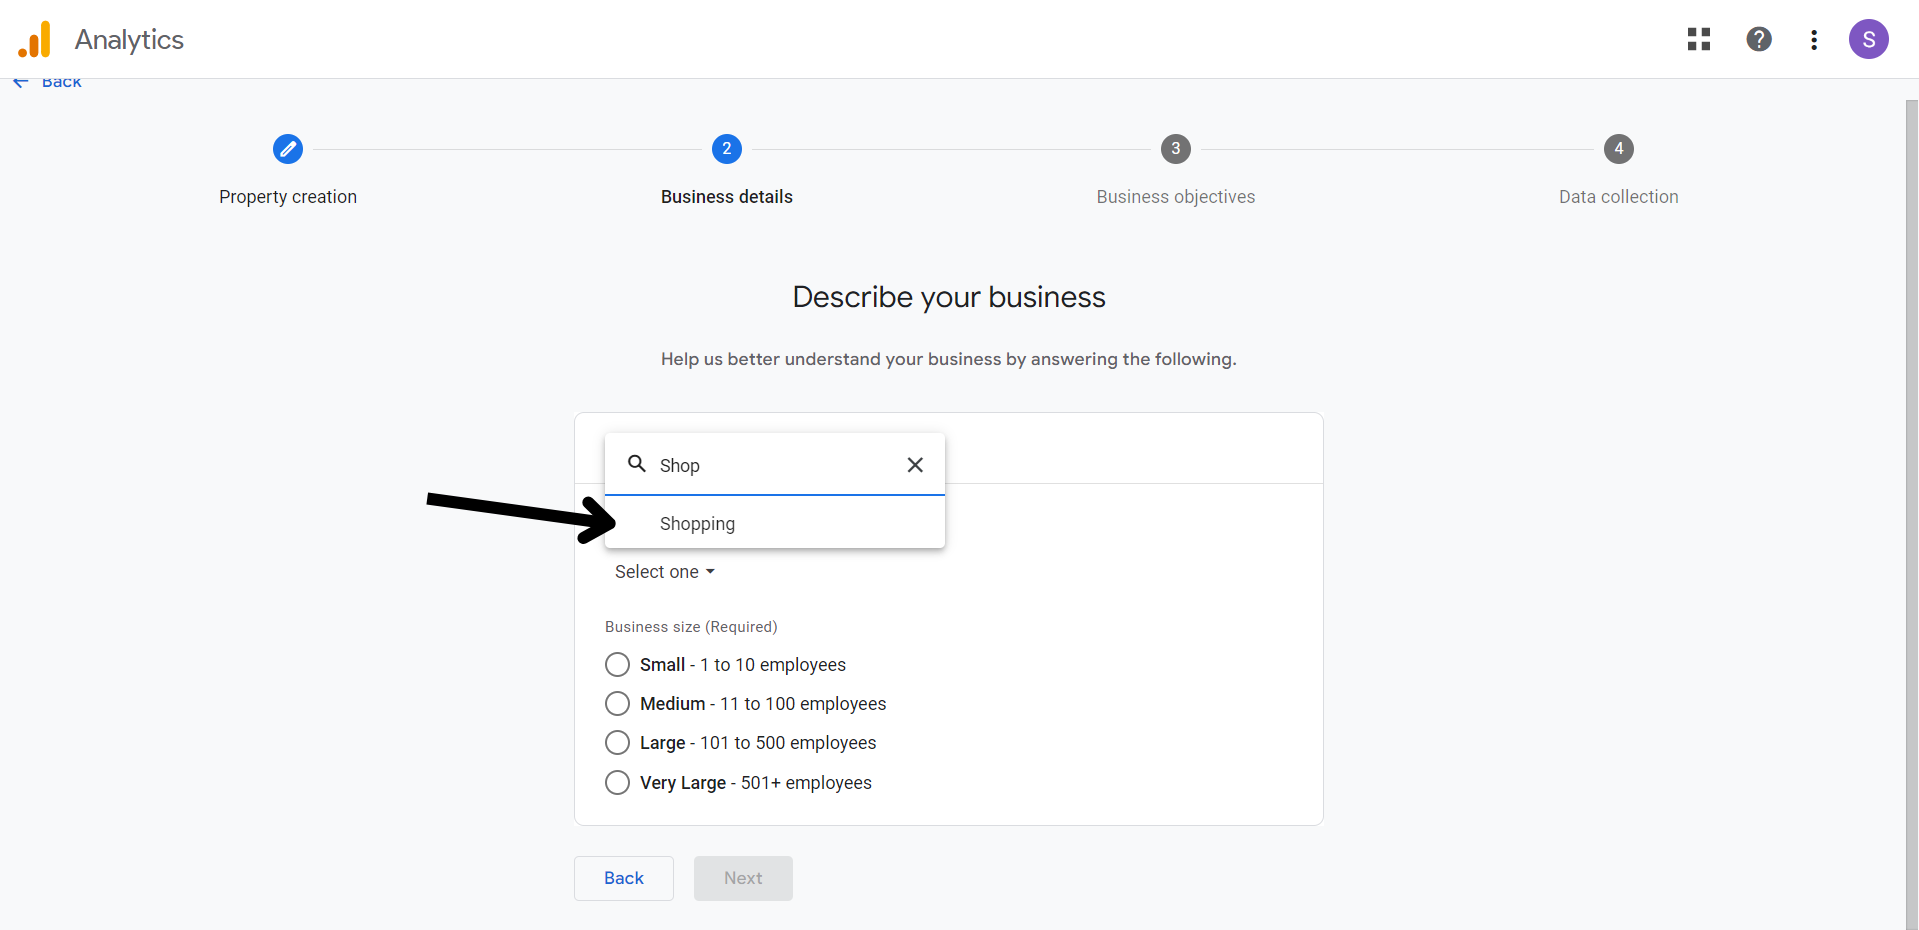
Click on Select one to choose your industry category.
**STEP 5:**
Select your category. Here we will select Shopping.
**STEP 6:**
Choose your Business size and click on Next.
**STEP 7:**
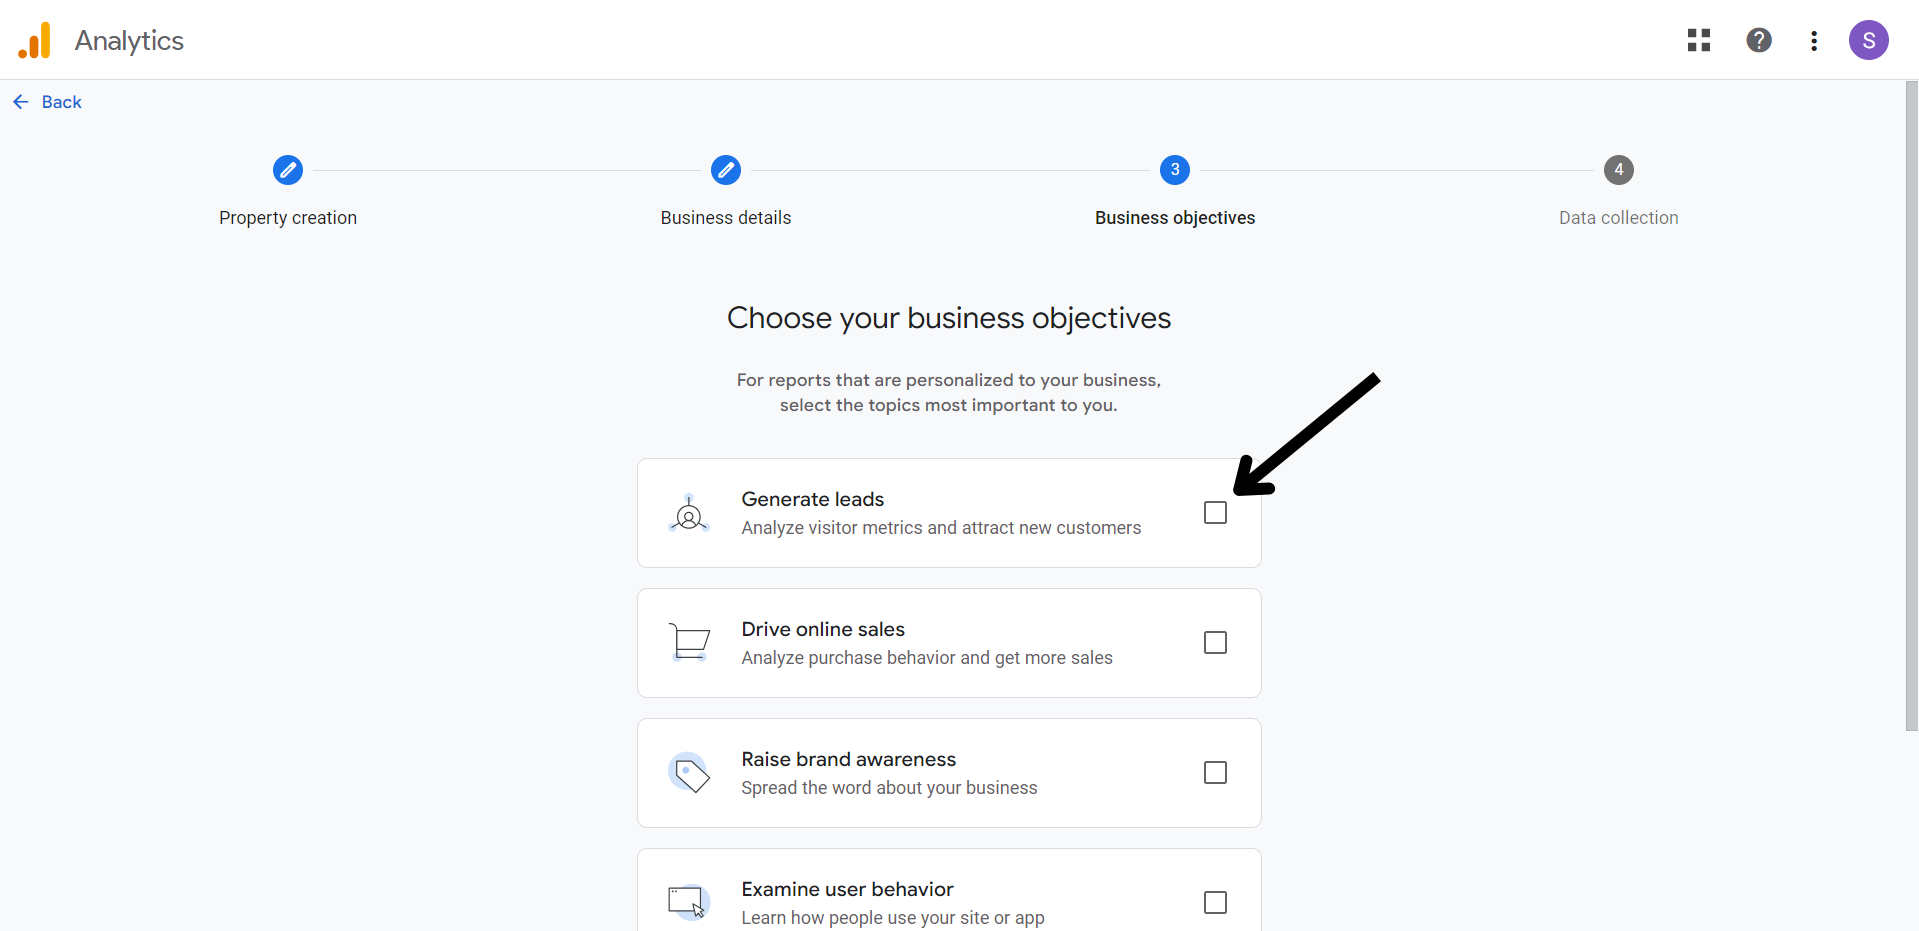
Choose your relevant business objectives.
**STEP 8:**
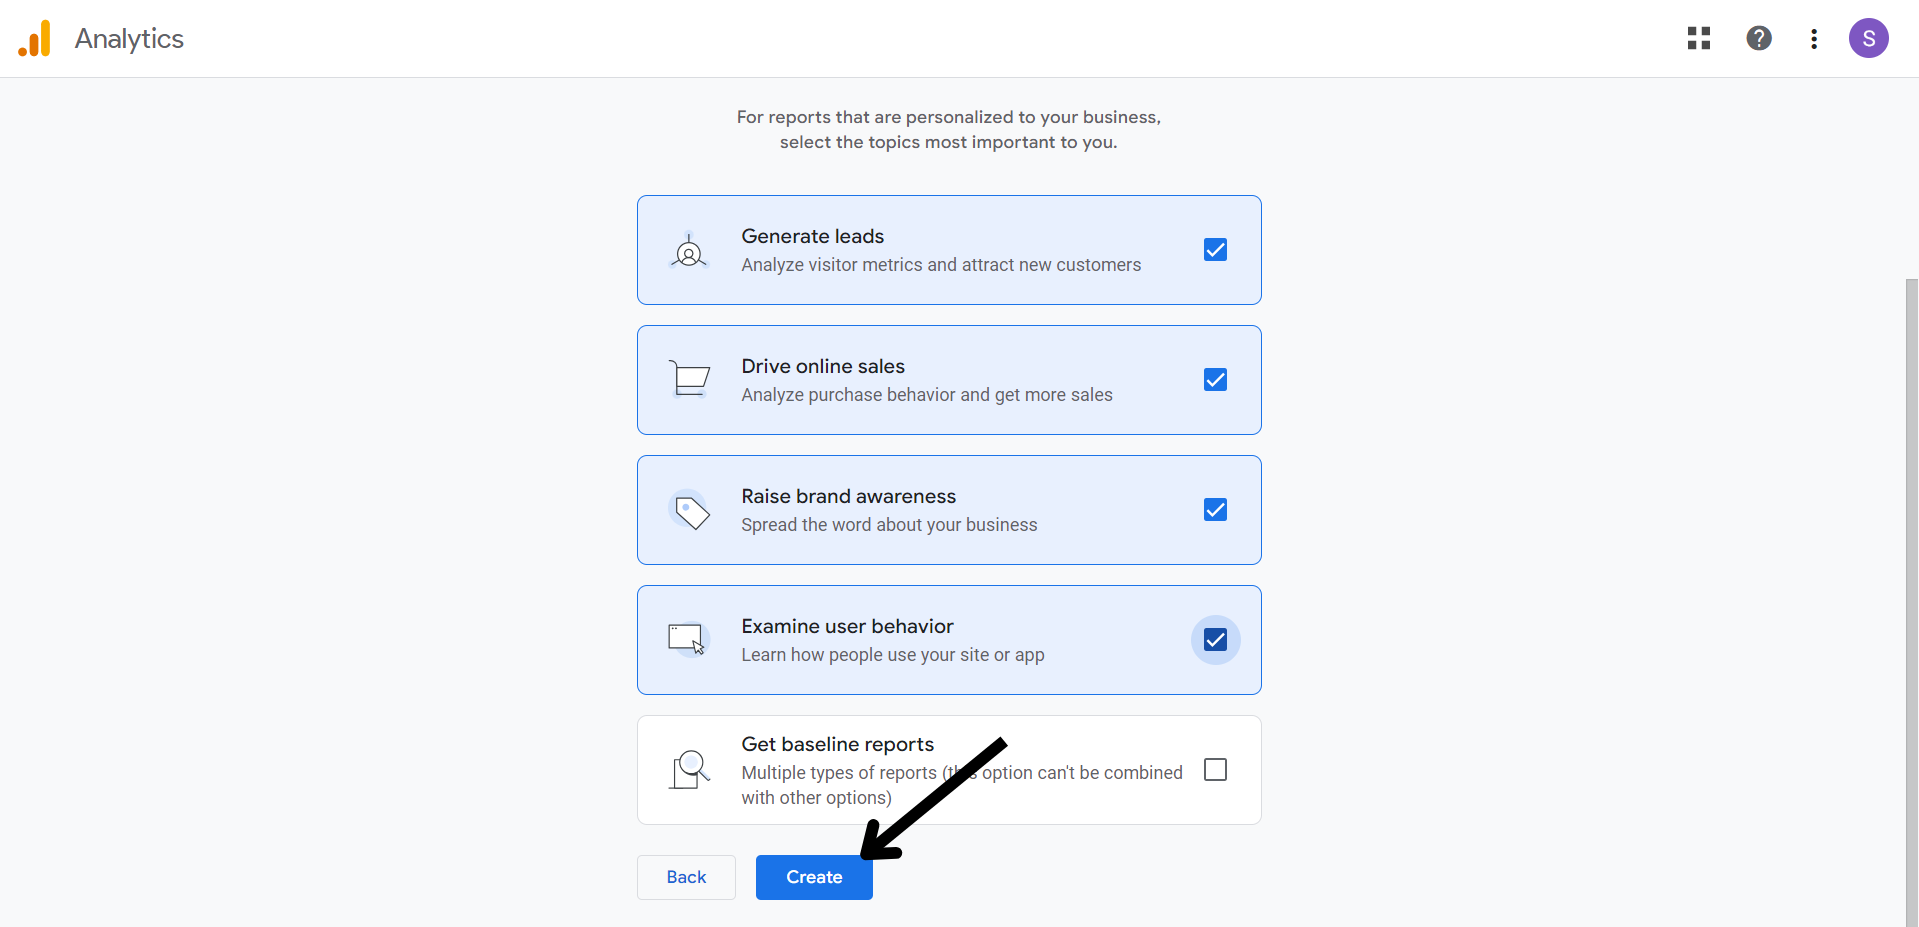
Click on Create to create the property.
**STEP 9:**
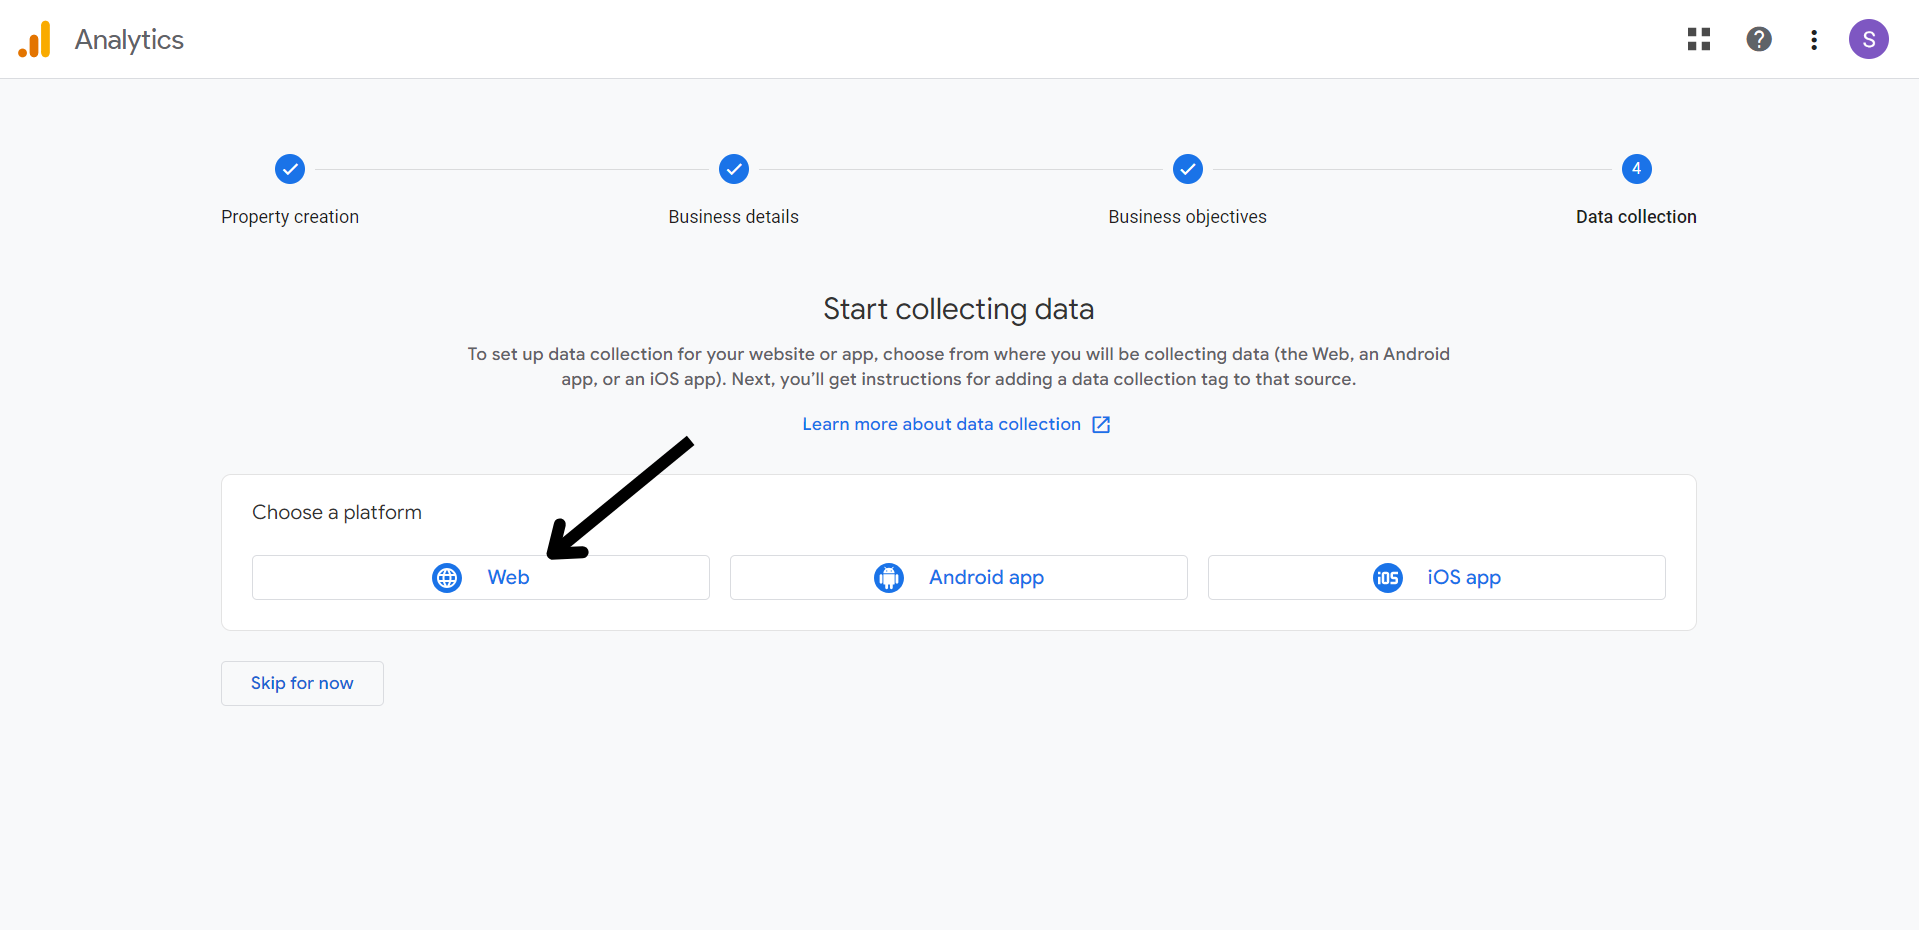
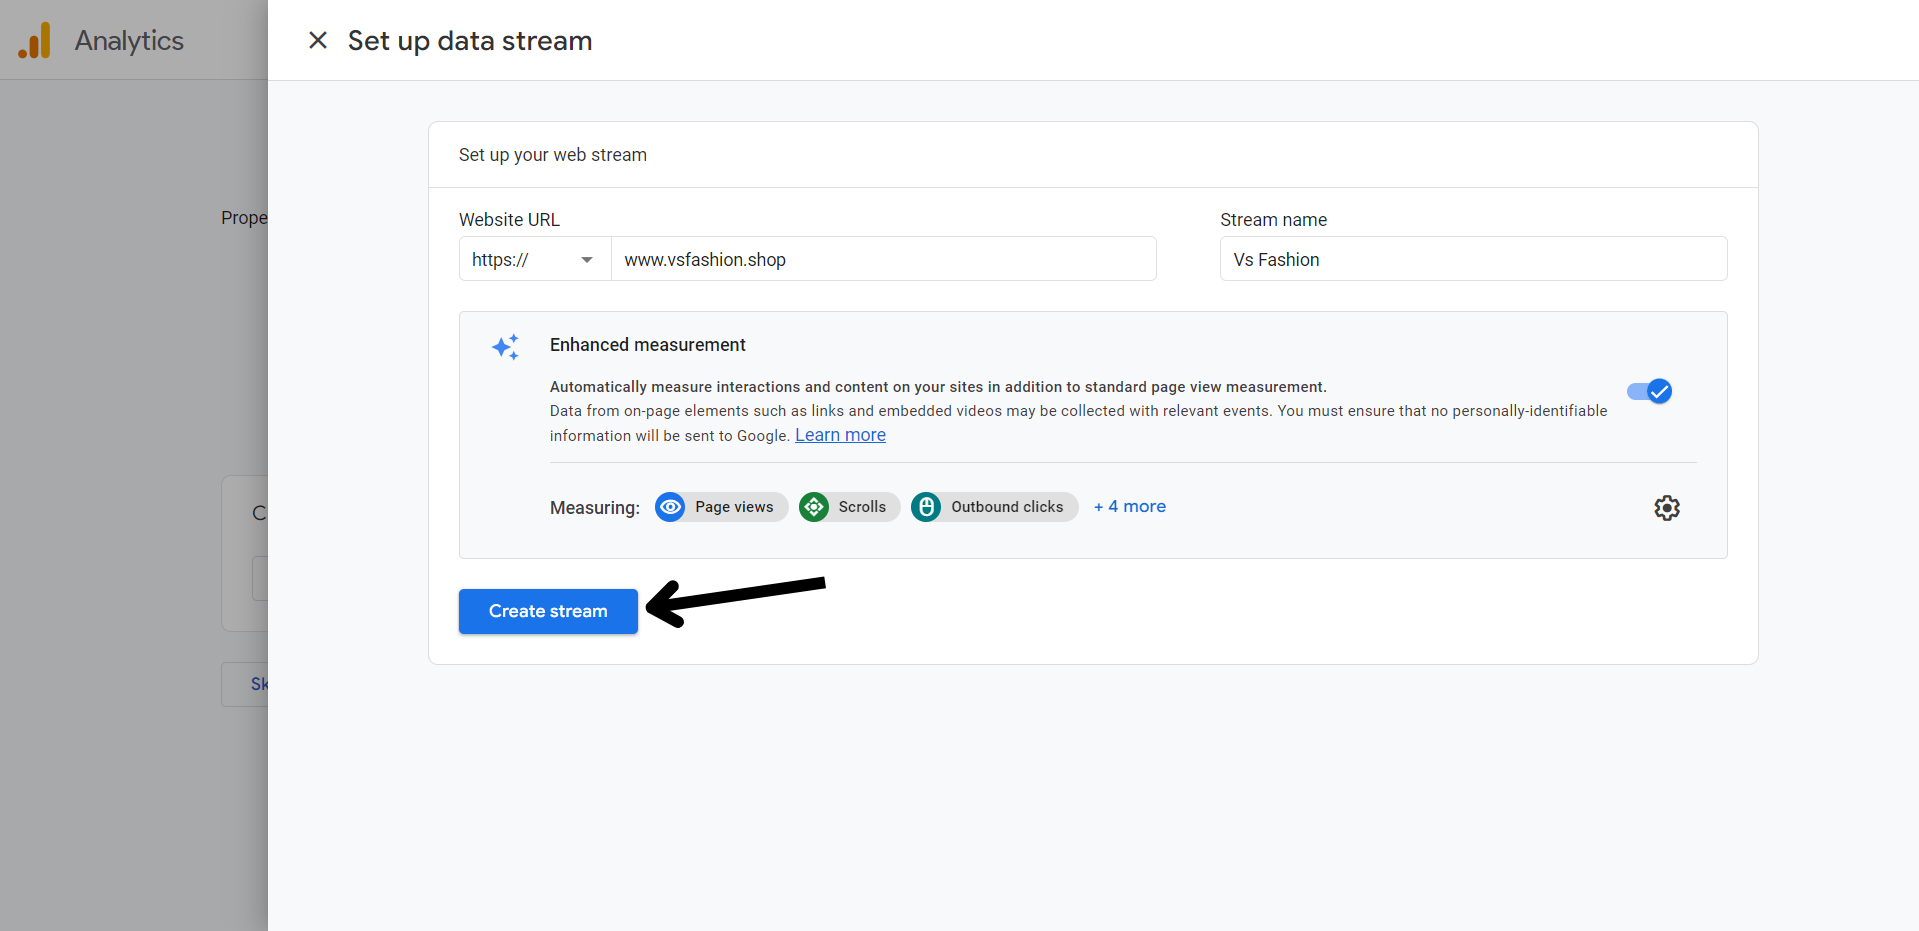
Now we need to create the data stream to capture user activity on your website. To do that, click on Web.
**STEP 10:**
Enter your website URL, stream name, and click on Create Stream.
**STEP 11:**
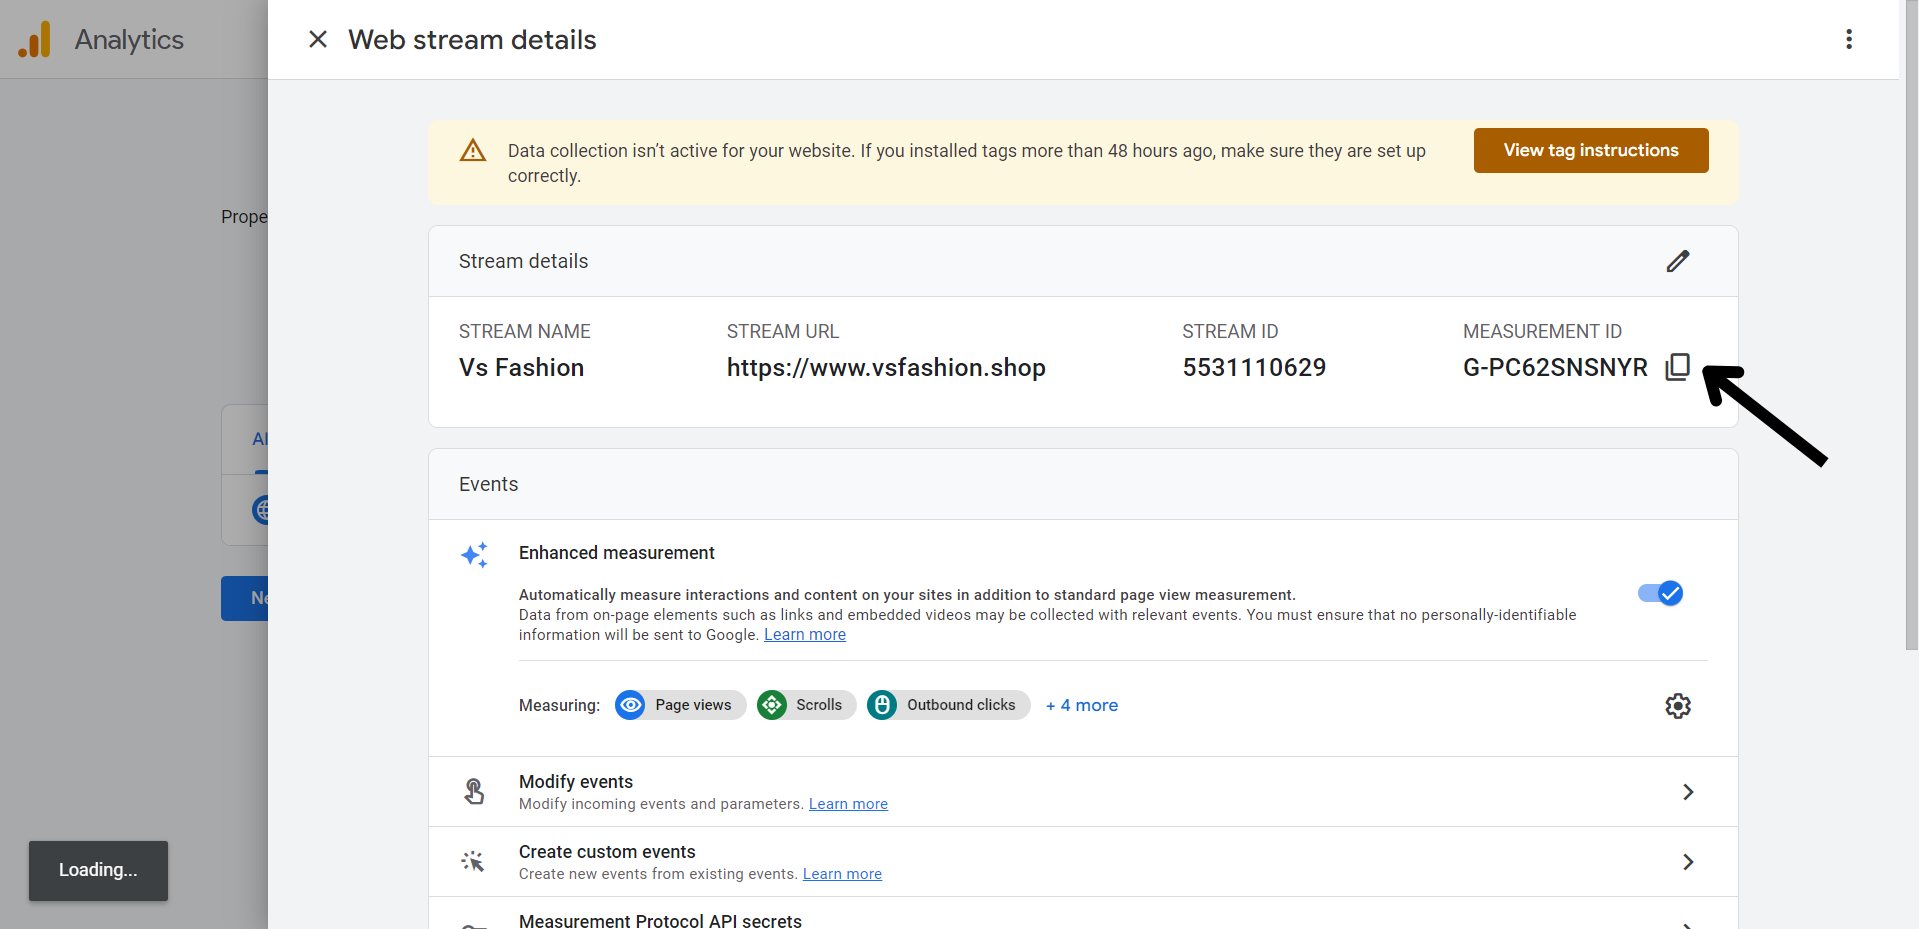
Your stream has been successfully created. Use the measurement ID shown use it to verify your Google Tag Manager integration in aasaan.
**STEP 12:**
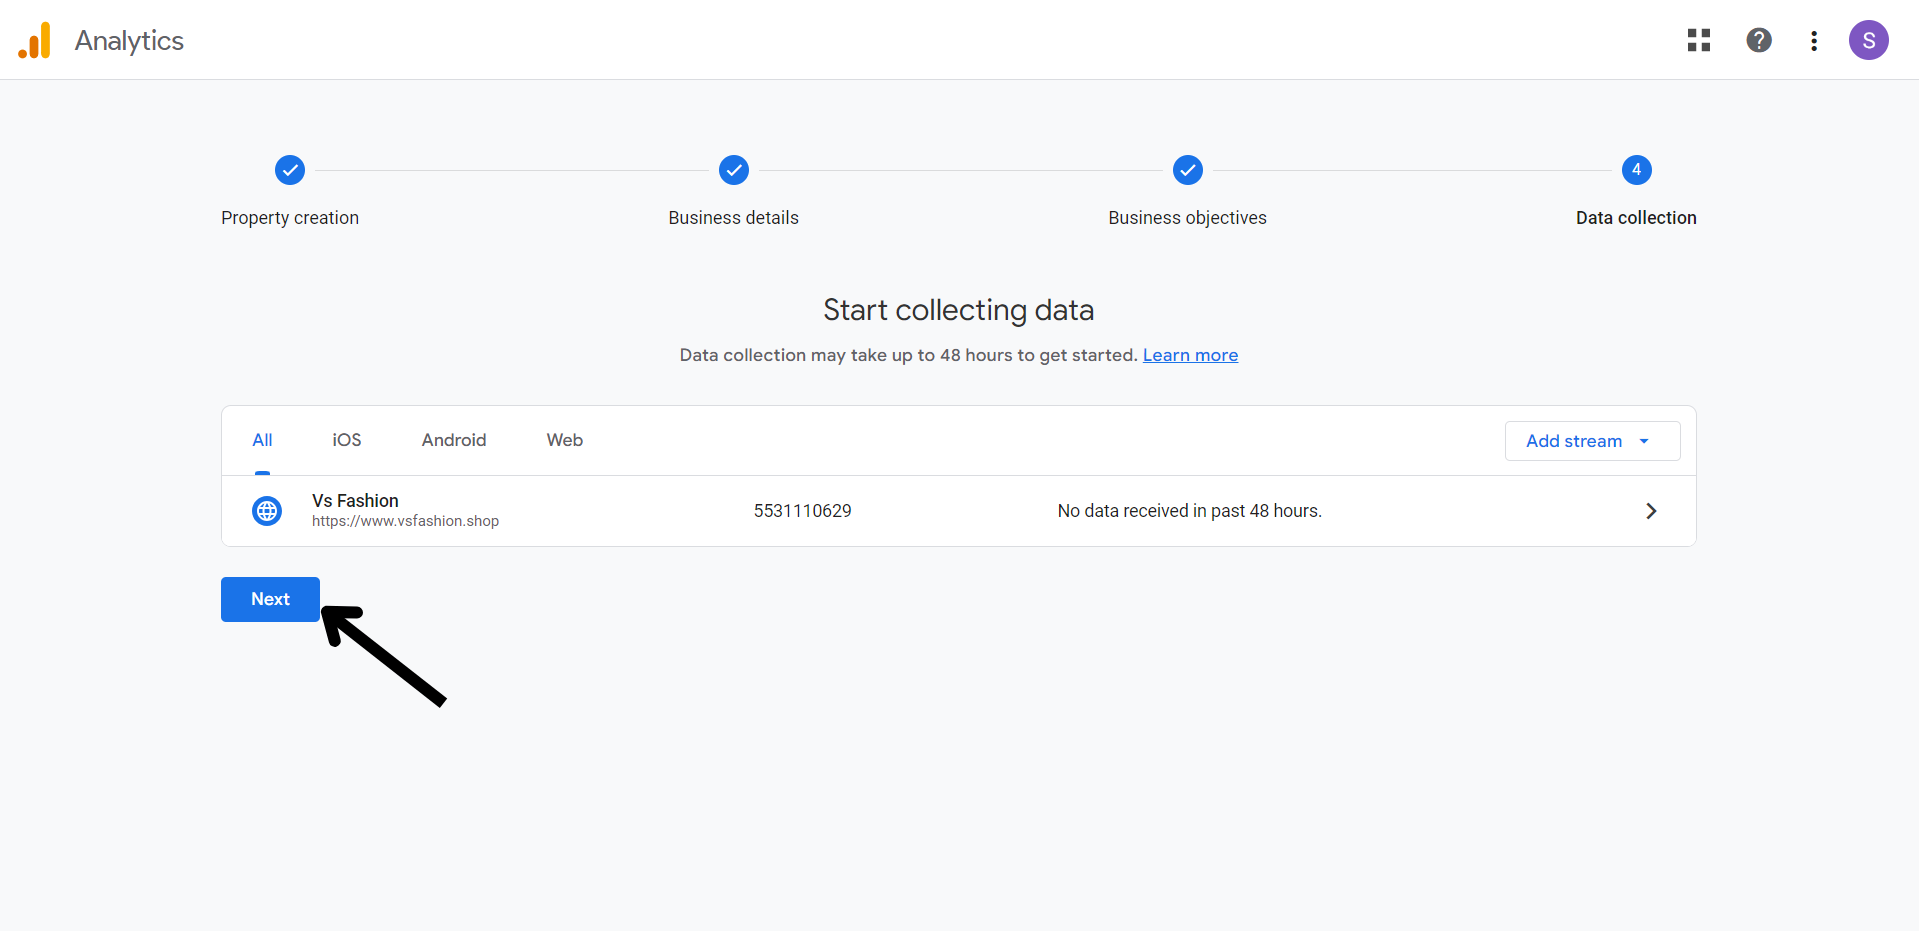
Click on Next to proceed further.
**STEP 13:**
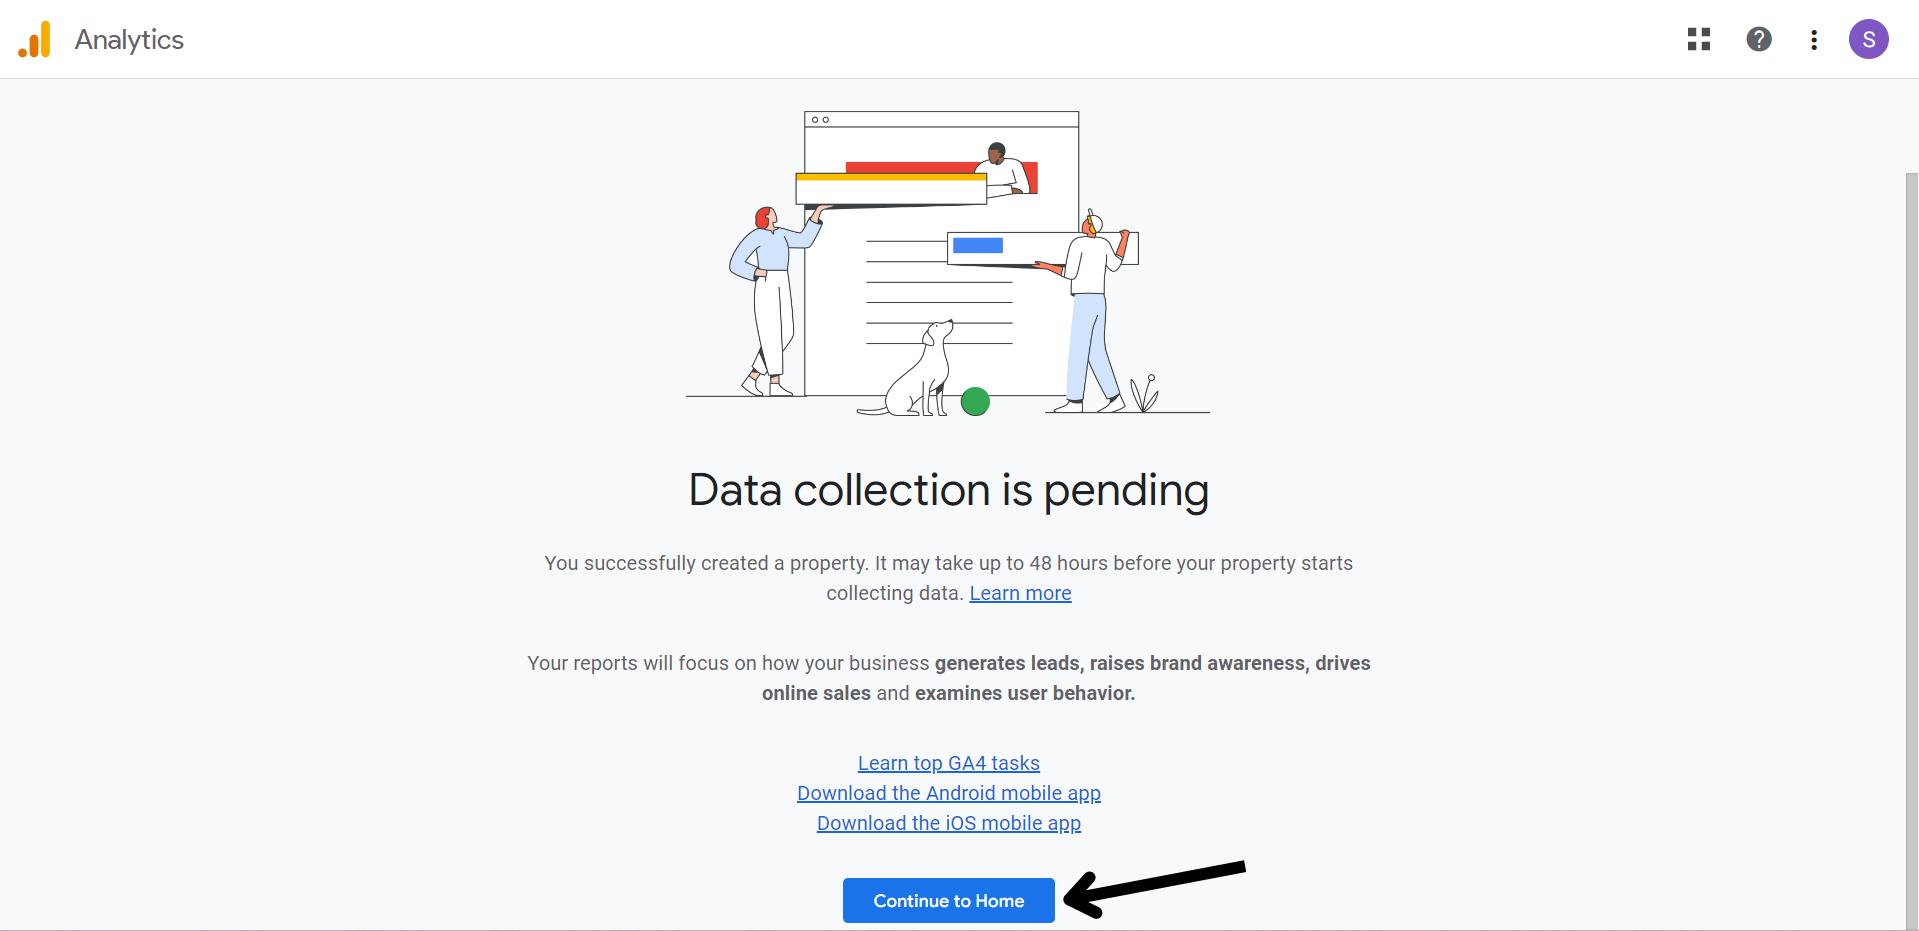
Click on Continue to Home to visit your property dashboard.
## Screenshots for Google Analytics 4 Property
***
## Google Standard Events
*What Events can you Send to Google Analytics?*
*What Conversion Events can I track?*\
When you set up Google Analytics 4, you get the added benefit of event tracking on your website, which can help you optimize your Google ad campaigns.
But what events can you send from your aasaan website? They are as follows:
* **Page View**
* Triggered When: each time the page loads or the browser history state is changed by the active site
* **First Visit**
* Triggered When: the first time a user visits a website
* **Session Start**
* Triggered When: when a user engages the app or website
* **Scroll**
* Triggered When: the first time a user reaches the bottom of each page (i.e., when a 90% vertical depth becomes visible)
* **View Item**
* Triggered When: a user views an item
* **Begin Checkout**
* Triggered When: a user begins checkout
* **Purchase**
* Triggered When: a user completes a purchase
*How to Track Your Conversion Events*
**STEP 1:**
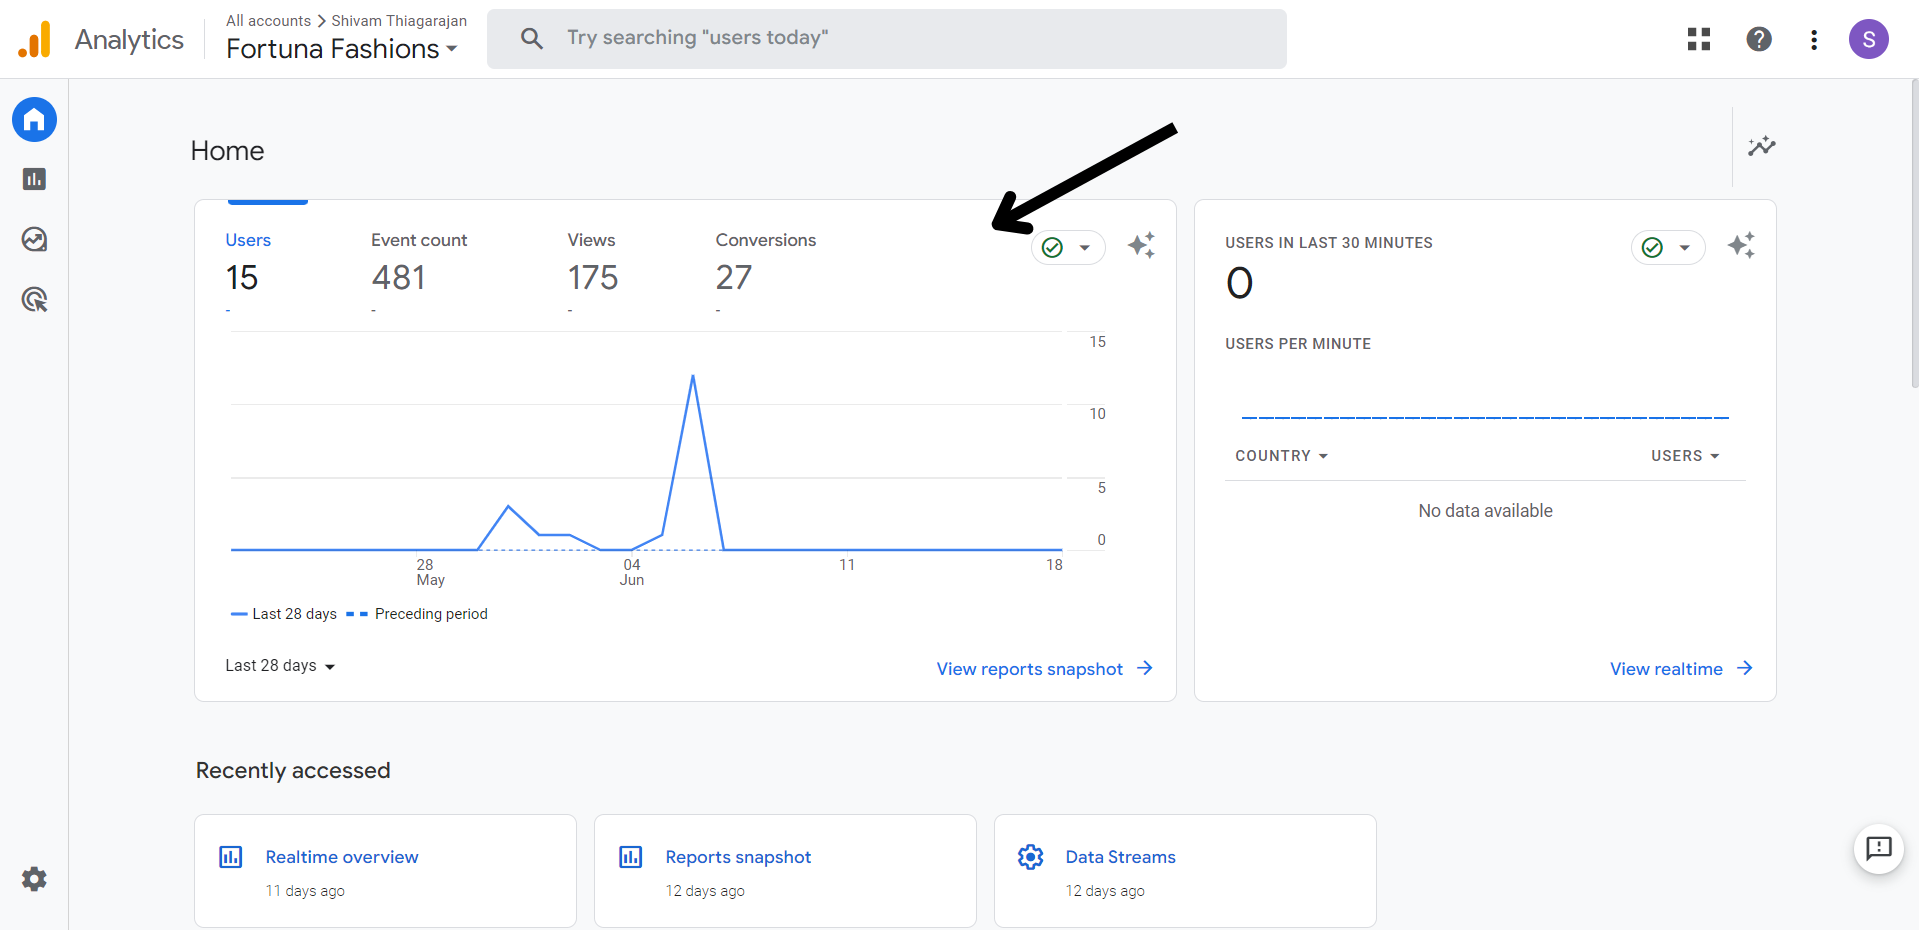
You can track the total number of conversions over a period of time in your main Google Analytics dashboard.
**STEP 2:**
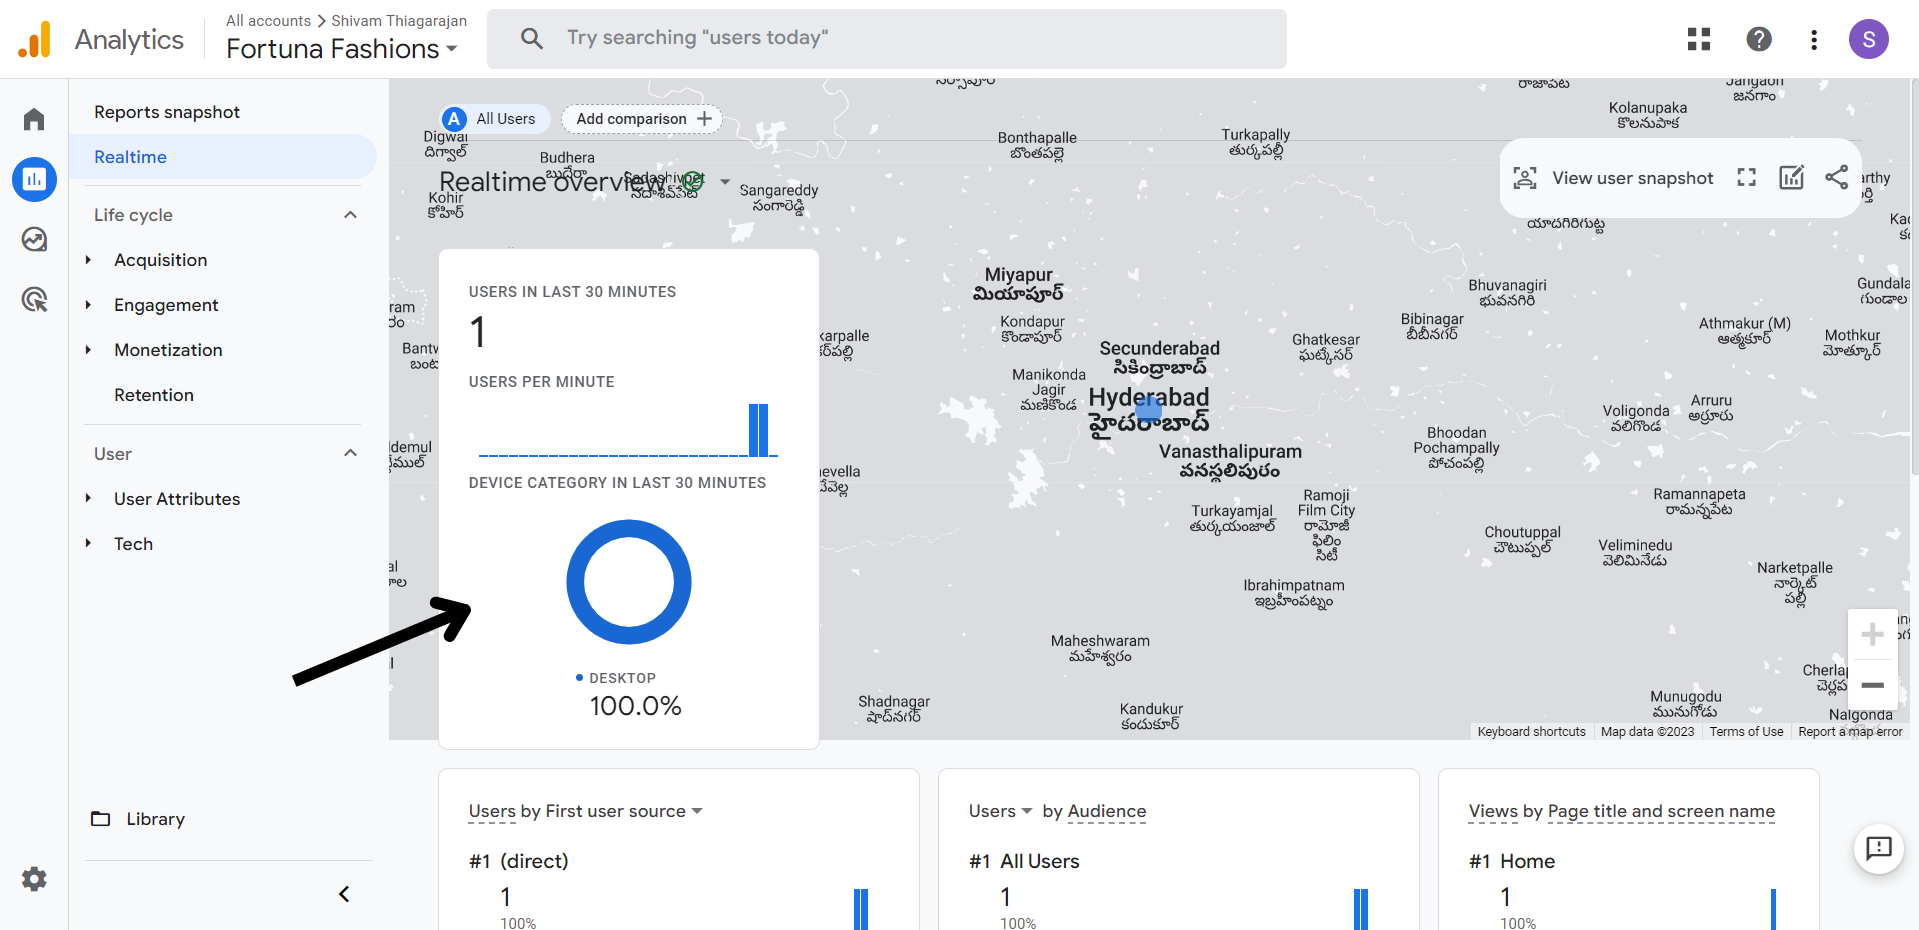
If you wish to track the events occurring in the last 30 minutes, you can click on View real-time.
**STEP 3:**
You can monitor the number of users in the last 30 minutes in the graph shown along with the device breakdown.
**STEP 4:**
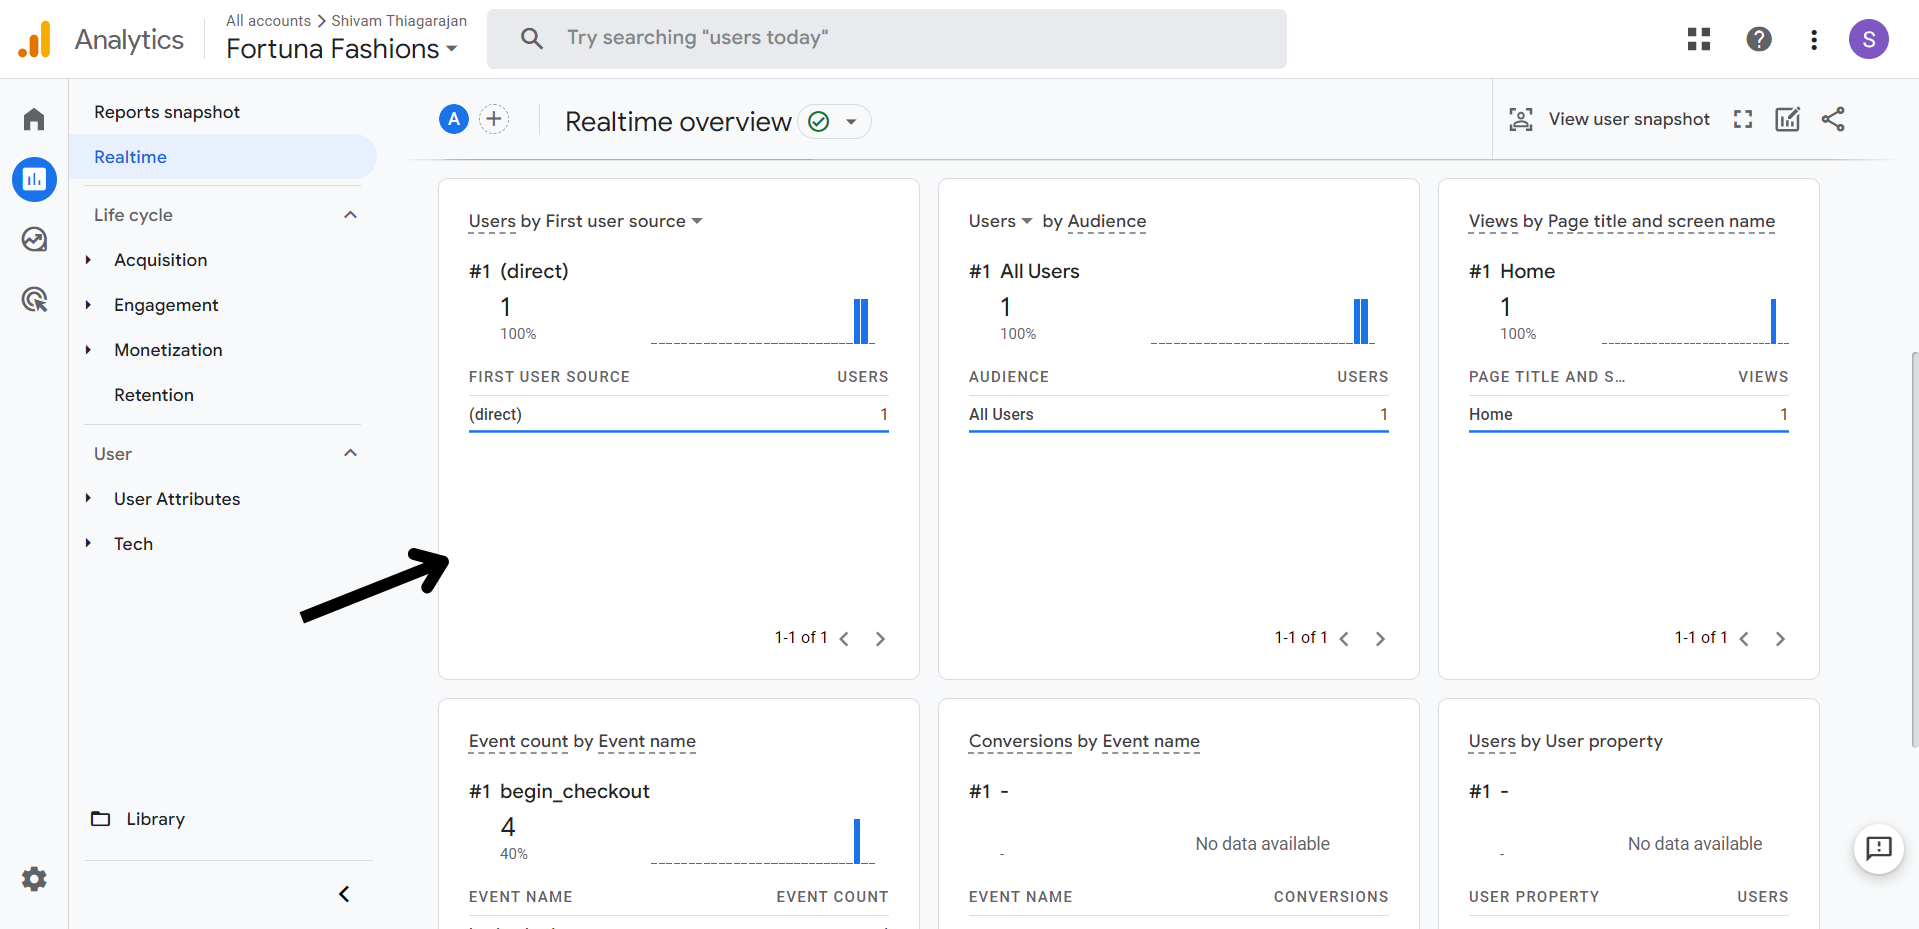
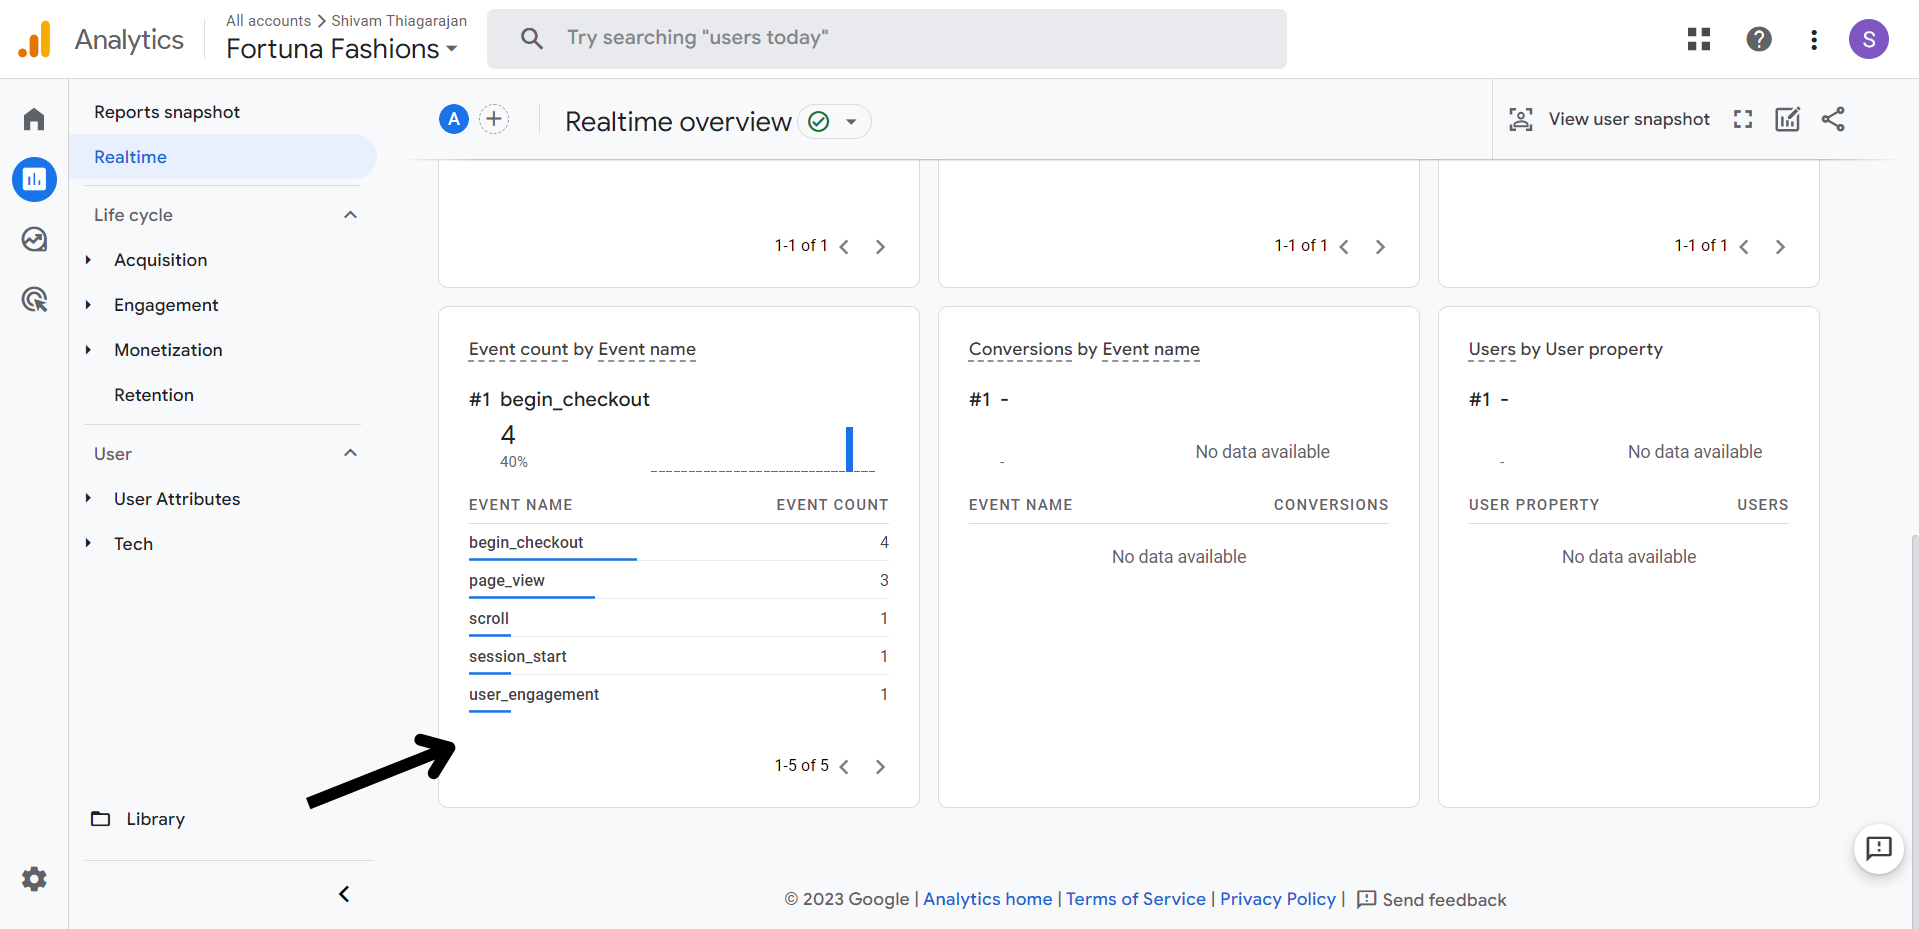
Upon scrolling down, you can also monitor the number of users by traffic source, location, and content viewed.
**STEP 5:**
You can also track event-specific data by clicking on Events under Reports.
## Screenshots for Google Standard Events


***
## Bing Webmaster
*How to Connect Your Website to Bing Webmaster*
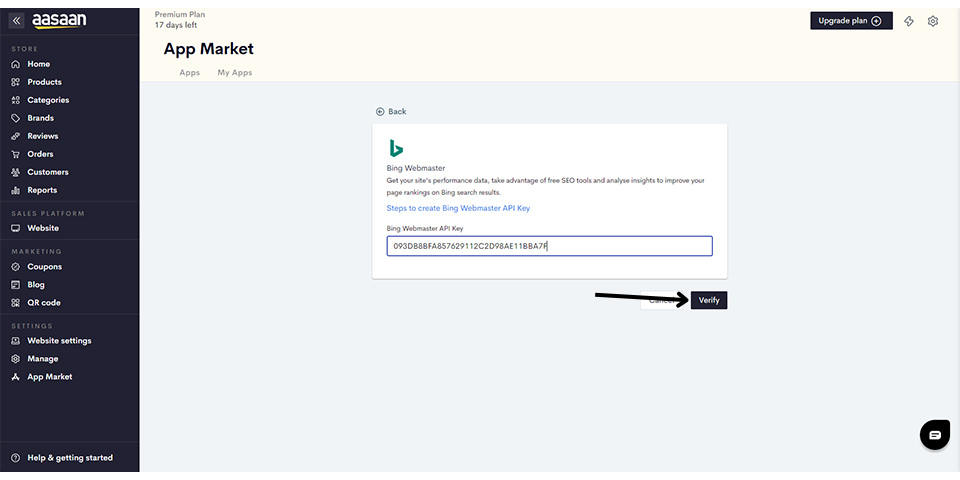
Bing Webmaster is a free tool by Microsoft that allows you to monitor your website's performance in Bing search results. Follow these steps to connect your website to Bing Webmaster:
**STEP 1:**
Go to [Bing Webmaster Tools](https://www.bing.com/toolbox/webmaster).
**STEP 2:**
Sign in with your Microsoft account. If you don't have one, you can create it for free.
**STEP 3:**
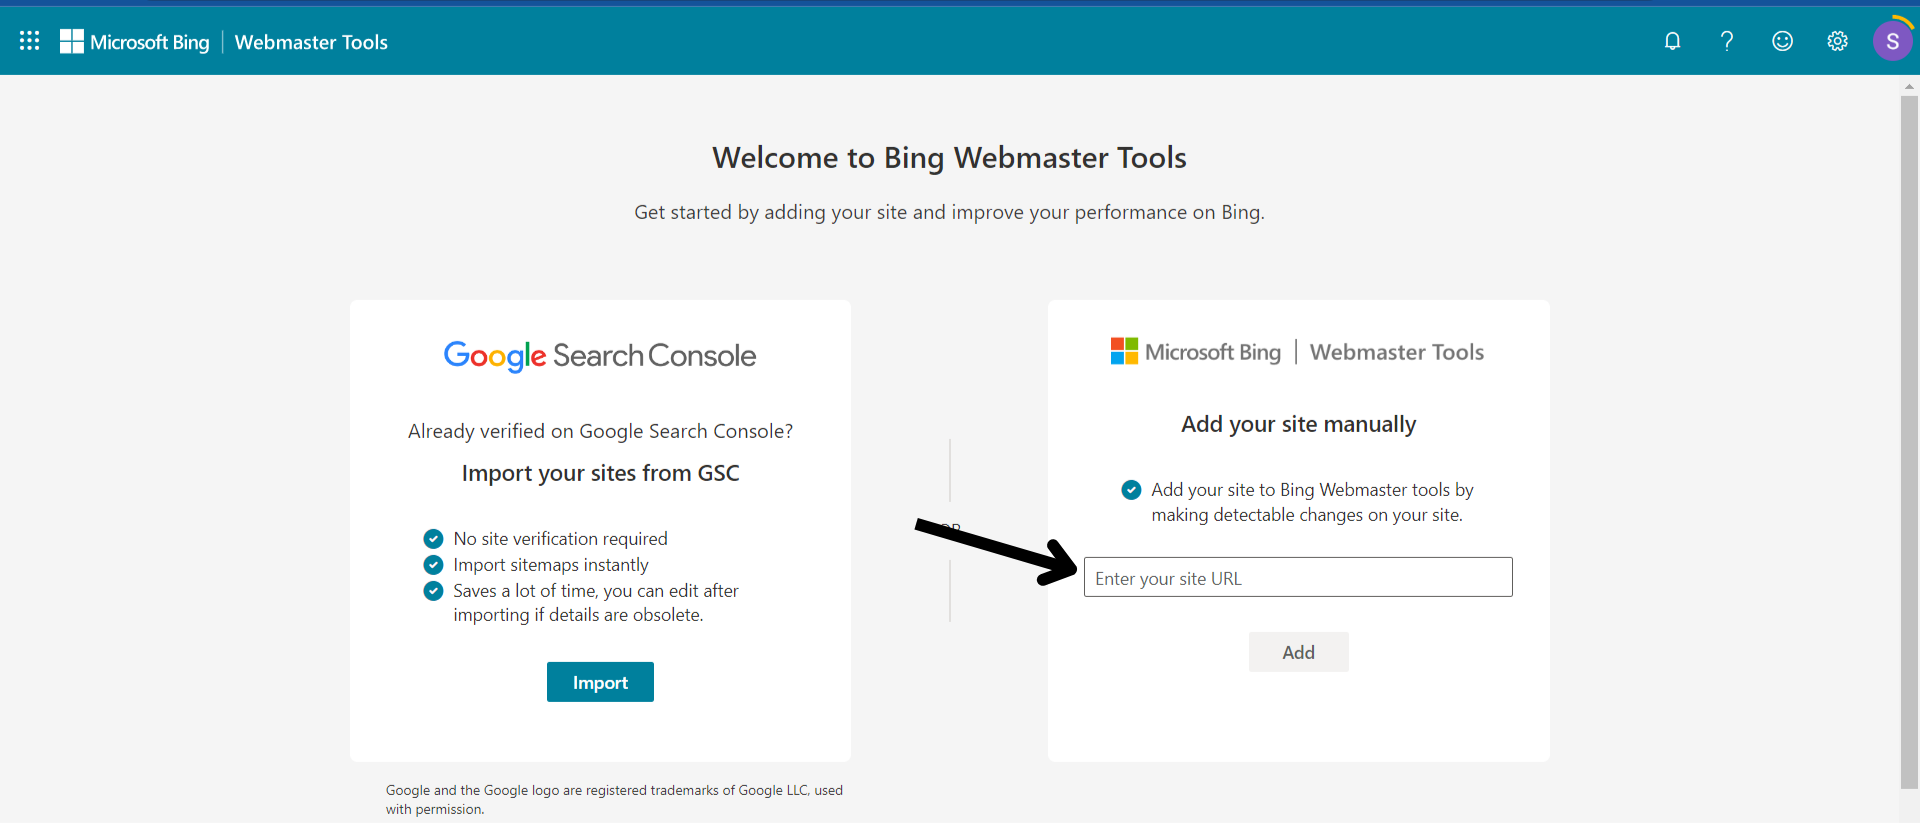
Once you are signed in, click on Add a Site.
**STEP 4:**
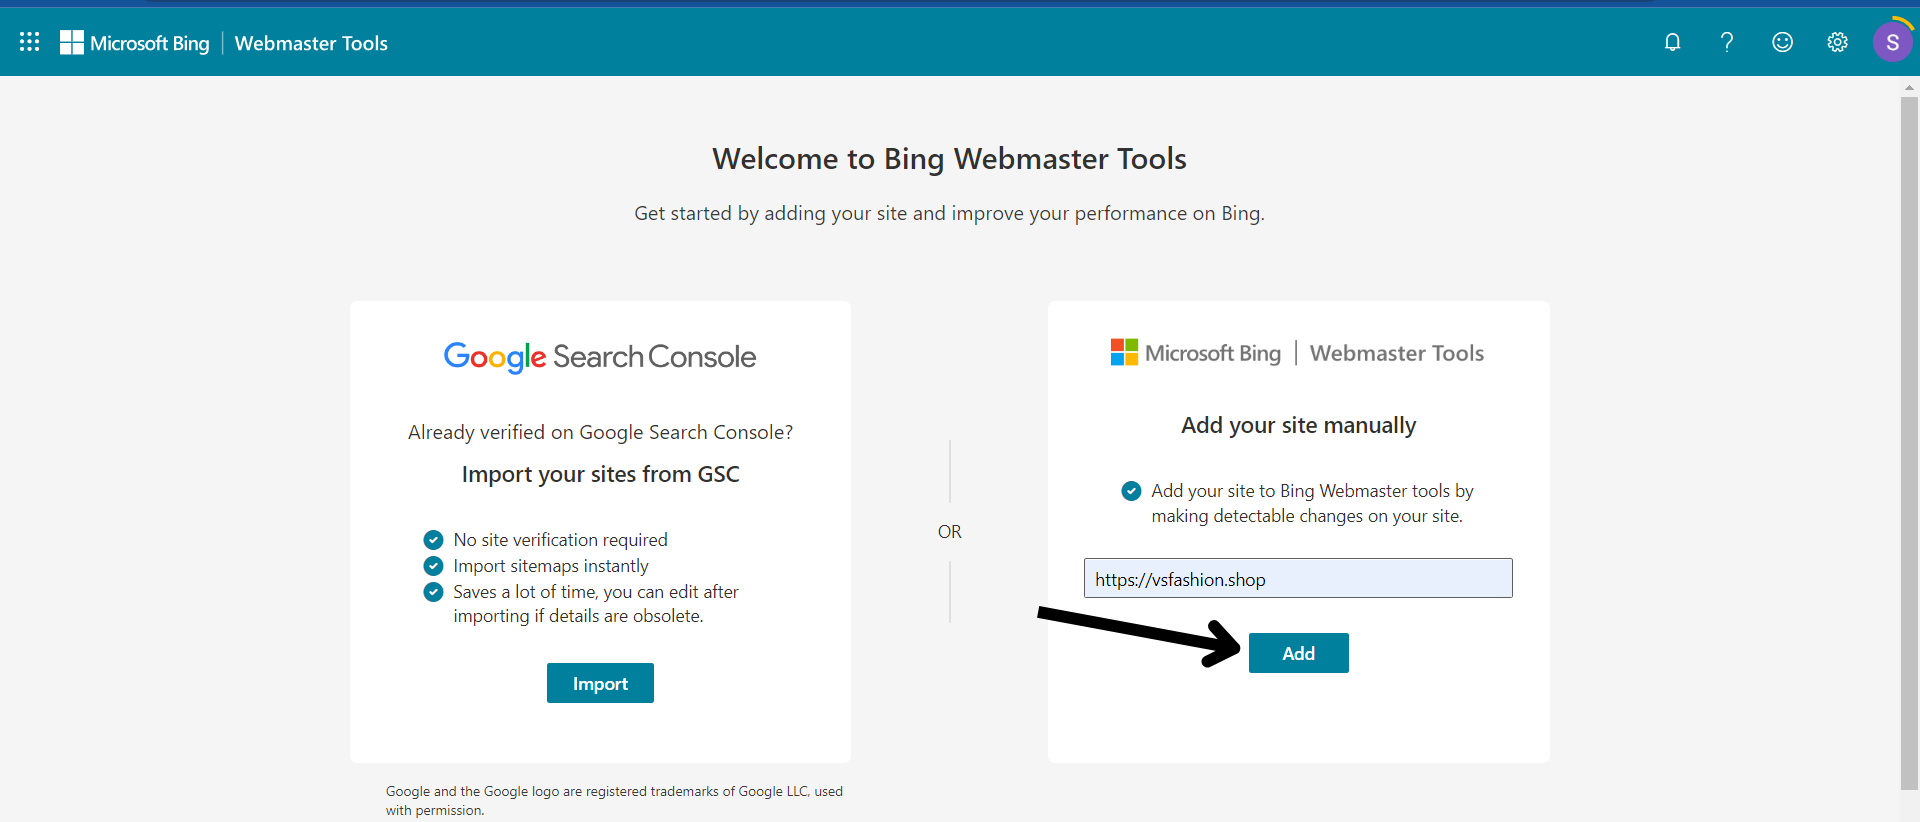
Enter your website URL and click on Add.
**STEP 5:**
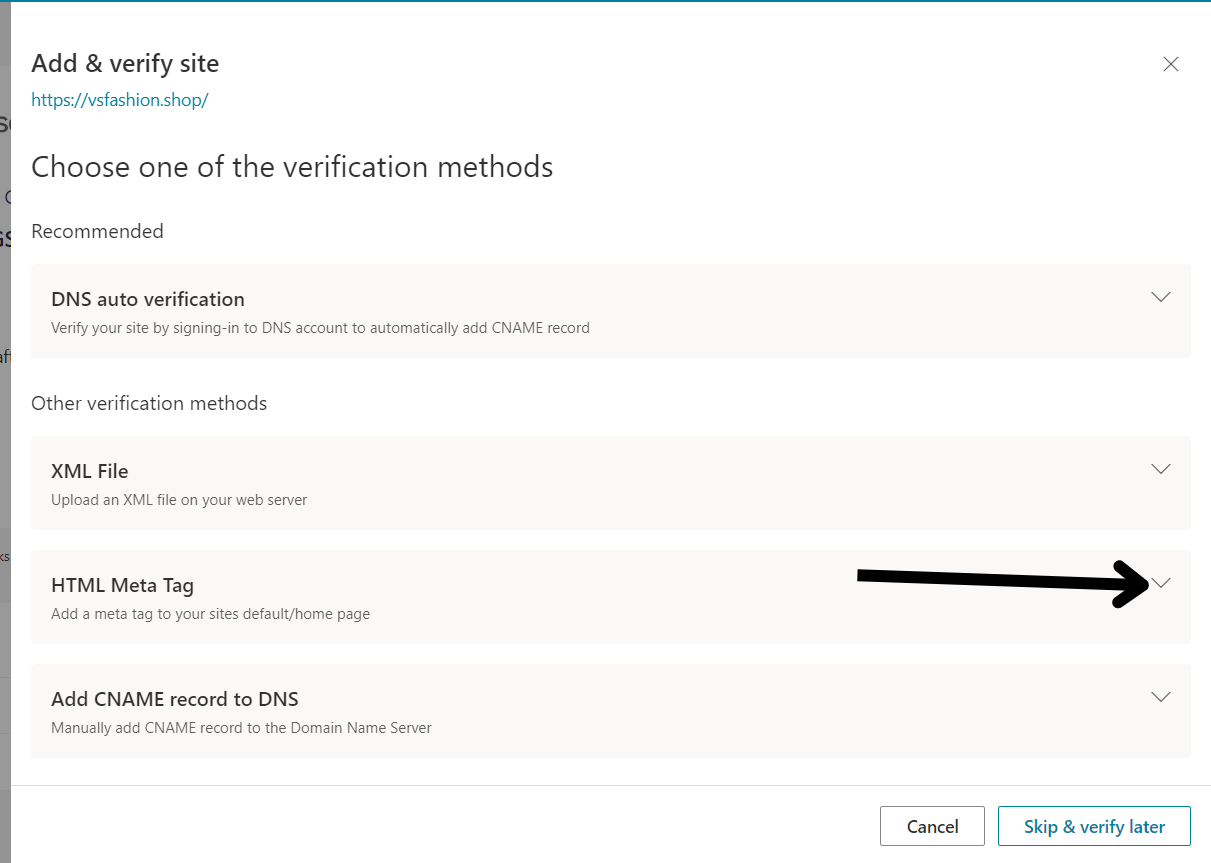
You will be prompted to verify ownership of your website. Choose the recommended method, which is adding a DNS TXT record to your domain's DNS settings.
**STEP 6:**
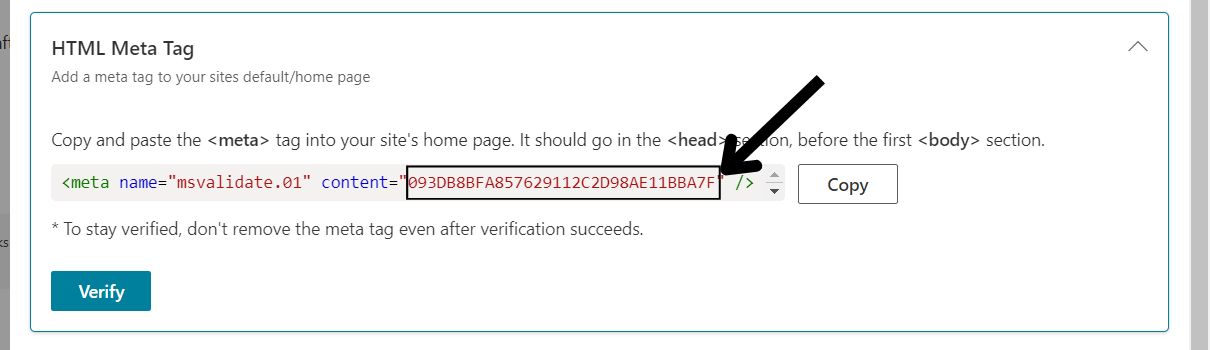
Follow the instructions provided by Bing Webmaster to add the DNS TXT record to your domain's DNS settings.
**STEP 7:**
Once the DNS TXT record is added, go back to Bing Webmaster and click on Verify.
**STEP 8:**
Your website is now connected to Bing Webmaster, and you can start monitoring its performance.
## Screenshots for Bing Webmaster


***
## Clarity by Microsoft
*How to Install and Use Clarity by Microsoft on Your Website*
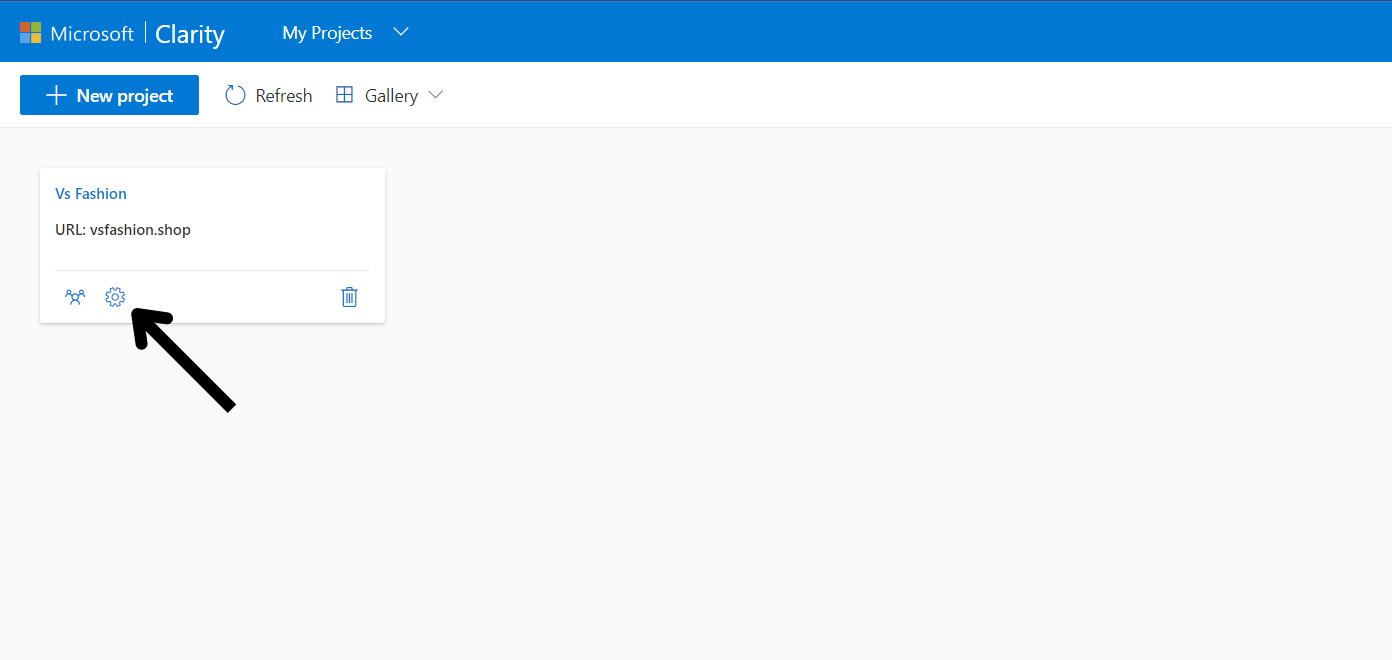
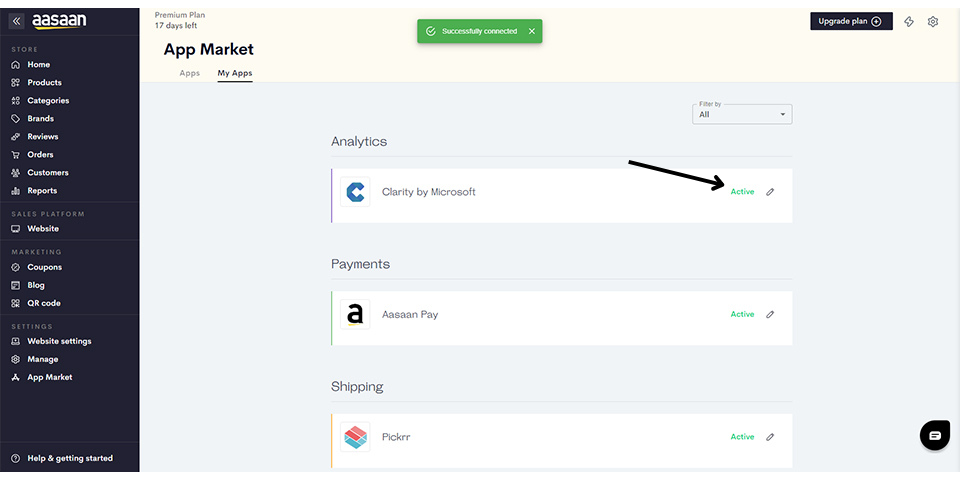
Clarity by Microsoft is a powerful web analytics tool that helps you understand user behavior on your website. Here's how to install and use Clarity on your website:
**STEP 1:**
Go to the [Clarity website](https://clarity.microsoft.com/) and sign in or create a free account.
**STEP 2:**
Once signed in, click on the "New Project" button to create a new project.
**STEP 3:**
Enter the name of your project and click on "Create Project."
**STEP 4:**
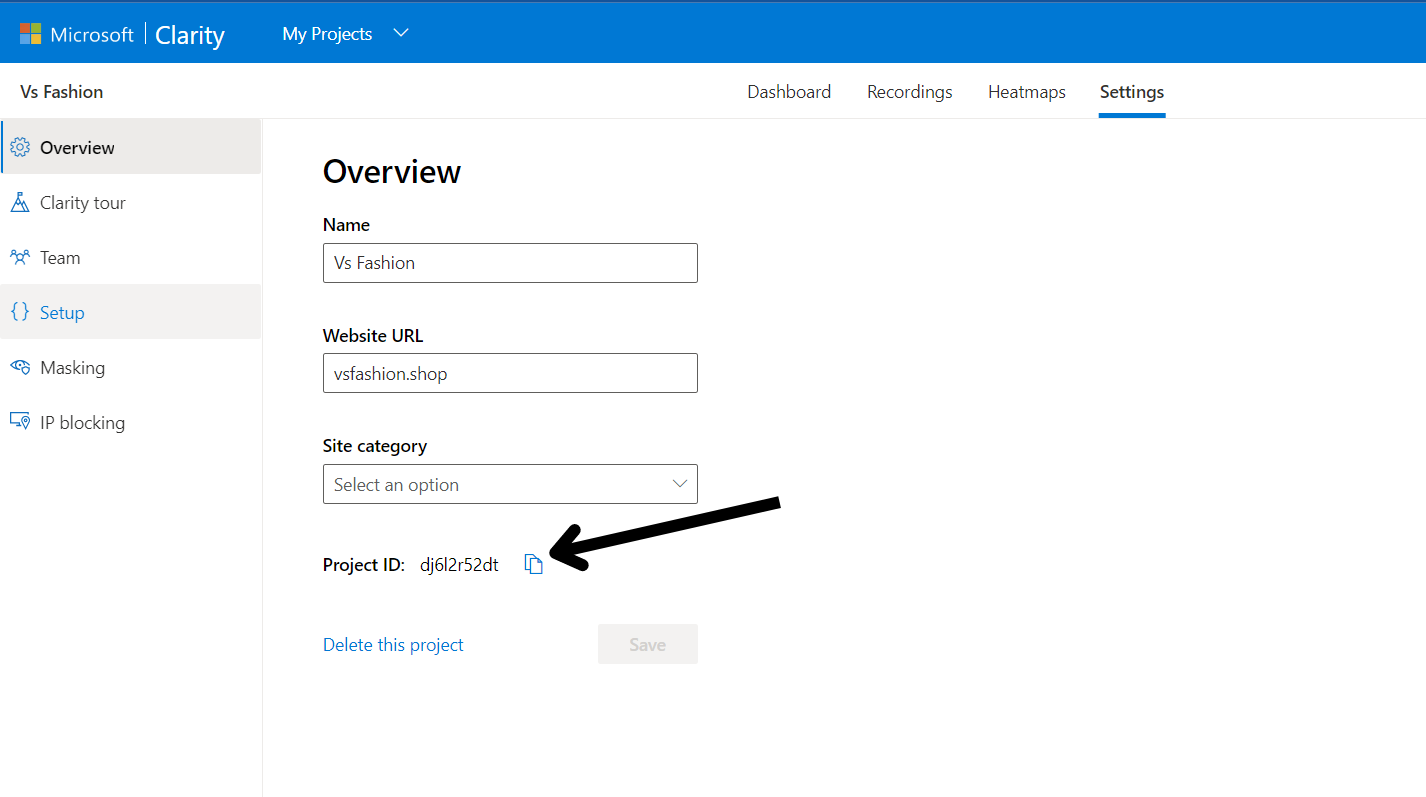
You will be provided with a tracking code snippet. Copy this code.
**STEP 5:**
Log in to your aasaan admin panel.
**STEP 6:**
In the aasaan dashboard, go to Settings > General > Advanced.
**STEP 7:**
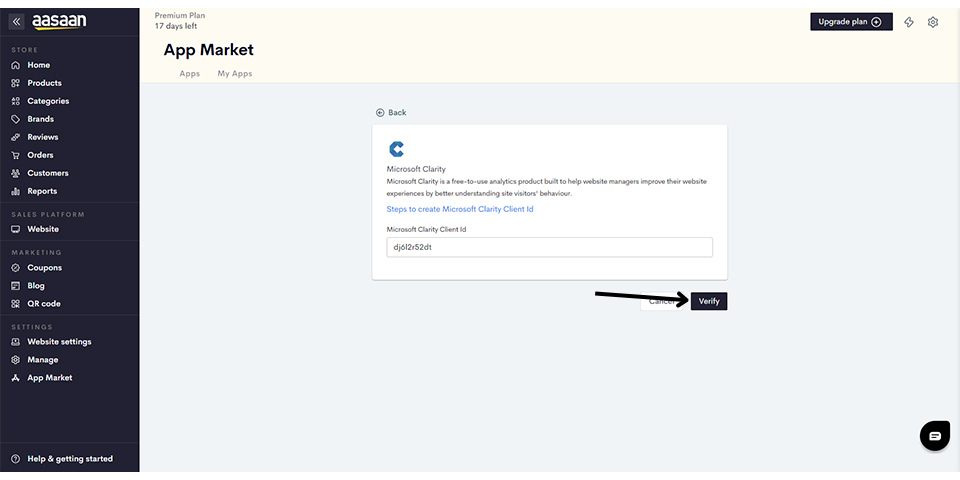
Scroll down to the "Custom Code" section and paste the Clarity tracking code snippet in the "Header Scripts" field.
**STEP 8:**
Save your changes.
**STEP 9:**
Go back to your Clarity project and click on "Verify Installation" to ensure that the tracking code is correctly added to your website.
**STEP 10:**
Clarity will start collecting data about user interactions on your website. You can view detailed analytics in your Clarity dashboard.
## Screenshots for Clarity by Microsoft


***
## Meta Pixel Integration Guide
**Add Meta(Facebook) Pixel to Your Website**\
*Connect your Meta Pixel to Your Store*\
*Note: Click [here](mobile-admin-link) to navigate to the mobile admin app version of this article.*
You can watch the video version of this article [here](video-link).
Meta Pixel is a powerful analytics tool by Meta (formerly Facebook) for tracking user behavior on your website. This guide will help you integrate Meta Pixel with your aasaan website to enhance your marketing efforts.
*Important:*
* Ensure Meta Pixel is installed from the aasaan app market. For installation guidance, click [here](app-market-link).
* If you haven't created a Meta Pixel yet, learn how to do so [here](create-pixel-link).
### Add Meta Pixel to Your Website
#### STEP 1:
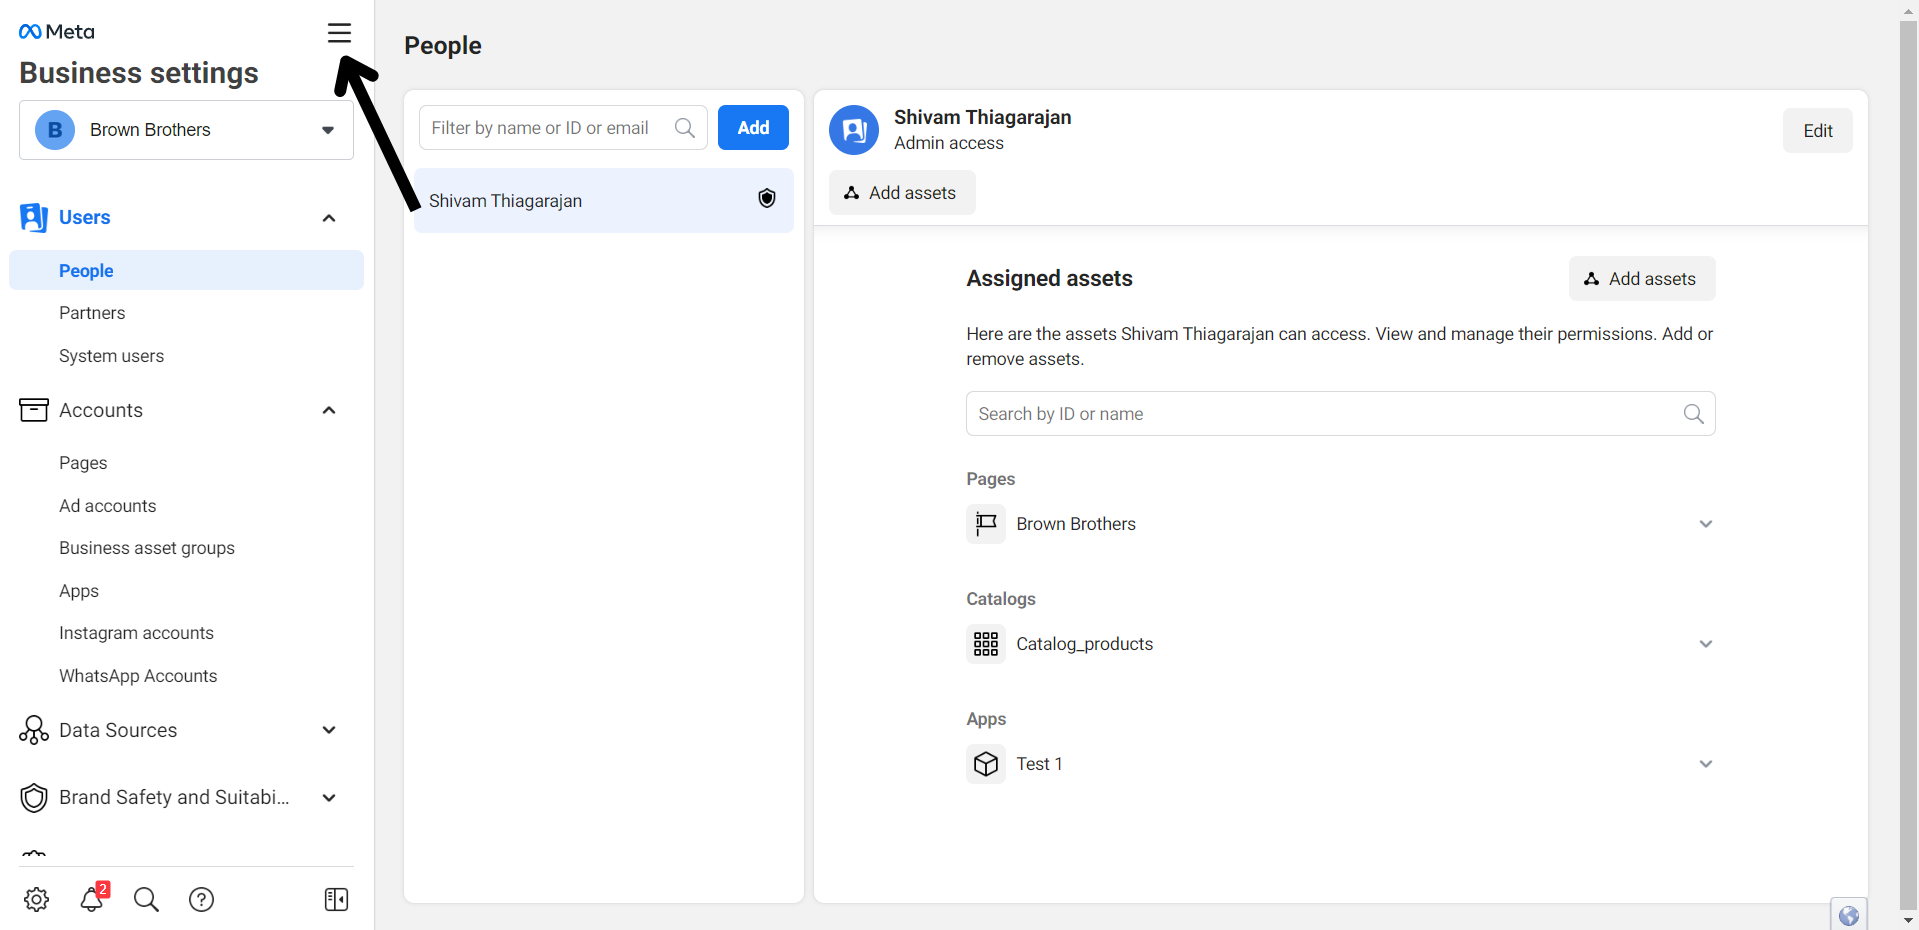
Navigate to the Meta Pixel app within aasaan and input your Meta Pixel ID from your events manager. Click 'Verify' to complete the integration.
Your Meta Pixel is now successfully connected to your aasaan website.
## Integration Screenshots
***
## Creating a Meta Pixel
Learn how to create a Meta Pixel for tracking interactions on your website and improving your advertising strategies.
### How to Create Your Meta Pixel
Follow these steps within your Meta business account to create a Meta Pixel:
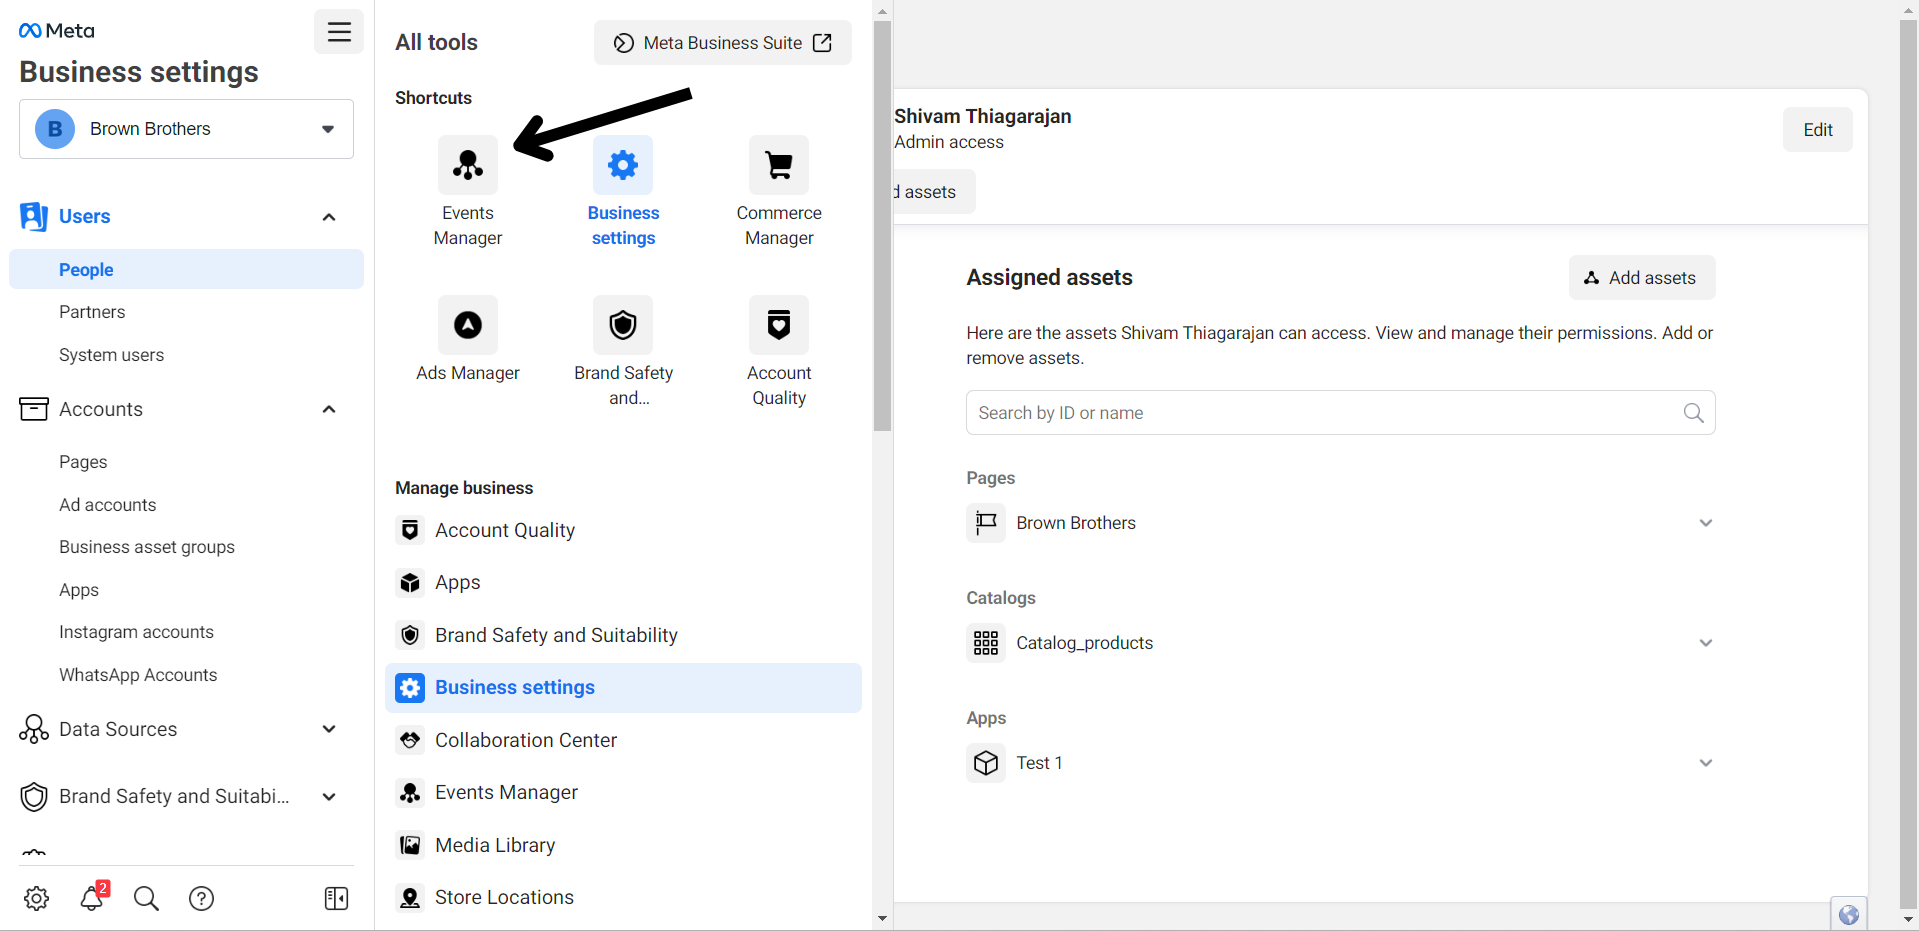
* **STEP 1:** Access your Meta business settings and select 'All Tools'.
* **STEP 2:** Choose 'Events Manager'.
* **STEP 3:** Select 'Connect Data Sources' and choose 'Web'.
* **STEP 4 to STEP 9:** Complete the setup by naming your pixel, adding your website URL, and finalizing the creation.
Once created, you can integrate this Pixel with your aasaan store by entering the Pixel ID.
## Creation Process Screenshots

* Further screenshots showcasing each step, from selecting Events Manager to the final creation of the Meta Pixel.
***
## Linking Meta Pixel to Ad Account
**How to Link Your Meta Pixel to Your Ad Account**
This guide shows you how to connect your Meta Pixel with your Facebook ad account for optimized remarketing.
### Linking Meta Pixel to Ad Account
#### STEP 1:
Go to the business settings of your Facebook account and navigate to Data Sources > Pixels.
#### STEP 2 to STEP 3:
Choose 'Add Assets', select the ad account you wish to link, and confirm the addition to link your Pixel to the ad account.
## Linking Process Screenshots
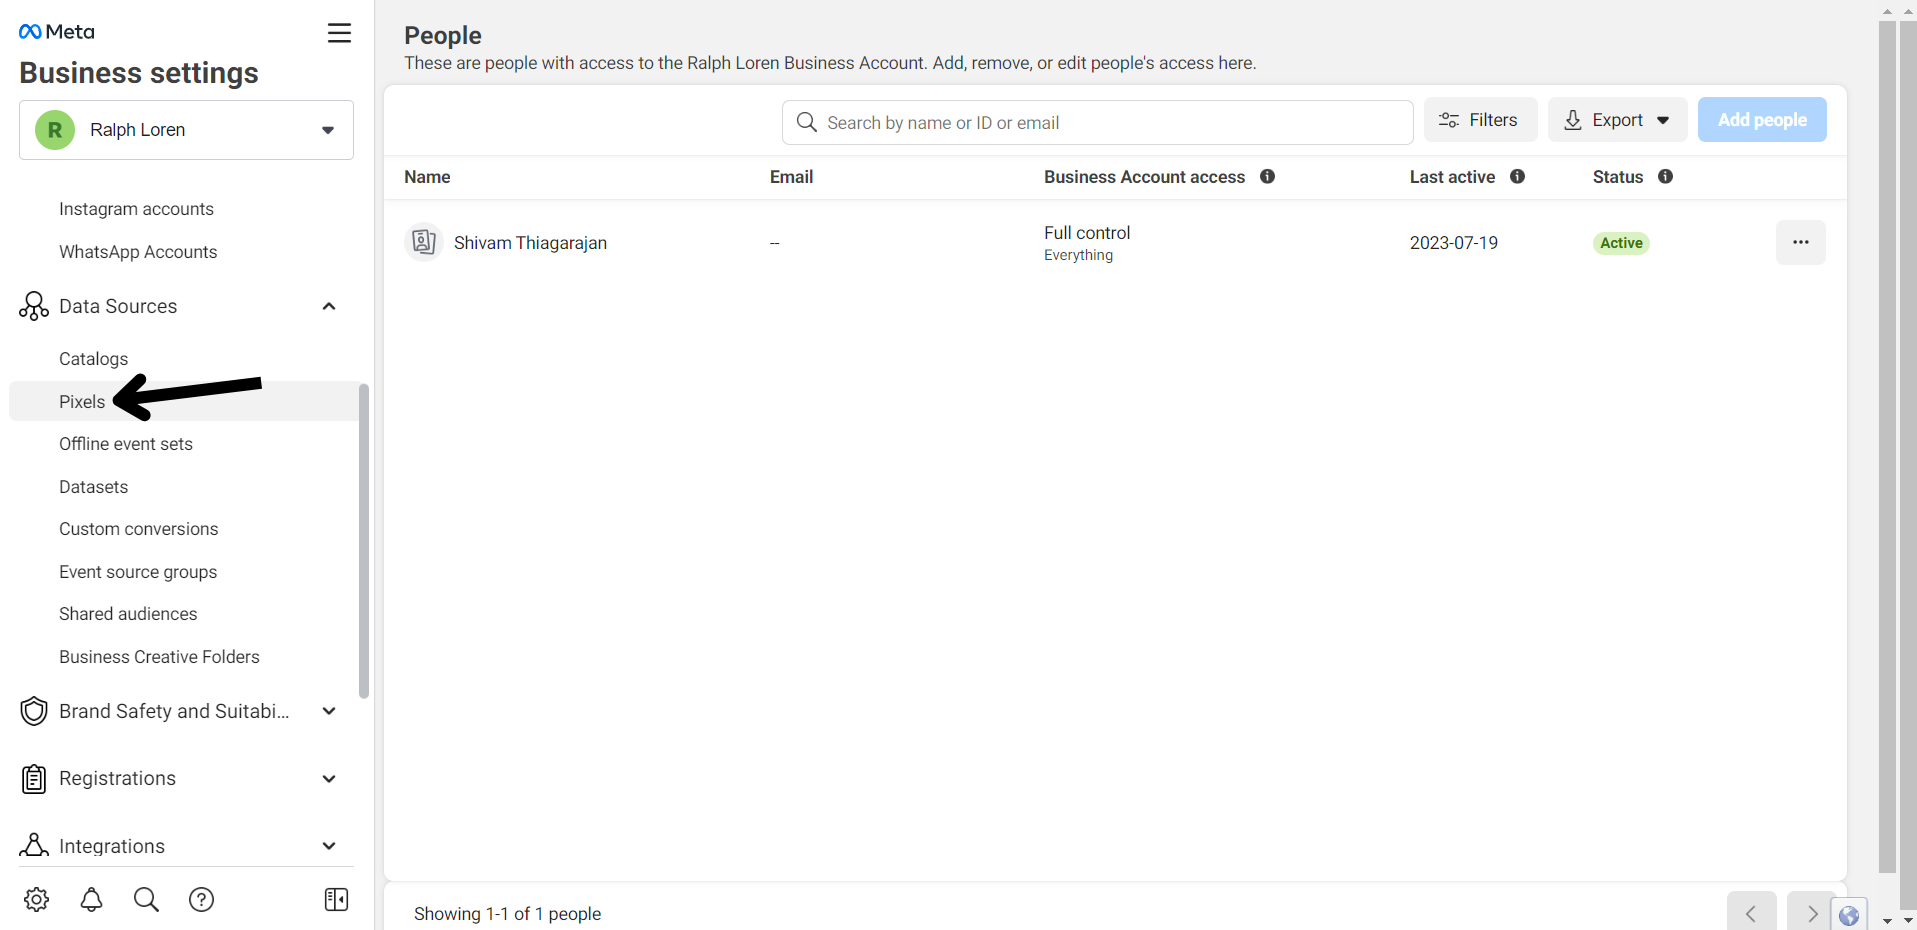
* Additional screenshots to illustrate the process of adding assets and confirming the linkage between the Meta Pixel and the ad account.
***
## Meta Standard Events
Understand the key events your Meta Pixel can track on your aasaan website to enhance your Facebook ad campaigns.
### Events Tracked by Meta Pixel
Meta Pixel can track various user actions on your website, crucial for optimizing your ad campaigns. The primary events include:
* **Page View:** Triggered when a page is loaded or the browser history changes.
* **Add to Cart:** Occurs when an item is added to the shopping cart.
* **Initiate Checkout:** Marks the start of the checkout process.
* **Purchase:** Denotes the completion of a purchase, typically indicated by landing on a confirmation page.
### How to View Your Pixel Events
Track your Pixel's captured events in the Meta Events Manager by following these steps:
* **STEP 1 to STEP 6:** Log in to your Meta business account, access the Events Manager, and select your Pixel to view the events.
You can adjust the date range and delve into specific event details for deeper insights.
***
## Hotjar Integration Guide
**Set Up Hotjar on Your Website**\
\*Connect Hot
jar to Your Store\*\
*Note: Click [here](mobile-admin-link) to navigate to the mobile admin app version of this article.*
You can watch the video version of this article [here](video-link).
Hotjar is an invaluable tool for understanding visitor behavior through heatmaps, recordings, and surveys. This guide will assist you in integrating Hotjar with your aasaan website.
*Important:*
* Ensure Hotjar is installed from the aasaan app market. Learn how [here](app-market-link).
### Set Up Hotjar on Your Website
#### STEP 1 to STEP 4:
Log in to your Hotjar workspace, access settings to find your tracking ID, and enter this ID in the Hotjar app within aasaan to verify the setup.
Hotjar is now ready to capture valuable insights on your website.
## Setup Screenshots
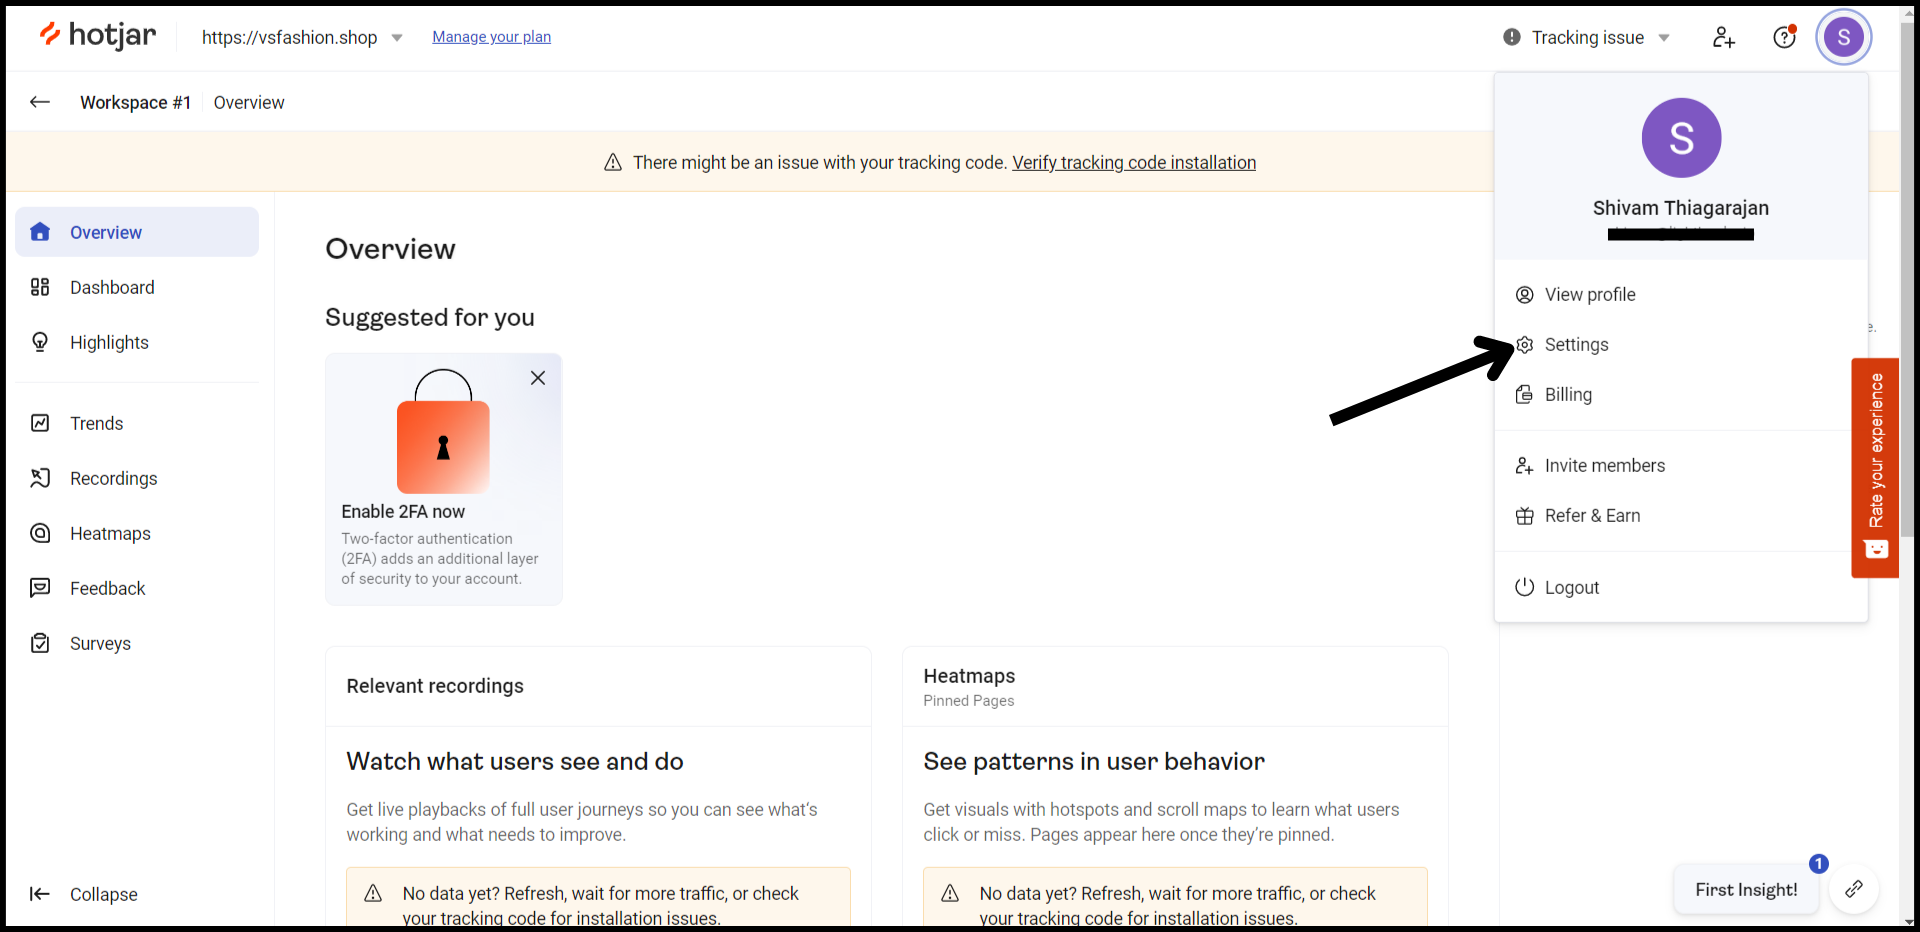
* Additional screenshots to guide through each step of the setup process, from accessing Hotjar settings to verifying the tracking ID in aasaan.
***
## Lucky Orange Analytics Setup
**Set Up Lucky Orange Analytics on Your Website**\
*Connect Lucky Orange to Your Store*\
*Note: Click [here](mobile-admin-link) to navigate to the mobile admin app version of this article.*
You can watch the video version of this article [here](video-link).
Lucky Orange provides detailed analytics to understand visitor behaviors through recordings, heatmaps, and surveys. Follow this guide to integrate Lucky Orange with your aasaan website.
*Important:*
* Ensure Lucky Orange is installed from the aasaan app market. For installation guidance, click [here](app-market-link).
### Set Up Lucky Orange Analytics on Your Website
#### STEP 1 to STEP 4:
Access your Lucky Orange account, navigate to settings to find your site ID, and enter this ID in the Lucky Orange app within aasaan to complete the setup.
Lucky Orange is now active on your site, ready to provide insightful analytics.
## Setup Process Screenshots
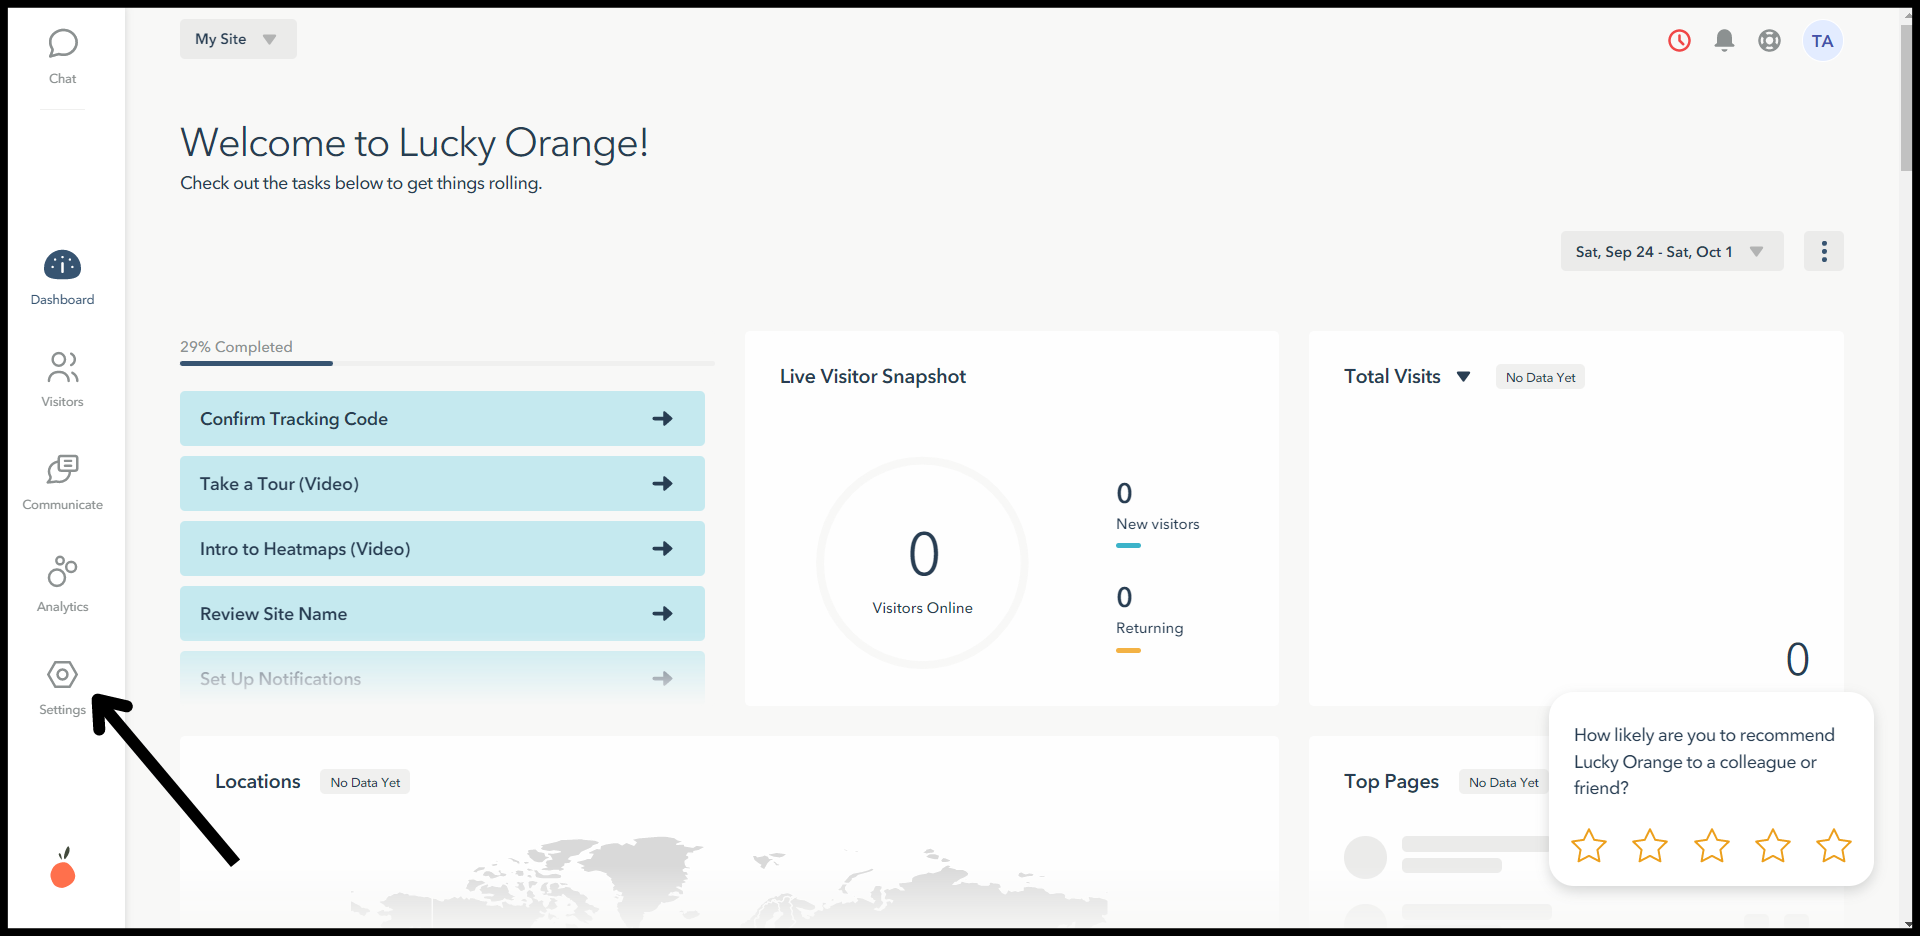
* Further screenshots detailing each step, from logging into Lucky Orange to entering the site ID in aasaan, ensuring a smooth setup process.
***